Category Archives: DBA

TDE and backup compression

In my recent post about “Options for smaller backups”, I intentionally omitted backup compression, which I’ll cover in this post. We’ll drill down a bit into the specifics of using TDE and backup compression together.

The history of TDE and backup compression is that until SQL 2016, they were great features that didn’t play well together – if TDE was in play, backup compression didn’t work well, or at all.

However, with the release of SQL 2016, Microsoft aimed to have these two awesome features get along better (the blog post announcing this feature interoperability is here). Then there was this “you need to patch” post, due to edge cases that might cause your backup to not be restored. So if you haven’t patched in a while, now would be a good time to do so, because Microsoft says those issues have been resolved (although that seems to be disputed here).

That “you need to patch” blog post was recently updated to make it (hopefully) crystal clear about the conditions under which database backups use a value for MAXTRANSFERSIZE that is other than the default, thereby optimizing the backup process. To be clear, the following conditions are specific to backups that do not use TDE. Without TDE, the engine will internally change the default MAXTRANSFERSIZE, if:

  • your database (not your backup) has >1 file
  • you are backing up to URL

BUT – if TDE is enabled for the database you’re backing up – and you don’t supply a value for MAXTRANSFERSIZE, the engine uses a MAXTRANSFERSIZE of 65536 (64K), and the new algorithm for getting good compression with TDE will not be used.

You must supply a value for MAXTRANSFERSIZE of at least 65537 (one byte > 64K) to enable the new compression algorithm when using TDE.

Yeah, it’s sort of hackish, and Microsoft is aware of that, but that’s the way it is for now.

I’ll update this post if/when more information becomes available about the co-existence of these features.

Options for smaller backups

I have a client that is running SQL 2016 Enterprise, and wants to get a full backup offsite every day. They’ve been doing it for over 5 years, and are now seeing scalability issues. 

In researching this blog post, I found a lot of useful information written by Dmitri Korotkevitch, who blogged about “Size does matter: 10 ways to reduce the database size and improve performance in SQL Server”. There is some overlap between his post and mine, but those who are interested in this topic will probably want to read both.

SPARSE columns

IF a column contains mostly NULLs, then depending on the data type, you can achieve space savings by using the SPARSE property (documentation here). SPARSE columns can be used with filtered indexes to theoretically reduce storage space and increase query performance. But there are a boatload of gotchas, such as issues with query plan caching (filtered indexes), and the fact that if you use SPARSE columns, neither the table or indexes can have any form of compression (the documentation is clear about not supporting table compression, but does not mention index compression being an issue – but it is).

As the documentation clearly states, when converting a column from non-sparse to sparse, the following steps are taken:

  1. Adds a new column to the table in the new storage size and format
  2. For each row in the table, updates and copies the value stored in the old column to the new column
  3. Removes the old column from the table schema
  4. Rebuilds the table (if there is no clustered index) or rebuilds the clustered index to reclaim space used by the old column

For large tables with even a few columns that you wanted to convert to SPARSE, this process would take forever, because you must do this for each column you want to convert.

In 2016+, if the conditions are right, we can get minimal logging plus parallelism for INSERT statements (see this CAT team blog post for more information). You might do something like:

  1. create a new table, adding SPARSE to the relevant columns
  2. use INSERT <newtable> WITH (TABLOCK)/SELECT FROM <originaltable>
  3. recreate indexes
  4. drop original table

In my case, I decided to not use SPARSE columns, because of the restrictions related to using other forms of compression on tables/indexes.

Data and/or index Compression

Compressing rowstore data and/or indexes used to be an Enterprise-only feature, but that’s changed since SQL 2016/SP1. However, to get any real benefit from doing this (especially for an OLTP system), you need to use some form of partitioning (see below), which can be a monumental task. Some have stated that when attempting to use compression on very wide tables (500+ columns), compression can fail, and in that case, SPARSE columns are your only option, assuming you can’t use other features described in this post.

COMPRESS() and DECOMPRESS()

ROW and PAGE compression only work with in-row data. However, SQL 2016 introduced the ability to compress off-row data with the COMPRESS() function. Depending on how much off-row data your databases contain, you might get storage savings when using this, although it will require some form of application change to decompress the relevant column(s) when required.

CLUSTERED COLUMNSTORE

Another formerly Enterprise-only feature, again included in other editions since SQL 2016/SP1. For the right type of workload, i.e. not too write intensive, you might consider replacing a rowstore with a clustered columnstore. I want to be clear that when I write about clustered columnstore indexes replacing a rowstore, I’m referring to on-disk tables only. There’s a lot of confusion about this because memory-optimized tables also support clustered columnstore, but in that case, the columnstore does not replace the rowstore (please refer to my blog post on the differences between columnstore for on-disk vs. in-mem here). When using partitioning with data compression, you can decide which partitions are compressed, if any, and what form of compression to deploy – the supported options are PAGE, ROW, and NONE. Columnstore is “all or nothing at all”, even when used with table partitioning. You can choose between ARCHIVAL and non-archival columnstore compression, but there is no way to designate specific partitions as uncompressed, as is the case with data compression. The deltastore (where inserts initially land) is an uncompressed rowstore.

One potential problem when using clustered columnstore is that you can’t deploy it on a table that has triggers. Also, LOB types (NVARCHAR(MAX)) are not supported for clustered columnstore indexes until SQL 2017.

Separating clustered and PRIMARY KEY

If you have an existing clustered rowstore that’s defined as a CONSTRAINT (for example with CREATE/ALTER TABLE), and you want to replace it with a clustered columnstore, then you’ll have to drop the constraint before creating the columnstore. That’s because the DROP_EXISTING = ON syntax is not supported for ALTER TABLE.

And because the key columns of a clustered index are also stored in every nonclustered index, it might be faster to drop nonclustered indexes before dropping a constraint that’s also the clustering key.

Keep in mind that even though a clustered columnstore contains the word “clustered” – which in the rowstore world means that it’s physically ordered – clustered columnstore indexes have no order. To achieve the best rowgroup elimination, you would first have to physically order your data using a regular clustered index, and then create the clustered columnstore with DROP_EXISTING = ON.

Data types

Violating the fundamentals of database design can have far reaching effects, long after the original designers have moved on. Common mistakes are using MAX for VARCHAR/NVARCHAR columns that don’t need it, like FirstName/LastName/Address, etc., and using DATETIME when you don’t need the time tick values, like for a check date. You’re not likely to see the negative effects of this for a long time, but those who come after you will be left with headaches that are difficult to fix. Let’s say that you had a CheckDate column on a table with billions of rows, and the CheckDate column was part of the clustering key. All nonclustered indexes store the clustering key internally, so instead of storing 3 bytes for a CheckDate column based upon the DATE datatype, each nonclustered index will store an extra 5 bytes (total of 8 bytes) for the DATETIME datatype.

Other solutions

If you want to optimize the size of your backups, what’s been discussed to far can help. But eventually, you’ll probably hit some type of time and/or size constraint when doing backups, even if using compression. One solution to this issue is to use some form of partitioning, be it partitioned tables and/or partitioned views.

With partitioned tables, you can mark filegroups as readonly, back them up once, and from that point on do only full and differential filegroup backups. Even CHECKDB can be run for specific filegroups. But be forewarned – table partitioning was introduced in SQL 2005, and there hasn’t been a lot of investment in this feature in recent years. Partitioned views solve a lot of the problems that exist with partitioned tables, but they have their own gotchas, such as not being able to insert through a partitioned view if the any of the base tables have columns that use the IDENTITY property.

As is often the case, choosing the best solution includes balancing requirements with feature limitations.

In-Memory OLTP Resources, Part 3: OOS (Out of Storage)

Zero free space

This is a continuation of Part 1 and Part 2 of this blog post series, related to resource issues/requirements for memory-optimized databases.

In this post, we’ll continue with simulating what happens to a memory-optimized database when all volumes run out of free space.

In my lab, I’m running Windows Server 2012. Let’s use Powershell to install the File System Resource Manager, which will allow us to create a quota for the relevant folder:

add-windowsfeature –name fs-resource-manager –includemanagementtools

After installing the Windows feature we can set the quota for the folder, but we shouldn’t enable it just yet, because first we have to verify the current size of the folder.

On my server, I created a quota of 1.5GB, and then enabled it.

Now let’s INSERT rows into the table, in batches of 1000, until we reach the limit (the INSERT script is listed in Part 2, I’m trying to keep this post from getting too long).

Once the quota has been reached, we receive the dreaded 41822 error – this is what you’ll see when all of the volumes where your containers reside run out of free space (if even one of the volumes has free space, your workload can still execute).

image_thumb[389]_thumb

Just out of curiosity, we’ll verify how many rows actually got inserted. On my server, I’ve got 4,639 rows in that table, and the folder consumes 1.44GB. So theoretically, there was enough space on the drive to create more checkpoint files, but it seems as though the engine won’t just create what it can to fit in the available space. It’s more likely that the engine attempts to precreate a set of files, and it either succeeds or fails all at once, but I’ve not confirmed that.

I disabled the quota, executed a manual CHECKPOINT, and ran the diagnostic queries again:

image_thumb[26]

File Merge

Data files persist rows that reside in durable memory-optimized tables, and delta files store references to logically deleted rows. As more and more rows become logically deleted across different sets of CFPs, two things happen:

  1. the storage footprint increases (imagine that all data files have 50% of their rows logically deleted)
  2. query performance gets worse, because result sets must be filtered by entries in the delta files, which are increasing in size

Microsoft killed both of these birds with one stone: File Merge (aka Garbage Collection for data/delta files)

In the background – while your workload is running – the File Merge process attempts to combine adjacent sets of CFPs, and this is where we get to one of the file states that we didn’t cover in Part 1: MERGE TARGET

A file that has the fileType of MERGE TARGET is the new set of combined data/delta files from the File Merge process. Once the merge has completed, the MERGE TARGET transitions to ACTIVE, and as we stated earlier in this series, ACTIVE files can no longer be populated.

But what about the source files that the MERGE TARGET is derived from? After a CHECKPOINT, these files transition to WAITING FOR LOG TRUNCATION, and can be removed. It should be noted that it can take several checkpoints and transaction log backups for CFPs to transition to a state where they can actually be removed. That’s why Microsoft recommends 4x durable memory-optimized data size for the initial storage footprint.

In the images that follow, we can see that the formerly distinct transaction ranges of 101 to 200, and 201 to 300, have been combined into a single CFP, which has the range of 101 to 300.

image_thumb[29]

image_thumb[31]

image_thumb[33]

Effect on backup size

File Merge – and the requisite file state changes that CFPs must go through – explain why backups for memory-optimized databases can be considerably larger than the amount of data stored in memory. Until CFPs go through the required state changes, they must be included in backups.

IOPS

The File Merge process requires both storage and IOPS, as it reads from both sets of CFPs, and writes to a new set. Let’s say your workload requires 500 IOPS to perform well. We’ve just added another 1,000 IOPS as a requirement for your workload to maintain the same level of performance: 500 IOPS each for the read and write components of File Merge. That’s why Microsoft recommends 3x workload IOPS for your memory-optimized storage.

Potential remedies, real and imagined

What happens to your memory-optimized database when all volumes run out of free space?

In my testing of inserts that breached the quota for the folder, I saw no affect on database status. However, if I created the database, set the quota to a much lower value, and then created a memory-optimized table, the database status became SUSPECT. In a real-world situation, with hundreds of gigabytes or more of memory-optimized data, the last thing you want to do is a database restore in order to return your database to a usable state.

I was able to set the database OFFLINE, and then ONLINE, and that cleared the SUSPECT status. But keep in mind, that setting the database OFFLINE/ONLINE will restream all your data, so there will be a delay in database recovery due to that.

What can you do if your volumes run out of free space?

Well, in SQL 2014, your database went into “SUSPENDED” mode (not suspect), and it was offline, until perhaps you added more space and restarted the database (not sure, I didn’t test that). In SQL 2016+, the database goes into what’s known as “delete-only mode”, where you can still SELECT data, but modifying data is limited to deleting rows and/or dropping indexes/tables. Of course, SELECT, DELETE, and DROP to nothing to solve your problem: you need more free space.

When a database transitions to delete-only mode, that fact is written to the SQL errorlog:

[WARNING] Database ID: [9]. Checkpoint hit an error code 0x8300000a. Database is now in DeleteOnlyMode

You might think that you can issue CHECKPOINT manually, and do transaction log backups, hoping that File Merge will kick in. Or you could manually execute File Merge, with this uber-long thing:

EXEC sys.sp_xtp_checkpoint_force_garbage_collection <dbname>

But keep in mind that if there was no additional free space on the volumes to precreate CFPs, then it’s not likely that there will be enough free space to write a new set of CFPs for DBA-initiated File Merge.

The only thing you can do to remedy this situation is to either free up some space on the existing volumes, or create a new container on a new volume that has free space.

In Part 4, we’ll discuss memory in the same ways we’ve discussed storage – how it’s allocated, and what happens to your memory-optimized workload when you run out of it.

Entire database in memory: Fact or fiction?

HP Servers and Persistent Memory

Advances in hardware and software have converged to allow storing your entire database in memory (depending on how large it is), even if you don’t use Microsoft’s In-Memory OLTP feature.

HP Gen9 servers support NVDIMM-N (known as Persistent Memory), which at that time had a maximum size of 8GB, and with 16 slots, offered a total server capacity of 128GB. Hardly large enough to run today’s mega-sized databases, and also there was no way to actually store your database there. So the use case for SQL Server 2016 was to store log blocks for transaction logs there. This could be beneficial in general, but particularly when using durable memory-optimized tables. That’s because WRITELOG waits for the transaction log could be a scalability bottleneck, which reduced the benefit of migrating to In-Memory OLTP.

There were other potential issues when using Persistent Memory, detailed in this blog post. But what’s not covered in that post is the fact that deploying NVIDMM-N reduced the memory speed and/or capacity, because they are not compatible with LRDIMM. This causes you to use RDIMM, which reduces capacity, and because NVDIMM-N operates at a slower speed than RDIMM, it also affects total memory speed.

HP has since released Gen10 servers, and they have changed the landscape for those seeking reduced latency by storing larger data sets in memory. For one thing, they raise the bar for what’s now referred to as Scalable Persistent Memory, with a total server capacity of 1TB. To be clear, NVDIMM-N is not used in this configuration. Instead, regular DIMMs are used, and they are persisted to flash via a power source (this was also the case for NVDIMM-N, but both the flash, DIMM, and power source were located on the NVDIMM-N).

In this video, Bob Ward demonstrates ~5x performance increase for the industry’s first “disklesss” database, using a HPE Gen10 server, SUSE Linux, Scalable Persistent Memory, and columnstore (presumably on a “traditional/formerly on-disk table”, not a memory-optimized table, although that’s not specifically detailed in the video).

Brett Gibbs, Persistent Memory Category Manager for HP servers, states in this video that even databases that use In-Memory OLTP can benefit from Scalable Persistent Memory, because the time required to restart the database can be significantly reduced. He stated that a 200GB memory-optimized database that took 20 minutes to restart on SAS drives, took 45 seconds using Persistent Scalable Memory. However, no details are provided about the circumstances under which those results are obtained.

We are left to guess about the number of containers used, and the IOPS available from storage. It may be that in both cases, they tested using a single container, which would be a worst practice. And if that’s correct, to reduce database restart time all you had to do was spread the containers across more volumes, to “parallelize” the streaming from storage to memory.

I’m assuming that the 45 seconds specified represents the amount of time required to get durable memory-optimized data from flash storage back into memory. If that’s correct, then the reduction of time required to restart the database has nothing to do with the Scalable Persistent Memory (other than memory speed), and everything to do with how fast flash storage can read data.

Licensing

The HP video also details how there might be a licensing benefit. It’s stated that if your workload requires 32 cores to perform well, and you reduce latency through the use of Scalable Persistent Memory, then you might be able to handle the same workload with less cores. I’d love to see independent test results of this.

In-Memory OLTP

If you are considering placing a database entirely in memory, and don’t want to be tied to a specific hardware vendor’s solution, In-Memory OLTP might be an option to consider.

This is an extremely vast topic that I’ve been interested in for quite a while, and I’ll summarize some of the potential benefits:

  • Maintaining referential integrity – Microsoft recommends keeping cold data in on-disk tables, and hot data in memory-optimized tables. But there’s just one problem with that: FOREIGN KEY constraints are not supported between on-disk and memory-optimized tables. Migrating all data to memory-optimized tables solves this specific issue.
  • Native compilation – if you want to use native compilation, it can only be used against memory-optimized tables. If you can deal with the potential TSQL surface area restrictions, migrating all data to memory-optimized tables might allow greater use of native compilation.
  • Single table structure – if you were to keep cold data on disk, and hot data in-memory, you would need to use two different table names, and perhaps reference them through a view. Migrating all data to memory-optimized tables solves this problem.
  • Unsupported isolation levels for cross-container transactions – it’s possible to reference both on-disk and memory-optimized tables in a single query, but memory-optimized tables only support a subset of the isolations that are available for on-disk tables, and some combinations are not supported (SNAPSHOT, for example).
  • Near-zero index maintenance – other than potentially reconfiguring the bucket count for HASH indexes, HASH and RANGE indexes don’t require any type of index maintenance. FILLFACTOR and fragmentation don’t exist for any of the indexes that are supported for memory-optimized tables.
  • Very large memory-optimized database size – Windows Server 2016 supports 24TB of memory, and most of that could be assigned to In-Memory OLTP, if you are using Enterprise Edition. This is way beyond the capacity supported by the current line of HP servers using Scalable Persistent Memory.

One extremely crucial point to make is that if you decide to migrate an entire database to In-Memory OLTP, then database recovery time must be rigorously tested. You will need to have enough containers spread across enough volumes to meet your RTO SLA.


In-Memory OLTP Resources, Part 1: The Foundation

This multi-part blog post will cover various resource conditions that can affect memory-optimized workloads. We’ll first lay the foundation for what types of resources are required for In-Memory OLTP, and why.

The following topics will be covered :

  • causes of OOM (Out of Memory)
  • how files that persist durable memory-optimized data affect backup size
  • how memory is allocated, including resource pools, if running Enterprise Edition
  • potential effect on disk-based workloads (buffer pool pressure)
  • what happens when volumes that store durable memory-optimized data run out of free space
  • what you can and cannot do when a memory-optimized database runs out of resources
  • database restore/recovery
  • garbage collection (GC) for row versions and files (file merge)
  • BPE (buffer pool extension)

Like most everything in the database world, In-Memory OLTP requires the following resources:

  • storage
  • IOPS
  • memory
  • CPU

Let’s take storage first – why would a memory-optimized database require storage, what is it used for, and how much storage is required?

Why and What?

You’ll need more storage than you might expect, to hold the files that persist your durable memory-optimized data, and backups. 

How much storage? 

No one can exactly answer that question, as we’ll explain over the next few blog posts. However, Microsoft’s recommendation is that you have 4x durable memory-optimized data size as a starting point for storage capacity planning.

Architecture

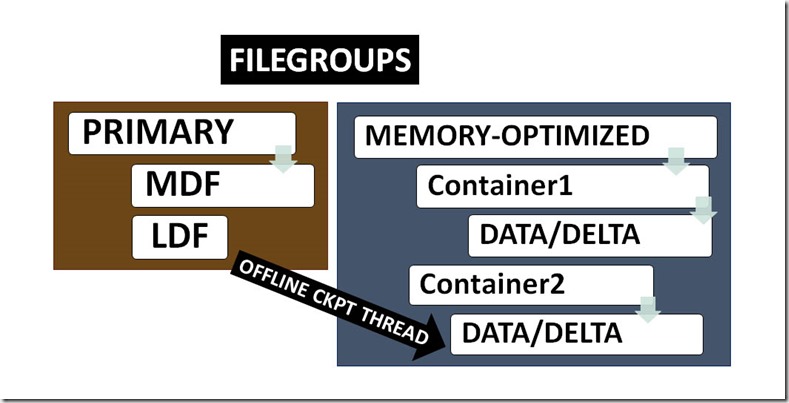
A memory-optimized database must have a special filegroup designated for memory-optimized data, known as a memory-optimized filegroup. This special filegroup is logically associated with one or more “containers”. What the heck is a “container”? Well, it’s just a fancy word for “folder”, nothing more, nothing less. But what is actually stored in those fancy folders?

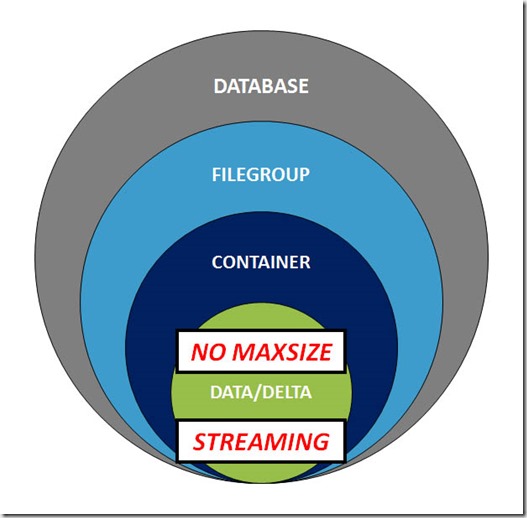
Containers hold files known as “checkpoint file pairs”, which are also known as “data and delta files”, and these files persist durable memory-optimized data (in this blog post series, I’ll use the terms CFP and data/delta files interchangeably). You’ll note on the following image that it clearly states in bold red letters, “NO MAXSIZE” and “STREAMING”. “NO MAXSIZE” means that you can’t specify how large these files will grow, nor can you specify how large the container that houses them can grow (unless you set a quota, but you should NOT do that). And there’s also no way at the database level to control the size of anything having to do with In-Memory OLTP storage – you simply must have enough available free space for the data and delta files to grow.

This is the first potential resource issue for In-Memory OLTP: certain types of data modifications are no longer allowed if the volume your container resides upon runs out of free space. I’ll cover workload recovery from resource depletion in a future blog post.

“STREAMING” means that the data stored within these files is different than what’s stored in MDF/LDF/NDF files. Data files for disk-based tables store data rows on 8K pages, a group of which is known as an extent. Data for durable memory-optimized tables is not stored on pages or extents. Instead, memory-optimized data is written in a sequential, streaming fashion, like the FILESTREAM feature (it should be noted that you do not have to enable the FILESTREAM feature in order to use In-Memory OLTP, and that statement has been true since In-Memory OLTP was first released in SQL 2014).   

  Storage1

How do these data/delta files get populated? All that is durable in SQL Server is written to the transaction log, and memory-optimized tables are no exception. After first being written to the transaction log, a process known as “offline checkpoint” harvests changes related to memory-optimized tables, and persists those changes in the data/delta files. In SQL 2014, there was a single offline checkpoint thread, but as of SQL 2016, there are multiple offline checkpoint threads. 

Storage2

Let’s create a sample database:

After creating the database, the InMemOOMTest folder looks like this:

image

OOM_DB_inmem1 and OOM_DB_inmem2 are containers (folders), and they’ll be used to hold checkpoint file pairs. You’ll note in the DDL listed above, that under the memory-optimized filegroup, each container has both a name and filename entry. The name is the logical name of the container, while the filename is actually the container name, which represents the folder that gets created on disk. Initially there are no CPFs in the containers, but as soon as you create your first memory-optimized table, CFPs get created in both containers.

If we have a look in one of the containers, we can see files that have GUIDs as names, and are created with different sizes.

image

This is definitely not human-readable, but luckily, Microsoft has created a DMV to allow us to figure out what these files represent.

Below we can clearly see that there are different types of files, and that files can have different “states”, which is central to the discussion of the storage footprint for memory-optimized databases, and backups of those databases. There are different values for container_id – remember we said that a memory-optimized database can have one or more containers. Next, we should pay attention to the fact that all entries for the “relative_file_path” column begin with “$HKv2\”. This means that in each container, we have a folder with the name “$HKv2”, and all data/delta files for that container are located there.

image

At this point, it’s time for a discussion of the various file states. I’ll stick to SQL 2016+ (because SQL 2014 had more file states).

The possible file states are:

  • PRECREATED
  • UNDER CONSTRUCTION
  • ACTIVE
  • MERGE TARGET
  • WAITING FOR LOG TRUNCATION

We’ll discuss the first three now, and save MERGE TARGET and WAITING FOR LOG TRUNCATION for later.

PRECREATED: as a performance optimization technique, the In-Memory engine will “precreate” files. These precreated files have nothing in them – they are completely empty, from a durable data perspective. A file in this state cannot yet be populated.

UNDER CONSTRUCTION: when the engine starts adding data to a file, the state of the file changes from PRECREATED to UNDER CONSTRUCTION. Data and delta files are shared by all durable memory-optimized tables, so it’s entirely possible that the first entry is for TableA, the next entry for TableB, and so on. “UNDER CONSTRUCTION” could be interpreted as “able to be populated”.

ACTIVE: When a file that was previously UNDER CONSTRUCTION gets closed, the state transitions to ACTIVE. That means it has entries in it, but is no longer able to be be populated. What causes a file to be closed? The CHECKPOINT process will close the checkpoint, changing all UNDER CONSTRUCTION files to ACTIVE.

That’s the basic rundown of the file states we need to know about at this point.

In Part 2, we’ll dive deeper into the impact of data/delta file states and the storage footprint for memory-optimized databases.

The subtleties of In-Memory OLTP Indexing

For this post, I wanted to cover some of the indexing subtleties for memory-optimized tables, with an accent on columnstore indexes

Let’s create a memory-optimized table:

Now, let’s attempt to create a NONCLUSTERED COLUMNSTORE INDEX:

Msg 10794, Level 16, State 76, Line 76
The feature ‘NONCLUSTERED COLUMNSTORE’ is not supported with memory optimized tables.

It fails because we can only create a CLUSTERED columnstore index (CCI). For 25 years, Microsoft SQL Server differentiated between indexes that physically ordered data on storage (CLUSTERED) and those that did not (NONCLUSTERED). Unfortunately, they chose to ignore that pattern when creating the syntax for memory-optimized tables; using the word CLUSTERED is required when creating a columnstore index on memory-optimized tables.

Can we create a clustered columnstore index on a memory-optimized table that is defined as SCHEMA_ONLY?

Only one way to find out:

Msg 35320, Level 16, State 1, Line 39
Column store indexes are not allowed on tables for which the durability option SCHEMA_ONLY is specified.

That won’t work, so let’s create our table with SCHEMA_AND_DATA:

Now, let’s create a clustered columnstore index:

Success! Let’s attempt to create a NONCLUSTERED index….

Msg 10794, Level 16, State 15, Line 117
The operation ‘ALTER TABLE’ is not supported with memory optimized tables that have a column store index.

Ooops – no can do. Once you add a clustered columnstore index to a memory-optimized table, the schema is totally locked down.

What about if we create the CCI and nonclustered index inline?

Awesome! We’ve proven that we can create both clustered columnstore and nonclustered indexes, but we must create them inline.

Now that we’ve got our indexes created, let’s try to add a column:

Msg 12349, Level 16, State 1, Line 68
Operation not supported for memory optimized tables having columnstore index.

Hey, when I said that the schema is locked down once you add a clustered columnstore index, I mean it!

What type of index maintenance is possible for indexes on memory-optimized tables?

For HASH indexes there is only one possible type of index maintenance, and that’s to modify/adjust the bucket count. There is zero index maintenance for RANGE/NONCLUSTERED indexes.

Let’s create a memory-optimized table with a HASH index, and verify the syntax for rebuilding the bucket count.

Here’s the syntax for rebuilding the bucket count for a HASH INDEX:

We can add a column, as long as we don’t have a CCI in place:

How about trying to rebuild the bucket count if we created the memory-optimized table with inline CCI and HASH indexes?

Msg 10794, Level 16, State 13, Line 136
The operation ‘ALTER TABLE’ is not supported with memory optimized tables that have a column store index.

You can’t rebuild that index if you also have a columnstore index on the table. We would have to drop the columnstore index, reconfigure the bucket count for the HASH index, and then recreate the columnstore index. Both the drop and the create of the columnstore index will be fully logged, and executed serially. Not a huge problem if the amount of data is not too large, but it’s a potentially much larger problem if you’ve got a lot of data.

We can create a clustered columnstore index on a #temp table (on-disk):

We can create multiple indexes with a single command:

Can we create a columnstore index on a memory-optimized table variable?

Create a table that includes a LOB column with a MAX datatype, then add a clustered columnstore index:

Msg 35343, Level 16, State 1, Line 22    The statement failed. Column ‘Notes’ has a data type that cannot participate in a columnstore index. Omit column ‘Notes’.   

Msg 1750, Level 16, State 1, Line 22    Could not create constraint or index. See previous errors.

For memory-optimized tables, LOB columns prevent creation of a clustered columnstore index.

Now let’s try creating a table using CHAR(8000). Astute readers will notice that the following table would create rows that are 32,060 bytes wide – this would fail for on-disk tables, but is perfectly valid for memory-optimized tables:

Msg 41833, Level 16, State 1, Line 29    Columnstore index ‘CCI_InMemLOB’ cannot be created, because table ‘InMemLOB’ has columns stored off-row.   
Columnstore indexes can only be created on memory-optimized table if the columns fit within the 8060 byte limit for in-row data.   
Reduce the size of the columns to fit within 8060 bytes.

Create a table with non-MAX LOB columns, but they are stored on-row,  then add a clustered columnstore index:

Let’s create a natively compiled module that selects from this table:

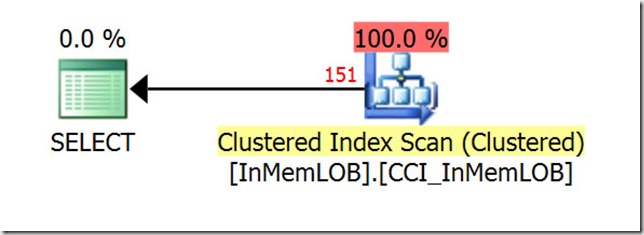
ENABLE “Actual Plan” and SELECT – which index is used?

CCIPlan1

Now highlight the EXEC statement, and click “Estimated Plan” – which index is used?

CCIPlan2

The SELECT statement uses the columnstore index, but the natively compiled procedure does not (that’s because natively compiled procedures ignore columnstore indexes).

Summing up

In this post, we’ve covered some of the finer points of indexing memory-optimized tables. Never know when they might come in handy….

SQL Server on Linux, Part 1

SQL 2017 is just about to be released, and one of the big ticket items is that SQL Server is now supported on the Linux platform.

In subsequent posts, I’ll be reporting on In-Memory OLTP on Linux, but first we’ll need to cover some Linux basics. I flirted with Unix ages ago, and I’ll be the first to admit that my brain doesn’t really work that way (perhaps no one’s brain does).

First, a note about environments – I usually like to work on a server in my home lab, because it has a lot of cores, 64GB of memory, and there’s no hourly cost for using it (and also because I built it….).

So I downloaded a copy of Ubuntu, CentOS, and a trial copy of Redhat Enterprise Linux, and attempted to install each one in my VMware Workstation environment. I spun my wheels for a few hours, and could not get any of them up and running in the way that I required. So, in the interest of saving time, I hit my Azure account, created a VM running Redhat, and proceeded to install SQL 2017 CTP2. Instructions for installing SQL 2017 on Linux can be found at this link. It should be noted that the installation varies by Linux distribution.

Those of us who don’t know Linux commands by heart, and are used to firing up GUI-based virtual machines, are in for a bit of a rude awakening. While it is possible to install GNOME on RHEL, you can’t simply RDP into the VM without a lot of Linux admin setup for xdp (I never did get it to work). So how do you connect to your Linux VM running SQL Server to do basic tasks? The answer is: PuTTY

PuTTY can be downloaded from this link, and after you install it on your client machine (your laptop or home workstation), connecting to your Azure VM is very easy. When you run PuTTY, you’re presented with the following window, and you can simply enter your IP address into the “Host Name (or IP address)” section, and click the “Open” button:
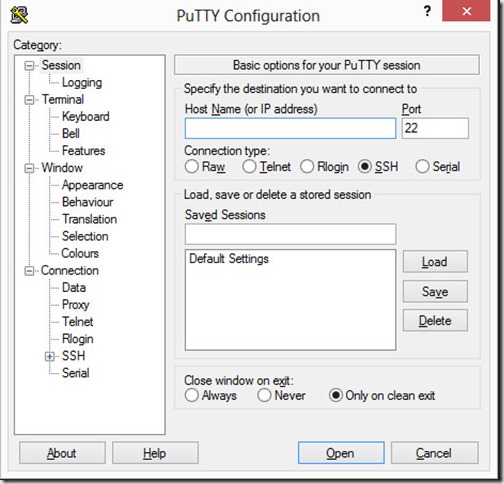
PUTTY

(you might receive a warning to confirm you want to connect).

Once you connect to the Azure VM, you are prompted for your user name and password, and after logging in to the VM, you arrive at the home directory for your login.
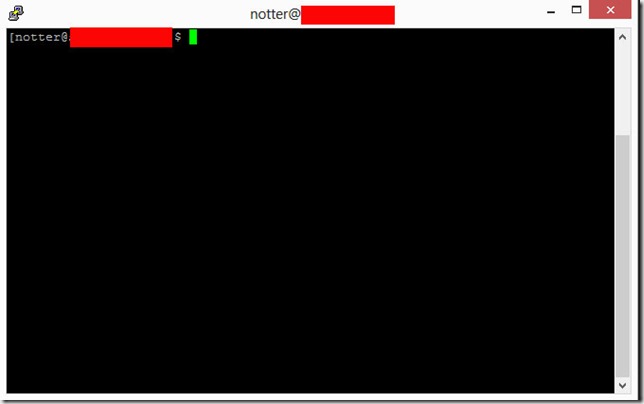
HomeDir

Once you’ve installed SQL Server according to the instructions at this link, you can use SSMS from your desktop to connect over the public internet, and manage your SQL Server environment. It’s a really good idea to limit the inbound connections for your VM to only your IP address, otherwise bots from all over the globe will attempt to hack your machine (you have been warned….).

Now that SQL Server is installed and running, we can attempt to connect, and create a database.

In SSMS, click connect, choose “Database Engine”, and when prompted, enter the user name and password. Make sure “SQL Server Authentication” is chosen, and not “Windows Authentication”.

The first thing I did was to determine where the system databases were stored, so I executed:

sp_helpdb master

master

I used the same path as the master database files to create a test database:

USE master
GO
CREATE DATABASE [TestDB]
ON PRIMARY
       (
           NAME = N’TestDBData’
          ,FILENAME = N’/var/opt/mssql/data/TestDB.mdf’
          ,SIZE = 100MB
          ,MAXSIZE = UNLIMITED
          ,FILEGROWTH = 100MB
       )
LOG ON
    (
        NAME = N’TestDBLog’
       ,FILENAME = N’/var/opt/mssql/data/TestDB.ldf’
       ,SIZE = 100MB
       ,MAXSIZE = 2048GB
       ,FILEGROWTH = 100MB
    );
GO

That worked fine, but what if we want to create a database in a separate folder?

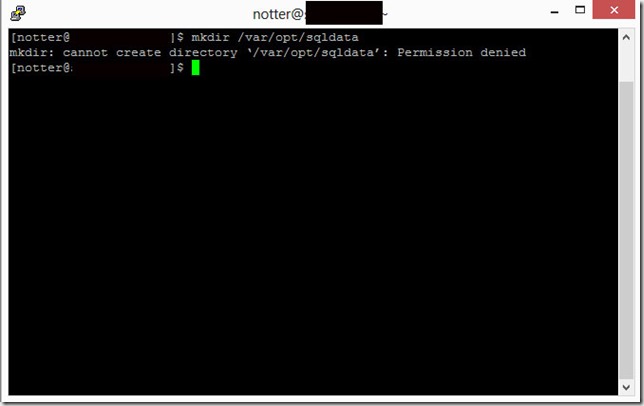
Using PuTTY, we can create a folder using the mkdir command (xp_cmdshell is not currently supported for SQL Server running on Linux):

mkdir /var/opt/sqldata
mkdir1

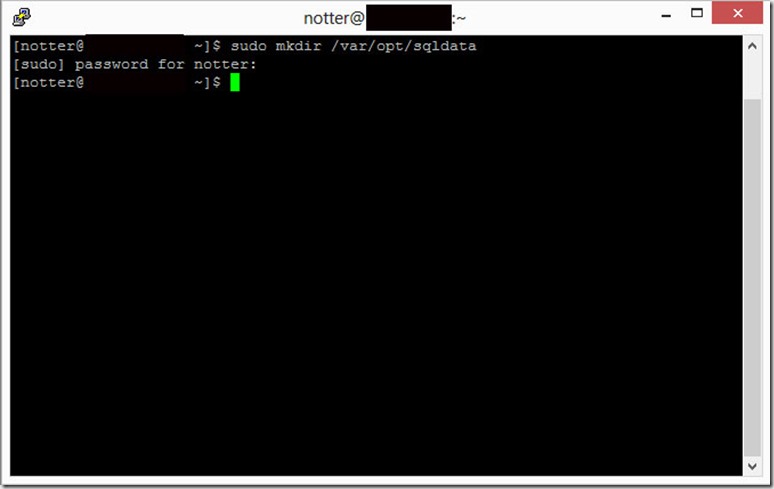
Unfortunately, that didn’t go as planned! We don’t have permission to create that folder, so we’ll try using sudo (more on sudo at this link):

sudo mkdir /var/opt/sqldata
sudomkdir

sudo prompts you for your password, after which it will create the directory.

Now that the directory has been created, we can attempt to create a new database there.

USE master
GO
CREATE DATABASE [TestDB2]
ON PRIMARY
       (
           NAME = N’TestDB2Data’
          ,FILENAME = N’/var/opt/sqldata/TestDB2.mdf’
          ,SIZE = 100MB
          ,MAXSIZE = UNLIMITED
          ,FILEGROWTH = 100MB
       )
LOG ON
    (
        NAME = N’TestDB2Log’
       ,FILENAME = N’/var/opt/sqldata/TestDB2.ldf’
       ,SIZE = 100MB
       ,MAXSIZE = 2048GB
       ,FILEGROWTH = 100MB
    );
GO

error1

Still no luck – what could be the issue?

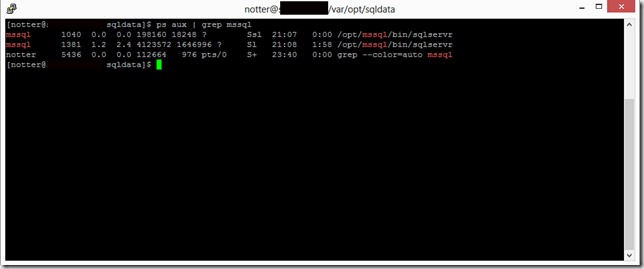
Let’s check the security context of the mssql service:

ps aux | grep mssql
mssql service

So, the sqlserver process executes under the mssql user account. Let’s check permissions in the sqldata directory with:

stat –format “%A” /var/opt/sqldata

On my VM, the results are:

rwxr-xr-x

Permissions for Linux files are separated into three sections:

  • owner
  • group (for the file or directory)
  • others

Each section can have the following attributes:

  • (r)ead
  • (w)rite
  • e(x)ecute

For more information on these attributes, please visit this link.

It’s easier to interpret the output if we break it up:

[rwx] [r-x] [r-x]

  • the directory owner has read, write, and execute permission
  • the directory group has read and execute permission
  • others have read and execute permission

When we create a directory, it’s owned by root. The problem with creating a database in this directory should be obvious: only the owner of the directory has write permission.

Let’s make the mssql user the owner of the sqldata directory:

chown mssql:mssql /var/opt/sqldata
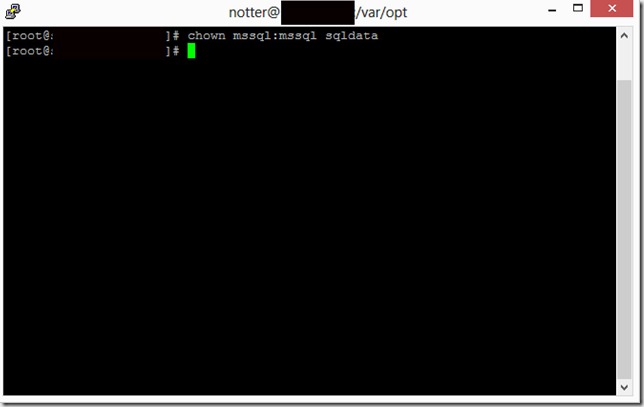
chown
And finally, we’ll check the permissions for the sqldata folder:
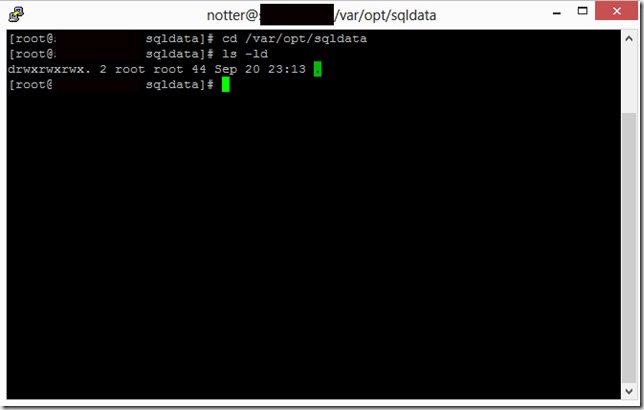
final

Now let’s retry our CREATE DATABASE statement.

USE master
GO
CREATE DATABASE [TestDB2]
ON PRIMARY
       (
           NAME = N’TestDB2Data’
          ,FILENAME = N’/var/opt/sqldata/TestDB2.mdf’
          ,SIZE = 100MB
          ,MAXSIZE = UNLIMITED
          ,FILEGROWTH = 100MB
       )
LOG ON
    (
        NAME = N’TestDB2Log’
       ,FILENAME = N’/var/opt/sqldata/TestDB2.ldf’
       ,SIZE = 100MB
       ,MAXSIZE = 2048GB
       ,FILEGROWTH = 100MB
    );
GO

Voila! We successfully created a database in the intended folder.

Seasoned DBAs might be wondering about Instant File Initialization (IFI), a best practice on Windows that greatly increases the speed of creating or extending data files.

When IFI is not configured, data files must be zeroed when created or extended. Does Linux have something akin to IFI? The answer is…..IFI does not exist as a thing you can configure on the file systems that SQL on Linux supports (EXT4, available on all distributions, or XFS file system, available only on Redhat).

However, the good news is that on the Linux platform, data files are not initialized with zeros when created or extended – Linux takes care of this without any intervention from DBAs.

Anthony Nocentino (@centinosystems) just blogged about the internals of file initialization on the Linux platform in this post.

Using native compilation to insert parent/child tables

This blog post demonstrates various approaches when using native compilation to insert rows into parent/child tables.

First, let’s create tables named Parent and Child, and relate them with a FOREIGN KEY constraint. Note that the Parent table uses the IDENTITY property for the PRIMARY KEY column.

DROP TABLE IF EXISTS dbo.Child
GO
DROP TABLE IF EXISTS dbo.Parent
GO

CREATE TABLE dbo.Parent
(
     ParentID INT IDENTITY PRIMARY KEY NONCLUSTERED
    ,Name CHAR(50) NOT NULL
    ,Description CHAR(100) NOT NULL
)
WITH (MEMORY_OPTIMIZED = ON, DURABILITY = SCHEMA_AND_DATA)
GO
CREATE TABLE dbo.Child
(
     ChildID INT IDENTITY PRIMARY KEY NONCLUSTERED
    ,ParentID INT NOT NULL FOREIGN KEY REFERENCES dbo.Parent (ParentID) INDEX IX_Child_ParentID 
    ,Name CHAR(50) NOT NULL
    ,Description CHAR(100) NOT NULL
)
WITH (MEMORY_OPTIMIZED = ON, DURABILITY = SCHEMA_AND_DATA)
GO

Next, we attempt to create a natively compiled procedure that performs an INSERT to the Parent table, and tries to reference the key value we just inserted, with @@IDENTITY.

Scenario 1

CREATE OR ALTER PROCEDURE dbo.Proc_InsertParentAndChild  
WITH NATIVE_COMPILATION, SCHEMABINDING
AS
BEGIN ATOMIC
WITH (TRANSACTION ISOLATION LEVEL = SNAPSHOT,  LANGUAGE = N'English')  

    INSERT dbo.Parent
    (
        Name
       ,Description
    )
    VALUES
    (
        'Parent1'
       ,'SomeDescription'
    )

    DECLARE @NewParentID INT
    SELECT @NewParentID  = SCOPE_IDENTITY()

    INSERT dbo.Child
    (
        ParentID
       ,Name
       ,Description
    )
    VALUES
    (
        @NewParentID
       ,'Child1'
       ,'SomeDescription' 
    )
END
GO

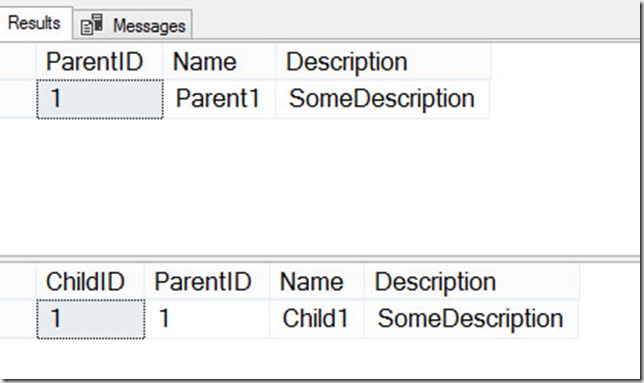
EXEC dbo.Proc_InsertParentAndChild

SELECT *
FROM Parent
ORDER BY ParentID

SELECT *
FROM Child
ORDER BY ParentID
GO


Results4

This works, but there are other approaches to solving this problem.

Next, we’ll try to DECLARE a table variable, and OUTPUT the new key value.

Scenario 2

CREATE OR ALTER PROCEDURE dbo.Proc_InsertParentAndChild  
WITH NATIVE_COMPILATION, SCHEMABINDING
AS
BEGIN ATOMIC
WITH (TRANSACTION ISOLATION LEVEL = SNAPSHOT,  LANGUAGE = N'English')  

    DECLARE @NewParentID TABLE (ParentID INT NOT NULL)
    INSERT dbo.Parent
    (
        Name
       ,Description
    )
    OUTPUT Inserted.ParentID INTO @NewParentID
    /*
        Msg 12305, Level 16, State 24, Procedure Proc_InsertParentAndChild, Line 7 [Batch Start Line 64]
        Inline table variables are not supported with natively compiled modules.
    */
    
    VALUES
    (
        'Parent1' 
       ,'SomeDescription' 
    ) 
END
GO

But again we have issues with unsupported T-SQL.

Now we’ll try creating a memory-optimized table variable outside the native procedure, and then declare a variable of that type inside the native procedure.

Scenario 3

CREATE TYPE dbo.ID_Table AS TABLE
(
    ParentID INT NOT NULL PRIMARY KEY NONCLUSTERED
)
WITH (MEMORY_OPTIMIZED = ON)

GO

CREATE OR ALTER PROCEDURE dbo.Proc_InsertParentAndChild  
WITH NATIVE_COMPILATION, SCHEMABINDING
AS
BEGIN ATOMIC
WITH (TRANSACTION ISOLATION LEVEL = SNAPSHOT,  LANGUAGE = N'English')  

    DECLARE @NewParentID dbo.ID_Table 
    INSERT dbo.Parent
    (
        Name
       ,Description
    )
    OUTPUT Inserted.ParentID INTO @NewParentID
    VALUES
    (
        'Parent1' 
       ,'SomeDescription' 
    )

    DECLARE @NewParentValue INT = (SELECT ParentID FROM @NewParentID)

    INSERT dbo.Child
    (
        ParentID
       ,Name
       ,Description
    )
    VALUES
    (
        @NewParentValue
       ,'Child1'
       ,'SomeDescriptioin' 
    )
END
GO

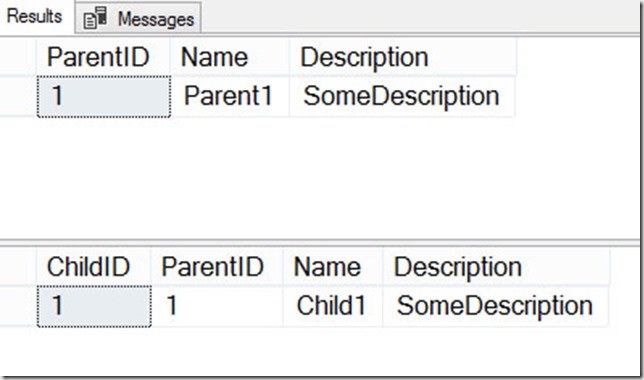
This compiles, so now let’s test it.

EXEC dbo.Proc_InsertParentAndChild

SELECT *
FROM Parent
ORDER BY ParentID

SELECT *
FROM Child
ORDER BY ParentID
GO

Results3
This works great, but for completeness, we should test other possibilities.

This time, we’ll recreate the tables, but we’ll leave off the IDENTITY property for the Parent table. Instead of IDENTITY, we’ll create a SEQUENCE, and attempt to generate the next value within the native module.

Scenario 4

DROP PROCEDURE IF EXISTS dbo.Proc_InsertParentAndChild  
go
DROP TABLE IF EXISTS dbo.Child
GO
DROP TABLE IF EXISTS dbo.Parent
GO

CREATE TABLE dbo.Parent
(
     ParentID INT PRIMARY KEY NONCLUSTERED – no IDENTITY property used here!
    ,Name CHAR(50) NOT NULL
    ,Description CHAR(100) NOT NULL
)
WITH (MEMORY_OPTIMIZED = ON, DURABILITY = SCHEMA_AND_DATA)
GO
CREATE TABLE dbo.Child
(
     ChildID INT IDENTITY PRIMARY KEY NONCLUSTERED
    ,ParentID INT NOT NULL FOREIGN KEY REFERENCES dbo.Parent (ParentID) INDEX IX_Child_ParentID 
    ,Name CHAR(50) NOT NULL
    ,Description CHAR(100) NOT NULL
)
WITH (MEMORY_OPTIMIZED = ON, DURABILITY = SCHEMA_AND_DATA)
GO


CREATE SEQUENCE dbo.ParentSequence AS INT

GO

CREATE OR ALTER PROCEDURE dbo.Proc_InsertParentAndChild  
WITH NATIVE_COMPILATION, SCHEMABINDING
AS
BEGIN ATOMIC
WITH (TRANSACTION ISOLATION LEVEL = SNAPSHOT,  LANGUAGE = N'English')  

    DECLARE @NextParentSequence INT = NEXT VALUE FOR dbo.ParentSequence

    INSERT dbo.Parent
    (
        ParentID
       ,Name
       ,Description
    )
    VALUES
    (
         @NextParentSequence
       ,'Parent1' 
       ,'SomeDescription' 
    )

    INSERT dbo.Child
    (
        ParentID
       ,Name
       ,Description
    )
    VALUES
    (
        @NextParentSequence
       ,'Child1'
       ,'SomeDescriptioin' 
    )
END
GO

/*
    Msg 10794, Level 16, State 72, Procedure Proc_InsertParentAndChild, Line 19 [Batch Start Line 176]
    The operator 'NEXT VALUE FOR' is not supported with natively compiled modules.
*/

But this fails, because as the error states, we can’t use NEXT VALUE FOR within native modules.

Scenario 5

How about if we generate the next value for the sequence outside the module, and pass that value?

Let’s see —


CREATE OR ALTER PROCEDURE dbo.Proc_InsertParentAndChild  
(
    @NewParentValue INT
)
WITH NATIVE_COMPILATION, SCHEMABINDING
AS
BEGIN ATOMIC
WITH (TRANSACTION ISOLATION LEVEL = SNAPSHOT,  LANGUAGE = N'English')  

    INSERT dbo.Parent
    (
        ParentID
       ,Name
       ,Description
    )
    VALUES
    (
         @NewParentValue
       ,'Parent1' -- Name - char(50)
       ,'SomeDescription' -- Description - char(100)
    )

    INSERT dbo.Child
    (
        ParentID
       ,Name
       ,Description
    )
    VALUES
    (
        @NewParentValue
       ,'Child1'
       ,'SomeDescriptioin' 
    )
END
GO

SELECT *
FROM Parent
ORDER BY ParentID

SELECT *
FROM Child
ORDER BY ParentID

DECLARE @NextParentSequence INT 
SELECT @NextParentSequence = NEXT VALUE FOR dbo.ParentSequence
EXEC dbo.Proc_InsertParentAndChild  @NextParentSequence

SELECT *
FROM Parent
ORDER BY ParentID

SELECT *
FROM Child
ORDER BY ParentID
GO

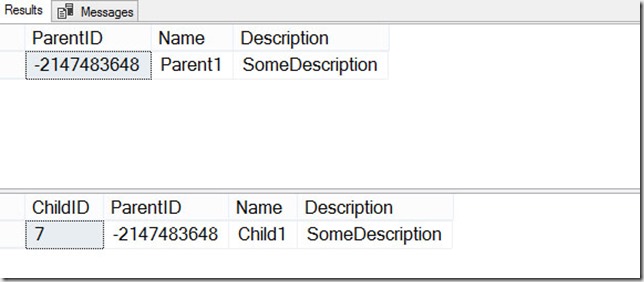
Results1

This also works, so we’ll add it to our arsenal. But there’s one weird thing – the value that was inserted into the Parent table is –2147483647, which is probably not what we intended. So we’ll have to tidy up our SEQUENCE a bit.

DROP SEQUENCE dbo.ParentSequence 
GO
CREATE SEQUENCE dbo.ParentSequence AS INT START WITH 1
GO
DECLARE @NextParentSequence INT 
SELECT @NextParentSequence = NEXT VALUE FOR dbo.ParentSequence
EXEC dbo.Proc_InsertParentAndChild  @NextParentSequence

SELECT *
FROM Parent
ORDER BY ParentID

SELECT *
FROM Child
ORDER BY ParentID

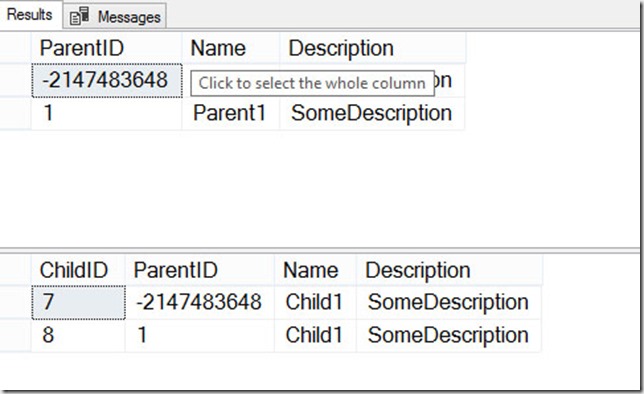
Everything looks good now:

Results2

In this post, we have verified three different ways to successfully insert into parent/child records, when using native compilation.

SQL 2017 In-Memory roundup

SQL Server 2017 includes enhancements to many features, and some of those enhancements include In-Memory OLTP.

  • Microsoft states that ALTER TABLE for memory-optimized tables is now “usually substantially faster”. I asked for clarity about that – if it means that ALTER TABLE is faster for the same events that were able to be executed in parallel and minimally logged in SQL 2016, or if there are new ALTER TABLE statements which now execute in parallel. They replied that there is no change to the set of operations that executed in parallel. So the ALTER TABLE commands that executed fast now (theoretically) execute faster.
  • Up to and including SQL 2016, the maximum number of nonclustered indexes on a memory-optimized table was eight, but that limitation has been removed for SQL 2017. I’ve tested this with almost 300 indexes, and it worked. With this many supported indexes, it’s no wonder they had to….
  • Enhance the index rebuild performance for nonclustered indexes during database recovery. I confirmed with Microsoft that the database does not have be in SQL 2017 compatibility mode (140) to benefit from the index rebuild enhancement. This type of rebuild happens not only for database restore and failover, but also for other “recovery events” – see my blog post here.
  • In SQL 2017, memory-optimized tables now support JSON in native modules (functions, procedures and check constraints).
  • Computed columns, and indexes on computed columns are now supported
  • TSQL enhancements for natively compiled modules include CASE, CROSS APPLY, and TOP (N) WITH TIES
  • Transaction log redo of memory-optimized tables is now done in parallel. This has been the case for on-disk tables since SQL 2016, so it’s great that this potential bottleneck for REDO has been removed.
  • Memory-optimized filegroup files can now be stored on Azure Storage, and you can also backup and restore memory-optimized files on Azure Storage.
  • sp_spaceused is now supported for memory-optimized tables
  • And last but definitely not least,  drum roll, please…….we can now rename memory-optimized tables and natively compiled modules

While Microsoft continues to improve columnstore indexes for on-disk tables, unfortunately columnstore for memory-optimized tables gets left further and further behind. Case in point would be support for LOB columns for on-disk tables in SQL 2017, but no such support for memory-optimized tables. And my good friend Niko Neugebauer (b|t) just reminded me that computed columns for on-disk CCI are supported in SQL 2017, but they are not supported for in-memory CCI. For an in-depth comparison of columnstore differences between on-disk and memory-optimized tables, see my  post here.

In addition to what’s listed above, I tested the following functionality for natively compiled stored procedures:

My wish list for the In-Memory OLTP feature is huge, but it’s great to see Microsoft continually improve and extend it.