Monthly Archives: August 2017

SQL 2017 In-Memory roundup

SQL Server 2017 includes enhancements to many features, and some of those enhancements include In-Memory OLTP.

  • Microsoft states that ALTER TABLE for memory-optimized tables is now “usually substantially faster”. I asked for clarity about that – if it means that ALTER TABLE is faster for the same events that were able to be executed in parallel and minimally logged in SQL 2016, or if there are new ALTER TABLE statements which now execute in parallel. They replied that there is no change to the set of operations that executed in parallel. So the ALTER TABLE commands that executed fast now (theoretically) execute faster.
  • Up to and including SQL 2016, the maximum number of nonclustered indexes on a memory-optimized table was eight, but that limitation has been removed for SQL 2017. I’ve tested this with almost 300 indexes, and it worked. With this many supported indexes, it’s no wonder they had to….
  • Enhance the index rebuild performance for nonclustered indexes during database recovery. I confirmed with Microsoft that the database does not have be in SQL 2017 compatibility mode (140) to benefit from the index rebuild enhancement. This type of rebuild happens not only for database restore and failover, but also for other “recovery events” – see my blog post here.
  • In SQL 2017, memory-optimized tables now support JSON in native modules (functions, procedures and check constraints).
  • Computed columns, and indexes on computed columns are now supported
  • TSQL enhancements for natively compiled modules include CASE, CROSS APPLY, and TOP (N) WITH TIES
  • Transaction log redo of memory-optimized tables is now done in parallel. This has been the case for on-disk tables since SQL 2016, so it’s great that this potential bottleneck for REDO has been removed.
  • Memory-optimized filegroup files can now be stored on Azure Storage, and you can also backup and restore memory-optimized files on Azure Storage.
  • sp_spaceused is now supported for memory-optimized tables
  • And last but definitely not least,  drum roll, please…….we can now rename memory-optimized tables and natively compiled modules

While Microsoft continues to improve columnstore indexes for on-disk tables, unfortunately columnstore for memory-optimized tables gets left further and further behind. Case in point would be support for LOB columns for on-disk tables in SQL 2017, but no such support for memory-optimized tables. And my good friend Niko Neugebauer (b|t) just reminded me that computed columns for on-disk CCI are supported in SQL 2017, but they are not supported for in-memory CCI. For an in-depth comparison of columnstore differences between on-disk and memory-optimized tables, see my  post here.

In addition to what’s listed above, I tested the following functionality for natively compiled stored procedures:

My wish list for the In-Memory OLTP feature is huge, but it’s great to see Microsoft continually improve and extend it.
All about In-Memory isolation levels, Part 2

In the Part 1, we covered the basics of transaction initiation modes and isolation levels. Today we’ll continue with more details about isolation levels and initiation modes for memory-optimized tables, and finally we’ll see how to reference both types of tables in a query.

But first, let’s summarize supported isolation levels.

List 1:

OnDiskIsolation_thumb4

Last time, we had this for “List 2”:

InMemIsolation_thumb1

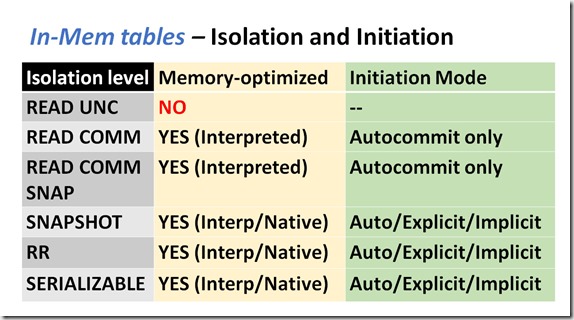
But that’s not the whole truth – the complete picture of isolation levels and initiation modes for memory-optimized tables is summarized in the following table:

InMemComplete

In Part 1, we said that READ COMMITED is supported for memory-optimized tables, but we didn’t explain how. Here we can see that it’s supported, but only for single statement, “autocommit” transactions. Autocommit transactions are not possible within a native module, so you’re limited to interpreted TSQL (un-compiled), as indicated in the table above.

Let’s work through an example.

If the transaction isolation level is set to READ COMMITED SNAPSHOT – which, as detailed in the last post, can only be set with an ALTER DATBASE command – then you can execute the following:

That’s a single statement that will be autocommitted.

But you cannot execute the following:

Why will it fail?

It will fail because the initiation mode of this transaction is not autocommit, which is required for READ COMMITED SNAPSHOT when referencing memory-optimized tables (the initiation mode is explicit, because we explicitly defined a transaction).  So to be totally clear, for queries that only reference memory-optimized tables, we can use the READ COMMITTED or READ COMMITTED SNAPSHOT isolation levels, but the transaction initiation mode must be autocommit. Keep this in mind, because in a moment, you’ll be questioning that statement….

Now let’s put it all together and understand the rules for referencing on-disk and memory-optimized tables in the same query.

Cross-Container

A query that references both on-disk and memory-optimized tables is known as a “cross-container” transaction.

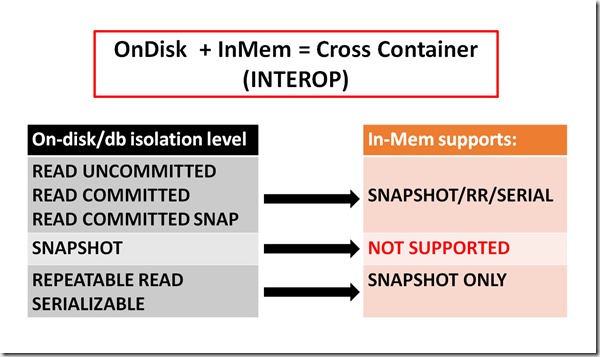
The following table lists the rules:

Interop1

If the on-disk or database isolation level is READ UNCOMMITTED, READ COMMITTED, or READ COMMITTED SNAPSHOT, then you can reference memory-optimized tables using SNAPSHOT, REPEATABLE READ, or SERIALIZABLE isolation levels. An example would be:

But wait – a moment ago we proved that when we use the READ COMMITTED isolation level, and we query a memory-optimized table, the transaction initiation mode must be autocommit. The code we just displayed uses an explicit transaction to do the same thing, so we’ve got some explaining to do….

The answer is that for queries that only reference memory-optimized tables, we must use autocommit. But the rules are different for cross-container transactions, and in that case, we can use explicit transactions.

Back to SNAPSHOT

What if we converted some tables to be memory-optimized, and they were referenced everywhere in our TSQL code?

Would we have to change all of our code to use WITH (SNAPSHOT)?

Fear not, there is a solution, and it’s a database setting known as MEMORY_OPTIMIZED_ELEVATE_TO_SNAPSHOT. If this option is enabled, then you don’t have to change your code to use WITH (SNAPSHOT) for interop statements. The engine will automagically elevate the isolation level to SNAPSHOT for all memory-optimized tables that use interop/cross-container. More information on MEMORY_OPTIMIZED_ELEVATE_TO_SNAPSHOT is available at this link.

Just to recap what we covered last time about the different forms of snapshot isolation:

  • READ COMMITTED SNAPSHOT isolation is “statement-level consistency”
  • SNAPSHOT isolation is “transaction-level consistency”

A cross-container transaction doesn’t support snapshot isolation, because it’s actually two sub-transactions, each with its own internal transaction ID and start time. As a result, it’s impossible to synchronize transaction-level consistency between on-disk and memory-optimized tables.

Wrapping up

In the first post on transaction processing, we covered isolation levels for both on-disk and memory-optimized tables, but we left out some of the details for memory-optimized tables. This post has filled in those details, and also introduced the rules for cross-container transactions.

All about In-Memory isolation levels, Part 1


Transaction initiation modes

If you want to understand the details of transaction isolation requirements for memory-optimized tables, you must first understand transaction initiation modes. That’s because the initiation mode affects what type of isolation levels are possible when referencing memory-optimized tables.

There are four different modes that describe the way in which a transaction is initiated:

Atomic Block – An atomic block is a unit of work that occurs within a natively compiled module (procedure, function, or trigger). Native modules can only reference memory-optimized tables.

Explicit – We’re all familiar with this mode, because it requires defining an explicit beginning for the transaction, and then either a commit or rollback.

Implicit – We’ll cover this mode for the sake of completeness, but I’ve not seen an implicit transaction in all my years of SQL Server. Implicit transactions require you to SET IMPLICIT_TRANSACTIONS ON, which then  – for specific types of TSQL statements – has the effect of beginning a transaction for you. It’s only benefit is that it spares you from having to write your own BEGIN TRAN statement (woo hoo).

Documentation for implicit transactions can be found here.

Autocommit – If you execute TSQL statements outside of an explicit or implicit transaction, and outside of an atomic block, then for each individual statement, the SQL Server engine starts a transaction. That transaction is automatically committed or rolled back.

An example of an autocommit transaction would be:

We did not create an explicit transaction with BEGIN TRAN, and we didn’t SET IMPLICIT_TRANSACTIONS ON, which would have allowed the engine to implicitly start a transaction. Therefore, this TSQL statement will be automatically committed or rolled back by the engine.

Isolation levels

Now that we have a basic understanding of transaction initiation modes, let’s move on to isolation levels. Isolation levels are what determine whether certain “concurrency side effects” are allowed, such as dirty reads (uncommitted data), or phantom reads. Please refer to the SQL Server documentation on isolation levels at this link or this link for specific details.

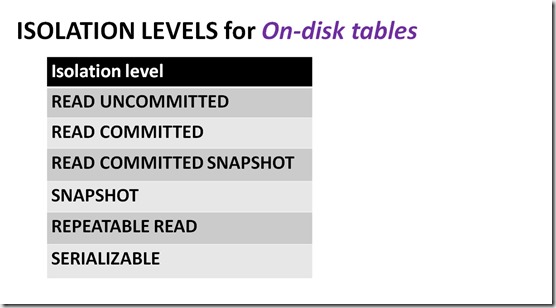
First, let’s display which types of isolation levels are available for each type of table.

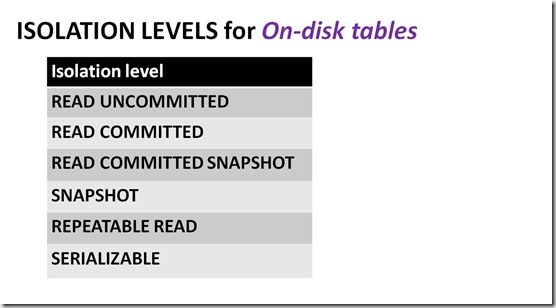
List 1:

OnDiskIsolation

“Snapshot”

One thing I want to clear up right way, is how freely the word “snapshot” is used in the SQL Server documentation, the technology world in general, and how confusing this label is in the context of transaction isolation levels.

Some editions of SQL Server have the ability to create database snapshots, which use NTFS sparse files to make a “copy on write”, read-only version of a database. This type of snapshot has absolutely nothing to do with isolation levels.

The word “snapshot” is also used to describe saving the state of a virtual machine, i.e. Hyper-V, VMware, etc.

And there are also SAN snapshots, which create an image of your storage at a fixed point in time. Again, none of these types of snapshots have anything to do with isolation levels in SQL Server.

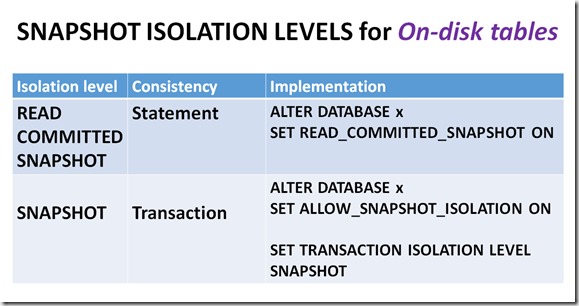
There are two variations of snapshot isolation in SQL Server:

  • statement-level consistency – Within the context of a transaction, each statement sees consistent data as of the moment the statement executed. Other transactions can modify data while your transaction is executing, potentially affecting results.
  • transaction-level consistency – All data that is referenced within the context of a transaction is guaranteed to be consistent as of the transaction start time. While your transaction is executing, modifications by other transactions cannot be seen by any statement within your transaction. When you attempt to COMMIT there can be conflicts, but we won’t cover that in this post.

Statement-level consistency is known as “read committed snapshot isolation”, while transaction-level consistency is known as “snapshot isolation”. Both can be enabled at the database level, while only transaction-level consistency can be set with the SET TRANSACTION ISOLATION command.

OnDiskSnapshot

(wrapping your brain around variations of snapshot isolation will help you understand some of the nuances in the next post)

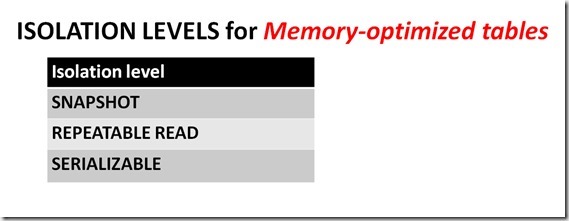
List 2*:

(*READ COMMITTED isolation is supported for memory-optimized tables, and we’ll cover that in the next post, but for now let’s concentrate on the isolations listed here)

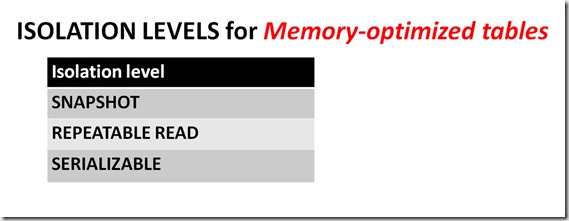
InMemIsolation

If you are only querying on-disk tables, you can use any of the isolations levels from List 1. And if you are only querying memory-optimized tables, you can use any of the isolation levels from List 2.

But what if you want to reference both on-disk and memory-optimized tables in the same query? Of course, the answer is “it depends”, with transaction initiation modes and isolation levels being the components of that dependency.

As mentioned earlier, you can’t use native compilation to reference both on-disk and memory-optimized tables – instead you must use interpreted TSQL, otherwise known as “interop”. In the next post we’ll discuss the requirements for using interop to reference both on-disk and memory-optimized tables within a single query.


Using temporal memory-optimized tables

The temporal feature works for both on-disk and memory-optimized tables, but has a slightly different implementation for memory-optimized tables.

As changes are made to rows in the temporal memory-optimized table, before being transferred to the history table on disk, they are first migrated to an internal memory-optimized staging table. That means when you query the “history table”, you could be retrieving rows from both the on-disk history table, and internal staging table. Because no custom indexing was possible on the internal staging table, there could be performance implications when executing queries against historical data. Microsoft addressed these potential performance issues in SQL 2016 SP1 (detailed in this CAT blog post).

The internal staging table only gets flushed to the on-disk history table when it reaches 8% of the size of the temporal table. Given the current capacities of Windows Server 2016 (24TB memory), it’s now possible to have very large memory-optimized tables. 8% of one of those large memory-optimized tables could be quite large, which will affect query performance, if predicates don’t match available indexes.

As of SP1 you can address the performance issues by adding (multiple) indexes to the internal staging table, and while that’s a fantastic improvement, there are some things to be aware of:

  • The fix requires Trace Flag 10316, so it’s one more thing you’ll have to remember to configure in your environments.
  • The name of the internal staging table is dynamic. This means that the script you maintain to recreate indexes on the internal table must first determine the name of the internal staging table (the CAT post details how to do this). And you’ll have the same issue for failover, whether it’s FCI or AG.

Now imagine you have dozens (or multiple dozens) of memory-optimized tables that use the temporal feature, and you want to customize indexing differently on all of them. The current SP1 solution doesn’t seem like such a great fix when DBAs must maintain dozens of scripts to apply custom indexing upon server reboot or failover.

There is perhaps a simpler solution, and that would be to monitor the number of rows in the internal staging table, and flush it to disk once it hits a threshold. Don’t assume that you’ll want to flush at the same threshold for all tables. And this won’t solve the custom indexing issue, but it could make queries perform less-worse until they’re flushed to the history table, where presumably you already have custom indexing in place. But again, you’ll have the dynamic table name issue.

You’d have to create a SQL Agent job that checks the rowcount for internal staging tables, and then call sys.sp_xtp_flush_temporal_history if required.

Your script would have to be intelligent enough to determine which tables are memory-optimized, and whether or not a given memory-optimized table uses the temporal feature.

And when you add/remove the temporal feature for a memory-optimized table, you’ll have to remember to update the custom script and Agent job. And of course this custom script will have to be executed upon reboot and/or failover.

This is just one more thing to be aware of when you consider deploying the temporal feature with In-Memory OLTP.