In the first post of this series, we explored the requirements for using Always Encrypted with secure enclaves, as well as some of the limitations.
For this post, we’ll be using Powershell to install and configure the HGS server (required for “attestation”) as well as executing the steps required to configure the SQL 2019 server to work with HGS.
Full requirements for running Always Encrypted with secure enclaves can be found here. Operating system requirements are:
- HGS server running Windows Server 2019, Standard or Datacenter edition
- SQL Server running Windows Server 2019 Datacenter edition
- SSMS 18.0 and later for testing (we won’t be running an application server)
Both the client and SQL Server must have connectivity to the HGS environment, and we’ll be using SSMS as the client. SSMS 18.0+ is required because it has the ability to alter the connection string to support Always Encrypted.
We’ll be using VMs for this scenario, and we could use SSMS on the host, but to keep things simple, we’ll be using SSMS on the SQL instance. However, you should never do this in the real world. Why?
The first reason is that Always Encrypted is designed to allow for role separation between those who own the data, and those who manage the data environment (DBAs). In the examples that follow, if a single person is using SSMS, generating the certificates, and subsequently encrypting data, there isn’t any separation of roles.
Again, I want to reiterate that for real-world usage, you should never have a single person do what’s outlined in the examples that follow – sample code is for proving concepts only. Details about using SSMS to deploy Always Encrypted can be found here.
The second reason you should not use SSMS on the SQL instance to provision keys and deploy encryption is that data can be leaked. More details about that here.
The main point from that link is:
“Make sure you run key provisioning or data encryption tools in a secure environment, on a computer that is different from the computer hosting your database. Otherwise, sensitive data or the keys could leak to the server environment, which would reduce the benefits of the using Always Encrypted.”
HGS
HGS can perform attestation using more than one method:
- Host Key
- Trusted Platform Module (TPM)
HGS and its implementation in your organization are vast topics, and detailed information about HGS attestation can be found here.
Microsoft recommends TPM for production environments and Host Key for lower environments, but it should be noted that many of the benefits of using TPM are reduced or eliminated if SQL Server runs virtualized.
Using an enclave with Always Encrypted is new to SQL 2019. Virtualization Based Security (VBS) is used to create the enclave, and is a feature of the Windows Hypervisor.
From the documentation:
“In the VBS enclave trust model, the encrypted queries and data are evaluated in a software-based enclave to protect it from the host OS. Access to this enclave is protected by the hypervisor in the same way two virtual machines running on the same computer can’t access each other’s memory. In order for a client to trust that it’s talking to a legitimate instance of VBS, you must use TPM-based attestation that establishes a hardware root of trust on the SQL Server computer. The TPM measurements captured during the boot process include the unique identity key of the VBS instance, ensuring the health certificate is only valid on that exact computer. Further, when a TPM is available on a computer running VBS, the private part of the VBS identity key is protected by the TPM, preventing anyone from trying to impersonate that VBS instance.
Secure Boot is required with TPM attestation to ensure UEFI loaded a legitimate, Microsoft-signed bootloader and that no rootkits intercepted the hypervisor boot process. Additionally, an IOMMU device is required by default to ensure any hardware devices with direct memory access can’t inspect or modify enclave memory.
These protections all assume the computer running SQL Server is a physical machine. If you virtualize the computer running SQL Server, you can no longer guarantee that the memory of the VM is safe from inspection by the hypervisor or hypervisor admin. A hypervisor admin could, for example, dump the memory of the VM and gain access to the plaintext version of the query and data in the enclave. Similarly, even if the VM has a virtual TPM, it can only measure the state and integrity of the VM operating system and boot environment. It cannot measure the state of the hypervisor controlling the VM.”
TPM is much more complicated to deploy, which is why we’ll be using Host Key attestation.
When you install the HGS feature, a Windows Server Failover Cluster (WSFC) is created, even if you only have only a single node. Presumably this is to allow you to add HA capabilities, i.e., additional nodes. DNS and Active Directory are also installed on the HGS cluster, and corporate DNS solutions will have to forward relevant requests to the HGS cluster. The HGS node also becomes a Domain Controller.
Here are the steps we’ll be following to deploy and configure the HGS server for for Host Key attestation:
- install the Host Guardian Service role
- define a domain name
- define a password for the Directory Services restore mode
- install the HGS server, referencing the domain name and password that we defined
- initialize HGS Attestation, giving a name to the service, and specifying that we want to use TrustHostKey
- copy the certificate from the SQL 2019 host to the HGS server
- add that host key to HGS attestation
- create self-signed certificates for HGS attestation and key protection
- export those certificates to files
- display the thumbprints for the each of the new certificates
- add those thumbprints to protect the encryption and signing certificates within HGS
- initialize the HGS server with the certificates we just created
- validate the HGS environment (assumes you have completed configuration on the SQL host, which was not included in these steps)
The first steps are to create two VMs in Hyper-V, and make sure that one of them is running Windows 2019 Datacenter. I did this on my Windows 10 laptop, which has the following specs:
- 32GB memory
- 2TB external Samsung T5 connected via Thunderbolt
VM specs:
- HGS, 3GB of memory, and 2 vCPU
- SQL Server, 4GB of memory, 4 vCPU (our PoC will use almost zero resources)
On the server running Datacenter, rename the machine to “SQL2019VM”, and install SQL 2019
On the other VM, (where we’ll be installing HGS), open Powershell ISE with Administrator privileges, and save the following code as a script. The code assumes that you will be adding a SQL Server host named SQL2019VM to the HGS environment.
I’m using “supersonic.local” for the HGS domain name.
# Install the Host Guardian Service (reboot might be required)
Install-WindowsFeature -Name HostGuardianServiceRole -IncludeManagementTools -Restart

# define variables
$HGSDomainName = "supersonic.local"
$DSRMPassword = Read-Host -AsSecureString -Prompt "Directory Services Restore Mode Password"

# install the HGS server
Install-HgsServer -HgsDomainName $HGSDomainName -SafeModeAdministratorPassword $DSRMPassword -Restart

# install HGS attestation
Initialize-HgsAttestation -HgsServiceName 'hgs' -TrustHostKey

Set-HgsServer -TrustHostKey -Verbose

# create self-signed certificates, and export them to PFX files
$certPW = ConverTTo-SecureString -AsPlainText "<your password" -force
$signcert = New-SelfSignedCertificate -DnsName 'signing.supersonic.local'
Export-PfxCertificate -Cert $signcert -Password $certpw -FilePath 'C:\signingcert.pfx' -Force

$enccert = New-SelfSignedCertificate -DnsName 'encryption.supersonic.local'
Export-PfxCertificate -Cert $enccert -Password $certpw -FilePath 'C:\enccert.pfx' -Force

# after creating and exporting the certificates, list the thumbprint for both the
# signing and encryption certificates

Get-ChildItem -Path cert:\LocalMachine\My -DnsName *super*

# reference those thumbprints when adding the keys to HGS
Add-HgsKeyProtectionCertificate -CertificateType Encryption -Thumbprint "<encryption thumbprint"
Add-HgsKeyProtectionCertificate -CertificateType Signing -Thumbprint "signing thumbprint"

# create passwords for the signing and encryption certificates
$signingCertPass = ConverTTo-SecureString -AsPlainText "your password" -force
$encryptionCertPass = ConverTTo-SecureString -AsPlainText "your password" -force

# initialize the HGS server, creating a service name of ‘HGS’
Initialize-HgsServer -HgsServiceName 'hgs' -SigningCertificatePath 'C:\signingcert.pfx' -SigningCertificatePassword $signingCertPass -EncryptionCertificatePath 'C:\enccert.pfx' -EncryptionCertificatePassword $encryptionCertPass -TrustHostkey
If you didn’t encounter any errors, you can move on to configuring the SQL2019VM.
# On the SQL2019VM, install required features

Enable-WindowsOptionalFeature -Online -FeatureName HostGuardian -All

Install-WindowsFeature Hyper-V, HostGuardian -IncludeManagementTools -Restart

Set-HgsClientHostKey

#export cert to file, so that we can import it on the HGS server
Get-HgsClientHostKey -Path "C:\temp\$env:computername-HostKey.cer"

# copy the cert you just exported to the HGS server (to C:\temp)
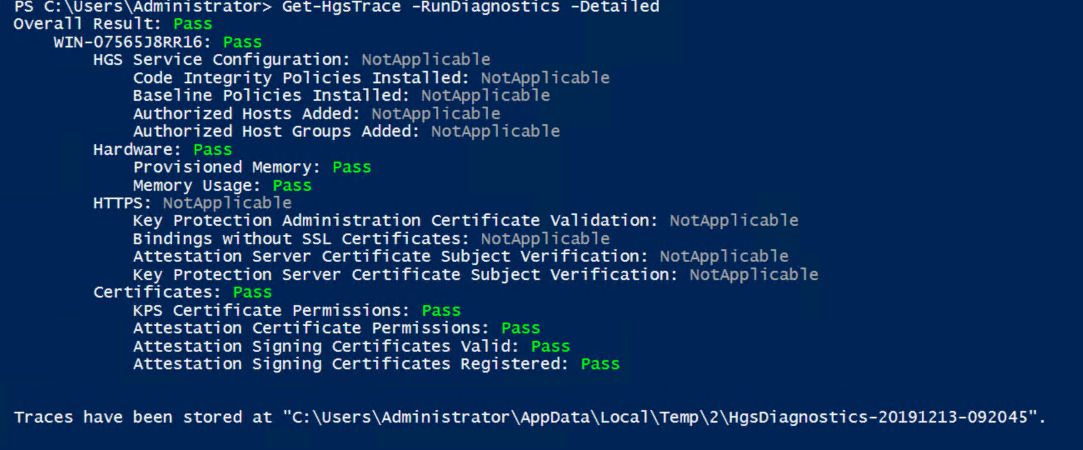
# back on the HGS VM, add the host key you just exported
Add-HgsAttestationHostKey -Name SQL2019VM -Path C:\temp\SQL2019VM-HostKey.cer

#run diagnostics on the HGS server
Get-HgsTrace -RunDiagnostics -Detailed
There’s no point in going further if both the SQL VM and the HGS VM don’t validate properly. If you have errors on the HGS server or the SQL Server, carefully check the code you ran, and perhaps retry.
Here’s an example of the type of output you would hope to see from executing Get-HgsTrace:
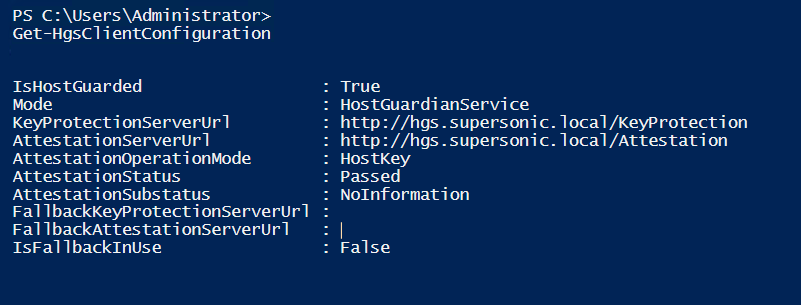
Here’s an example of the type of output you would hope to see from executing Get-HgsClientConfiguration:
Certificates
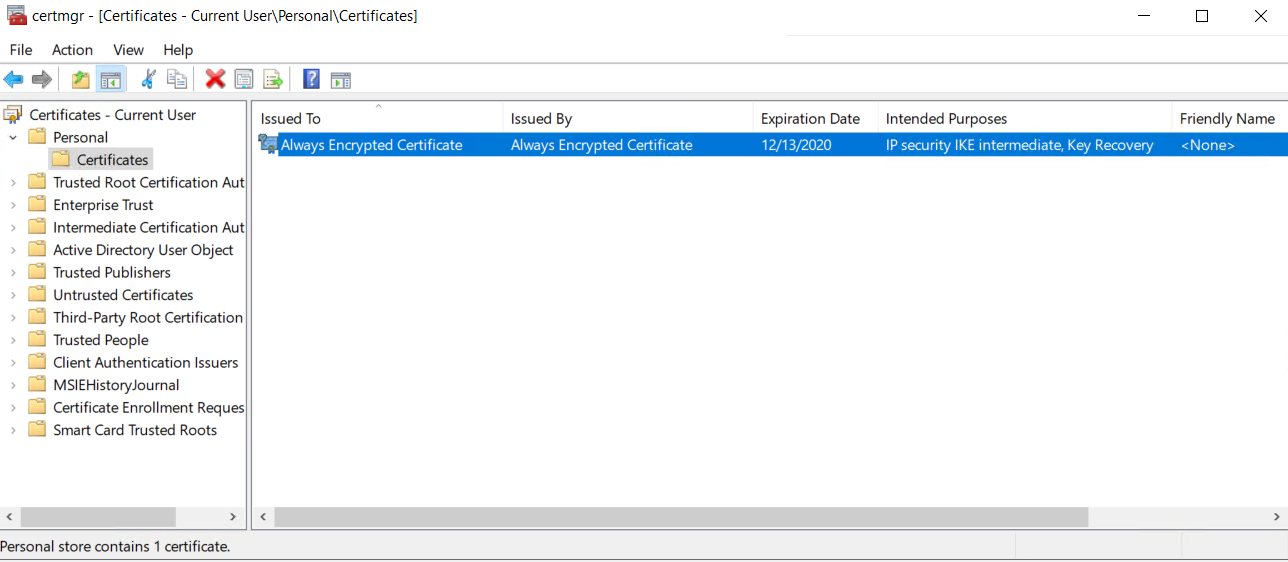
On the SQL2019VM server, verify that the certificates for the current user were properly created by going to a command prompt and executing:
certmgr.msc /f /y
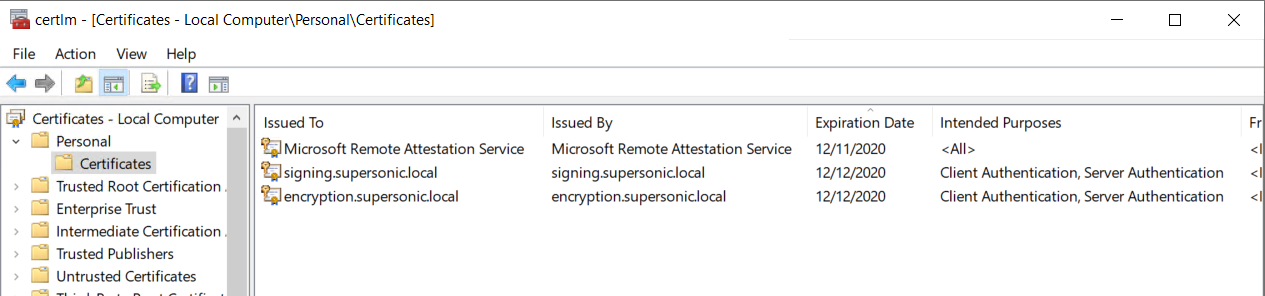
On the HGS server, verify that the certificates for the local machine were properly created by going to a command prompt and executing:
certlm.msc
Sample output for the current user:
Sample output for the local machine:
Assuming everything looks ok, we can begin to configure SQL Server – we’ll tackle that in the next post.