Author Archives: Ned Otter

Entire database in memory: Fact or fiction?

HP Servers and Persistent Memory

Advances in hardware and software have converged to allow storing your entire database in memory (depending on how large it is), even if you don’t use Microsoft’s In-Memory OLTP feature.

HP Gen9 servers support NVDIMM-N (known as Persistent Memory), which at that time had a maximum size of 8GB, and with 16 slots, offered a total server capacity of 128GB. Hardly large enough to run today’s mega-sized databases, and also there was no way to actually store your database there. So the use case for SQL Server 2016 was to store log blocks for transaction logs there. This could be beneficial in general, but particularly when using durable memory-optimized tables. That’s because WRITELOG waits for the transaction log could be a scalability bottleneck, which reduced the benefit of migrating to In-Memory OLTP.

There were other potential issues when using Persistent Memory, detailed in this blog post. But what’s not covered in that post is the fact that deploying NVIDMM-N reduced the memory speed and/or capacity, because they are not compatible with LRDIMM. This causes you to use RDIMM, which reduces capacity, and because NVDIMM-N operates at a slower speed than RDIMM, it also affects total memory speed.

HP has since released Gen10 servers, and they have changed the landscape for those seeking reduced latency by storing larger data sets in memory. For one thing, they raise the bar for what’s now referred to as Scalable Persistent Memory, with a total server capacity of 1TB. To be clear, NVDIMM-N is not used in this configuration. Instead, regular DIMMs are used, and they are persisted to flash via a power source (this was also the case for NVDIMM-N, but both the flash, DIMM, and power source were located on the NVDIMM-N).

In this video, Bob Ward demonstrates ~5x performance increase for the industry’s first “disklesss” database, using a HPE Gen10 server, SUSE Linux, Scalable Persistent Memory, and columnstore (presumably on a “traditional/formerly on-disk table”, not a memory-optimized table, although that’s not specifically detailed in the video).

Brett Gibbs, Persistent Memory Category Manager for HP servers, states in this video that even databases that use In-Memory OLTP can benefit from Scalable Persistent Memory, because the time required to restart the database can be significantly reduced. He stated that a 200GB memory-optimized database that took 20 minutes to restart on SAS drives, took 45 seconds using Persistent Scalable Memory. However, no details are provided about the circumstances under which those results are obtained.

We are left to guess about the number of containers used, and the IOPS available from storage. It may be that in both cases, they tested using a single container, which would be a worst practice. And if that’s correct, to reduce database restart time all you had to do was spread the containers across more volumes, to “parallelize” the streaming from storage to memory.

I’m assuming that the 45 seconds specified represents the amount of time required to get durable memory-optimized data from flash storage back into memory. If that’s correct, then the reduction of time required to restart the database has nothing to do with the Scalable Persistent Memory (other than memory speed), and everything to do with how fast flash storage can read data.

Licensing

The HP video also details how there might be a licensing benefit. It’s stated that if your workload requires 32 cores to perform well, and you reduce latency through the use of Scalable Persistent Memory, then you might be able to handle the same workload with less cores. I’d love to see independent test results of this.

In-Memory OLTP

If you are considering placing a database entirely in memory, and don’t want to be tied to a specific hardware vendor’s solution, In-Memory OLTP might be an option to consider.

This is an extremely vast topic that I’ve been interested in for quite a while, and I’ll summarize some of the potential benefits:

  • Maintaining referential integrity – Microsoft recommends keeping cold data in on-disk tables, and hot data in memory-optimized tables. But there’s just one problem with that: FOREIGN KEY constraints are not supported between on-disk and memory-optimized tables. Migrating all data to memory-optimized tables solves this specific issue.
  • Native compilation – if you want to use native compilation, it can only be used against memory-optimized tables. If you can deal with the potential TSQL surface area restrictions, migrating all data to memory-optimized tables might allow greater use of native compilation.
  • Single table structure – if you were to keep cold data on disk, and hot data in-memory, you would need to use two different table names, and perhaps reference them through a view. Migrating all data to memory-optimized tables solves this problem.
  • Unsupported isolation levels for cross-container transactions – it’s possible to reference both on-disk and memory-optimized tables in a single query, but memory-optimized tables only support a subset of the isolations that are available for on-disk tables, and some combinations are not supported (SNAPSHOT, for example).
  • Near-zero index maintenance – other than potentially reconfiguring the bucket count for HASH indexes, HASH and RANGE indexes don’t require any type of index maintenance. FILLFACTOR and fragmentation don’t exist for any of the indexes that are supported for memory-optimized tables.
  • Very large memory-optimized database size – Windows Server 2016 supports 24TB of memory, and most of that could be assigned to In-Memory OLTP, if you are using Enterprise Edition. This is way beyond the capacity supported by the current line of HP servers using Scalable Persistent Memory.

One extremely crucial point to make is that if you decide to migrate an entire database to In-Memory OLTP, then database recovery time must be rigorously tested. You will need to have enough containers spread across enough volumes to meet your RTO SLA.
In-Memory OLTP Resources, Part 1: The Foundation

This multi-part blog post will cover various resource conditions that can affect memory-optimized workloads. We’ll first lay the foundation for what types of resources are required for In-Memory OLTP, and why.

The following topics will be covered :

  • causes of OOM (Out of Memory)
  • how files that persist durable memory-optimized data affect backup size
  • how memory is allocated, including resource pools, if running Enterprise Edition
  • potential effect on disk-based workloads (buffer pool pressure)
  • what happens when volumes that store durable memory-optimized data run out of free space
  • what you can and cannot do when a memory-optimized database runs out of resources
  • database restore/recovery
  • garbage collection (GC) for row versions and files (file merge)
  • BPE (buffer pool extension)

Like most everything in the database world, In-Memory OLTP requires the following resources:

  • storage
  • IOPS
  • memory
  • CPU

Let’s take storage first – why would a memory-optimized database require storage, what is it used for, and how much storage is required?

Why and What?

You’ll need more storage than you might expect, to hold the files that persist your durable memory-optimized data, and backups. 

How much storage? 

No one can exactly answer that question, as we’ll explain over the next few blog posts. However, Microsoft’s recommendation is that you have 4x durable memory-optimized data size as a starting point for storage capacity planning.

Architecture

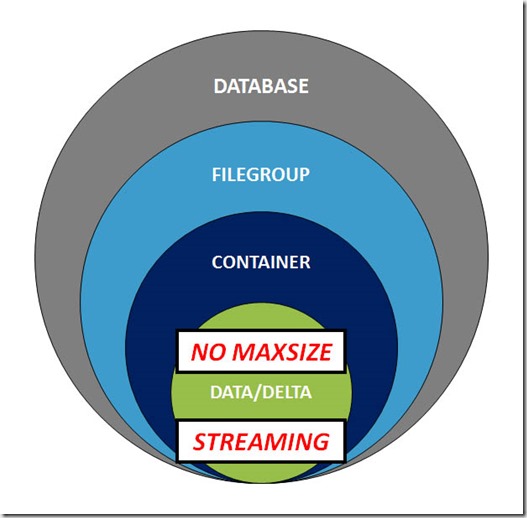
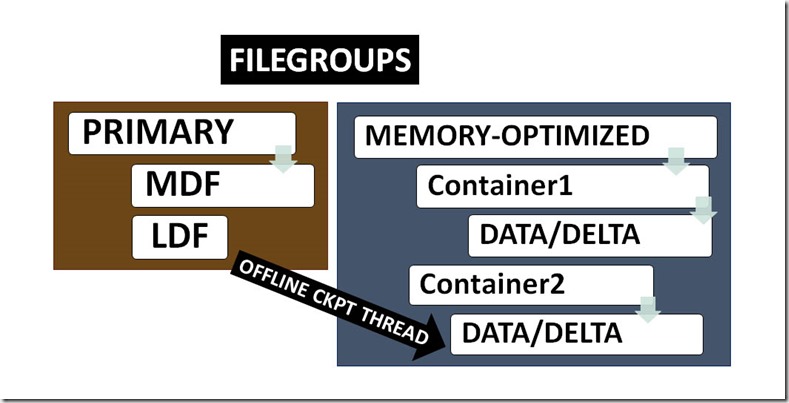
A memory-optimized database must have a special filegroup designated for memory-optimized data, known as a memory-optimized filegroup. This special filegroup is logically associated with one or more “containers”. What the heck is a “container”? Well, it’s just a fancy word for “folder”, nothing more, nothing less. But what is actually stored in those fancy folders?

Containers hold files known as “checkpoint file pairs”, which are also known as “data and delta files”, and these files persist durable memory-optimized data (in this blog post series, I’ll use the terms CFP and data/delta files interchangeably). You’ll note on the following image that it clearly states in bold red letters, “NO MAXSIZE” and “STREAMING”. “NO MAXSIZE” means that you can’t specify how large these files will grow, nor can you specify how large the container that houses them can grow (unless you set a quota, but you should NOT do that). And there’s also no way at the database level to control the size of anything having to do with In-Memory OLTP storage – you simply must have enough available free space for the data and delta files to grow.

This is the first potential resource issue for In-Memory OLTP: certain types of data modifications are no longer allowed if the volume your container resides upon runs out of free space. I’ll cover workload recovery from resource depletion in a future blog post.

“STREAMING” means that the data stored within these files is different than what’s stored in MDF/LDF/NDF files. Data files for disk-based tables store data rows on 8K pages, a group of which is known as an extent. Data for durable memory-optimized tables is not stored on pages or extents. Instead, memory-optimized data is written in a sequential, streaming fashion, like the FILESTREAM feature (it should be noted that you do not have to enable the FILESTREAM feature in order to use In-Memory OLTP, and that statement has been true since In-Memory OLTP was first released in SQL 2014).   

  Storage1

How do these data/delta files get populated? All that is durable in SQL Server is written to the transaction log, and memory-optimized tables are no exception. After first being written to the transaction log, a process known as “offline checkpoint” harvests changes related to memory-optimized tables, and persists those changes in the data/delta files. In SQL 2014, there was a single offline checkpoint thread, but as of SQL 2016, there are multiple offline checkpoint threads. 

Storage2

Let’s create a sample database:

After creating the database, the InMemOOMTest folder looks like this:

image

OOM_DB_inmem1 and OOM_DB_inmem2 are containers (folders), and they’ll be used to hold checkpoint file pairs. You’ll note in the DDL listed above, that under the memory-optimized filegroup, each container has both a name and filename entry. The name is the logical name of the container, while the filename is actually the container name, which represents the folder that gets created on disk. Initially there are no CPFs in the containers, but as soon as you create your first memory-optimized table, CFPs get created in both containers.

If we have a look in one of the containers, we can see files that have GUIDs as names, and are created with different sizes.

image

This is definitely not human-readable, but luckily, Microsoft has created a DMV to allow us to figure out what these files represent.

Below we can clearly see that there are different types of files, and that files can have different “states”, which is central to the discussion of the storage footprint for memory-optimized databases, and backups of those databases. There are different values for container_id – remember we said that a memory-optimized database can have one or more containers. Next, we should pay attention to the fact that all entries for the “relative_file_path” column begin with “$HKv2\”. This means that in each container, we have a folder with the name “$HKv2”, and all data/delta files for that container are located there.

image

At this point, it’s time for a discussion of the various file states. I’ll stick to SQL 2016+ (because SQL 2014 had more file states).

The possible file states are:

  • PRECREATED
  • UNDER CONSTRUCTION
  • ACTIVE
  • MERGE TARGET
  • WAITING FOR LOG TRUNCATION

We’ll discuss the first three now, and save MERGE TARGET and WAITING FOR LOG TRUNCATION for later.

PRECREATED: as a performance optimization technique, the In-Memory engine will “precreate” files. These precreated files have nothing in them – they are completely empty, from a durable data perspective. A file in this state cannot yet be populated.

UNDER CONSTRUCTION: when the engine starts adding data to a file, the state of the file changes from PRECREATED to UNDER CONSTRUCTION. Data and delta files are shared by all durable memory-optimized tables, so it’s entirely possible that the first entry is for TableA, the next entry for TableB, and so on. “UNDER CONSTRUCTION” could be interpreted as “able to be populated”.

ACTIVE: When a file that was previously UNDER CONSTRUCTION gets closed, the state transitions to ACTIVE. That means it has entries in it, but is no longer able to be be populated. What causes a file to be closed? The CHECKPOINT process will close the checkpoint, changing all UNDER CONSTRUCTION files to ACTIVE.

That’s the basic rundown of the file states we need to know about at this point.

In Part 2, we’ll dive deeper into the impact of data/delta file states and the storage footprint for memory-optimized databases.

Technology can change your life

Roy Dorman

When I first met Roy Dorman, he was in is mid-thirties, and completing a degree in philosophy at Fordham University here in New York City. Roy was coupled with a very close friend; I took a liking to him immediately.

It’s a tall order to find a teaching position in philosophy under the best of circumstances, and upon graduating, he struggled to find work (his age was likely not an asset). To meet the financial demands of living in this city, he toiled at whatever jobs came his way: limousine dispatcher, real-estate manager, etc.

After getting to know him for a while, I could see that Roy had the right combination of natural skills that would be perfect for a role in technology, and I told him so. He was extremely responsible, persevering, detail oriented, and enjoyed solving problems.

Remembering my own struggles to wrap my brain around technology (detailed here), I said to Roy – “Hey man, if you ever want to do something in the tech world, just let me know – I’d be glad to teach you.”

Time ticked on by, and then one day the phone rang – Roy was ready to begin his studies.

First ascent

The first hurdle we faced was that Roy had zero disposafble income, so I offered to lend him the money to purchase a computer. Our plan was that he would do self-study from home, with my oversight. However, there was one gigantic problem with this scenario – he had a very young child at home (I don’t know what we were thinking). As the great jazz musician Ahmad Jamal told me years ago – “you cannot serve two masters.”

With no measurable progress after a fair amount of study time, the likelihood of Roy being gainfully employed in the field of technology was hovering around impossible.

We needed another plan.

Second ascent

I could see that the obligations of a husband and father were not easily circumvented. On the other hand, Roy had worked a series of gigs that had zero financial upside, so he was highly motivated – an essential requirement of all heavy lifting.

Our second plan was more structured and required a larger commitment from both of us. Also built in to the plan were some “teeth”.

I asked Roy how much money he needed to survive, and the figure he came up with was $1,000 per week, and I agreed to sustain him financially throughout his studies. But because lending money to a friend can jeopardize the relationship, we approached the financial aspect from a different perspective. I told him that I would not lend him the money he needed – I would give him the money he needed. And should he one day be in a financial position to return the gesture, so be it. We went forward without my having any expectation of seeing the money that flowed to him.

Roy had no idea if he could morph into a SQL Server DBA, and I was keenly aware of the vast amount of trust he placed in me. It was an awesome responsibility, to say the least.

I had recently started a contract for a large migration of 100+ SQL Servers to the latest version, and this put me in a position to help Roy out. I wrote him a letter explaining what was expected of each of us, and what would happen if we did not succeed. With the letter I enclosed a check for $2,000, saying that there would be subsequent payments of $1,000 per week. My estimation was that it would take approximately nine months for Roy to become employable, but our timeline was open-ended.

Tough love

My letter in part said:

“If I was you, I’d be as frugal as humanly possible with this check, for the following reasons:

· I eat before you do

· Anything can happen

· Don’t assume there will be a next check, because I don’t. You’re a consultant now; your income is unpredictable.”

“I will evaluate your performance each month and discuss with you where you stand. If for whatever reason I deem that you are not living up to your end of the bargain – and it does not change – the deal is off, I become yet another line item in your long list of creditors, and our lives resume as before.“

I didn’t like to be that hard on Roy, but I felt it was the only way we could get to the finish line. It was for his own good, and he knew it.

I told him that he had to treat his SQL Server education exactly like a job. He received a set of keys to my studio apartment in Greenwich Village, and had to be there five days a week, eight hours a day.

To the grindstone

In addition to being a SQL Server DBA, I’ve had a life in music. Many people have come to me for music lessons, and almost none of them have ever returned after the initial encounter. Perhaps it’s because I don’t sugar-coat what’s involved with pursuing the subtleties of creative improvised music. Roy stands alone as the only student I’ve ever had that got into the long run with me.

Keep in mind that he had only very basic knowledge of computers when we began, and he knew absolutely nothing about operating systems or database software. I’ve sometimes thought that if Roy knew how much he’d have to learn in such a short span of time, he might have backed out. But ignorance is bliss, as they say.

To be honest, we worked like mad men.

I drilled him.

I grilled him.

I imparted mindful after mindful of technology upon Roy Dorman each and every day. Weeks turned to months, and slowly, the veil of technological ignorance lifted, giving way to comprehension and knowledge. After seven months, I had taught Roy everything I could think of (but I did leave off some critical items, such as how to determine how much memory is installed on a SQL Server – sorry, Roy!).

One day I arrived home to find a package he had left for me. Inside was a collage that he made about our collaboration, and I laughed out loud when I saw it. It had photos of the two of us, plus artwork for Sybase, Oracle and MS SQL – really hysterical. Also included was a very small pair of scissors. I called Roy and asked him what the scissors were for. He said: “To cut the cord!”

It was time for Roy to fly.

Looking for a gig

Roy wanted to work as a consultant, but at that point in time, there seemed to be more opportunities for him as an employee. Also, with a wife and young child, he needed the benefits that came with full time employment.

One day he called and said that he was going to have an interview, and there was something in his voice that sounded kind of funny. His appointment was to be at the same company I was working for, and in the same building where I worked. He asked me: “Are your manager’s initials ‘XYZ’?”

They were indeed.

Unbelievably, Roy would have an interview in my office the following Monday (I wonder how long those odds were).

As luck would have it, when Roy arrived on site, my manager asked me to give him a technical interview, and then he “introduced” me to Roy.

You will not be shocked to learn that I gave Roy the green light. Not because I had trained him, but because he was a good candidate, and would have been an asset to the team. But as it turned out, the company decided not to engage the services of Roy Dorman. I was really disappointed – we would have had a ball working together.

Opportunity knocks

After interviewing for a while, Roy told me that he was being considered for positions at two different companies – there was now third party endorsement of his skills. He had studied hard and done well.

One of the companies had three servers, and the other had fifteen. I told him that he had to take the job at the fifteen-server company, but he was extremely hesitant to do so. I stated in no uncertain terms that the larger company was his only move, and when he asked me why, I told him: “Because you’ll learn more there.”

Roy accepted the position at the fifteen-server company, and it was the beginning of a career that would encompass working at some very large corporations, such as Viacom, SAC Capital and others.

Through our collaboration, an intensely personal bond between us was formed – I looked upon Roy as a brother, and we stayed close throughout the many years that followed.

The Eternal Optimist

Roy called one day, revealing that he had Stage IV colon cancer. One thing I remember him saying to me was that he was looking at it as one of life’s “bumps in the road”. That was Roy’s essence – he was The Eternal Optimist.

For a while he did well with treatment. But after about a year, it was clear that Roy was losing the battle. When I picked him up from the hospital to take him home for the last time, he thanked me for giving him an opportunity to do better. I told him that my role was simply one of guidance (and ass kicker drill sergeant) – he did all the work.

Tragically, Roy passed away not long after that conversation, leaving behind a wife and two beautiful young daughters. For about ten years, he got to live the life he wanted (if you think that working is living, that is).

Coda

What can we take away from all of this?

· Back in the day, there was a lot less to learn, in order to become gainfully employed as a SQL Server DBA

· it’s never too late to change your life

· Motivation is more important than raw talent

· Good karma is good

In New York City, for decades the final destination for many who were down on their luck was the infamous Bowery. My mother told me that every time she walked along that famed stretch known as Skid Row, she came home broke – you need not be Sigmund Freud to figure out where my generous side originates.

Some of you reading this post might think that I had ulterior motives for helping Roy – that nobody does something for nothing. I can assure you there were no obligations on Roy’s part, but he did remit every penny of the $29,600 that he received.

Now that I think of it, perhaps I did get more from Roy than what I initially gave him. Every time I think of him, and what we achieved together, a warm smile spreads across my face.

Good DBAs always strive to be better at their tradecraft. How many of us attempt to improve our humanity?

I challenge everyone reading this post to commit to making another person’s life better in some way, large or small – no strings attached.

Thanks for reading –

Ned Otter

New York City, 2013

The subtleties of In-Memory OLTP Indexing

For this post, I wanted to cover some of the indexing subtleties for memory-optimized tables, with an accent on columnstore indexes

Let’s create a memory-optimized table:

Now, let’s attempt to create a NONCLUSTERED COLUMNSTORE INDEX:

Msg 10794, Level 16, State 76, Line 76
The feature ‘NONCLUSTERED COLUMNSTORE’ is not supported with memory optimized tables.

It fails because we can only create a CLUSTERED columnstore index (CCI). For 25 years, Microsoft SQL Server differentiated between indexes that physically ordered data on storage (CLUSTERED) and those that did not (NONCLUSTERED). Unfortunately, they chose to ignore that pattern when creating the syntax for memory-optimized tables; using the word CLUSTERED is required when creating a columnstore index on memory-optimized tables.

Can we create a clustered columnstore index on a memory-optimized table that is defined as SCHEMA_ONLY?

Only one way to find out:

Msg 35320, Level 16, State 1, Line 39
Column store indexes are not allowed on tables for which the durability option SCHEMA_ONLY is specified.

That won’t work, so let’s create our table with SCHEMA_AND_DATA:

Now, let’s create a clustered columnstore index:

Success! Let’s attempt to create a NONCLUSTERED index….

Msg 10794, Level 16, State 15, Line 117
The operation ‘ALTER TABLE’ is not supported with memory optimized tables that have a column store index.

Ooops – no can do. Once you add a clustered columnstore index to a memory-optimized table, the schema is totally locked down.

What about if we create the CCI and nonclustered index inline?

Awesome! We’ve proven that we can create both clustered columnstore and nonclustered indexes, but we must create them inline.

Now that we’ve got our indexes created, let’s try to add a column:

Msg 12349, Level 16, State 1, Line 68
Operation not supported for memory optimized tables having columnstore index.

Hey, when I said that the schema is locked down once you add a clustered columnstore index, I mean it!

What type of index maintenance is possible for indexes on memory-optimized tables?

For HASH indexes there is only one possible type of index maintenance, and that’s to modify/adjust the bucket count. There is zero index maintenance for RANGE/NONCLUSTERED indexes.

Let’s create a memory-optimized table with a HASH index, and verify the syntax for rebuilding the bucket count.

Here’s the syntax for rebuilding the bucket count for a HASH INDEX:

We can add a column, as long as we don’t have a CCI in place:

How about trying to rebuild the bucket count if we created the memory-optimized table with inline CCI and HASH indexes?

Msg 10794, Level 16, State 13, Line 136
The operation ‘ALTER TABLE’ is not supported with memory optimized tables that have a column store index.

You can’t rebuild that index if you also have a columnstore index on the table. We would have to drop the columnstore index, reconfigure the bucket count for the HASH index, and then recreate the columnstore index. Both the drop and the create of the columnstore index will be fully logged, and executed serially. Not a huge problem if the amount of data is not too large, but it’s a potentially much larger problem if you’ve got a lot of data.

We can create a clustered columnstore index on a #temp table (on-disk):

We can create multiple indexes with a single command:

Can we create a columnstore index on a memory-optimized table variable?

Create a table that includes a LOB column with a MAX datatype, then add a clustered columnstore index:

Msg 35343, Level 16, State 1, Line 22    The statement failed. Column ‘Notes’ has a data type that cannot participate in a columnstore index. Omit column ‘Notes’.   

Msg 1750, Level 16, State 1, Line 22    Could not create constraint or index. See previous errors.

For memory-optimized tables, LOB columns prevent creation of a clustered columnstore index.

Now let’s try creating a table using CHAR(8000). Astute readers will notice that the following table would create rows that are 32,060 bytes wide – this would fail for on-disk tables, but is perfectly valid for memory-optimized tables:

Msg 41833, Level 16, State 1, Line 29    Columnstore index ‘CCI_InMemLOB’ cannot be created, because table ‘InMemLOB’ has columns stored off-row.   
Columnstore indexes can only be created on memory-optimized table if the columns fit within the 8060 byte limit for in-row data.   
Reduce the size of the columns to fit within 8060 bytes.

Create a table with non-MAX LOB columns, but they are stored on-row,  then add a clustered columnstore index:

Let’s create a natively compiled module that selects from this table:

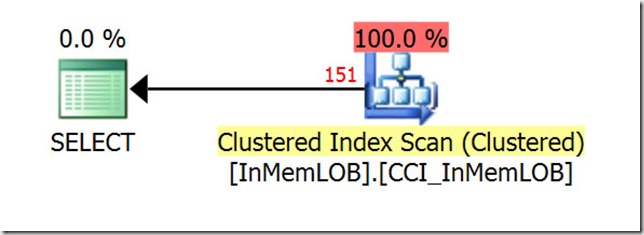
ENABLE “Actual Plan” and SELECT – which index is used?

CCIPlan1

Now highlight the EXEC statement, and click “Estimated Plan” – which index is used?

CCIPlan2

The SELECT statement uses the columnstore index, but the natively compiled procedure does not (that’s because natively compiled procedures ignore columnstore indexes).

Summing up

In this post, we’ve covered some of the finer points of indexing memory-optimized tables. Never know when they might come in handy….

SQL Server on Linux, Part 1

SQL 2017 is just about to be released, and one of the big ticket items is that SQL Server is now supported on the Linux platform.

In subsequent posts, I’ll be reporting on In-Memory OLTP on Linux, but first we’ll need to cover some Linux basics. I flirted with Unix ages ago, and I’ll be the first to admit that my brain doesn’t really work that way (perhaps no one’s brain does).

First, a note about environments – I usually like to work on a server in my home lab, because it has a lot of cores, 64GB of memory, and there’s no hourly cost for using it (and also because I built it….).

So I downloaded a copy of Ubuntu, CentOS, and a trial copy of Redhat Enterprise Linux, and attempted to install each one in my VMware Workstation environment. I spun my wheels for a few hours, and could not get any of them up and running in the way that I required. So, in the interest of saving time, I hit my Azure account, created a VM running Redhat, and proceeded to install SQL 2017 CTP2. Instructions for installing SQL 2017 on Linux can be found at this link. It should be noted that the installation varies by Linux distribution.

Those of us who don’t know Linux commands by heart, and are used to firing up GUI-based virtual machines, are in for a bit of a rude awakening. While it is possible to install GNOME on RHEL, you can’t simply RDP into the VM without a lot of Linux admin setup for xdp (I never did get it to work). So how do you connect to your Linux VM running SQL Server to do basic tasks? The answer is: PuTTY

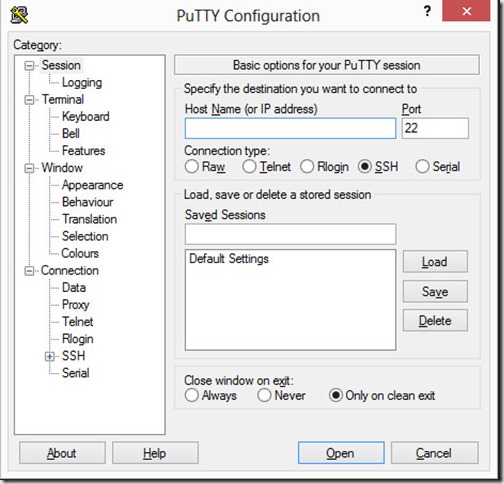
PuTTY can be downloaded from this link, and after you install it on your client machine (your laptop or home workstation), connecting to your Azure VM is very easy. When you run PuTTY, you’re presented with the following window, and you can simply enter your IP address into the “Host Name (or IP address)” section, and click the “Open” button:

PUTTY

(you might receive a warning to confirm you want to connect).

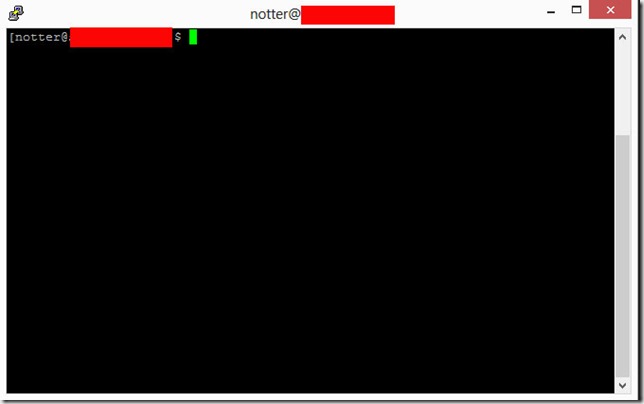
Once you connect to the Azure VM, you are prompted for your user name and password, and after logging in to the VM, you arrive at the home directory for your login.

HomeDir

Once you’ve installed SQL Server according to the instructions at this link, you can use SSMS from your desktop to connect over the public internet, and manage your SQL Server environment. It’s a really good idea to limit the inbound connections for your VM to only your IP address, otherwise bots from all over the globe will attempt to hack your machine (you have been warned….).

Now that SQL Server is installed and running, we can attempt to connect, and create a database.

In SSMS, click connect, choose “Database Engine”, and when prompted, enter the user name and password. Make sure “SQL Server Authentication” is chosen, and not “Windows Authentication”.

The first thing I did was to determine where the system databases were stored, so I executed:

sp_helpdb master

master

I used the same path as the master database files to create a test database:

USE master
GO
CREATE DATABASE [TestDB]
ON PRIMARY
       (
           NAME = N’TestDBData’
          ,FILENAME = N’/var/opt/mssql/data/TestDB.mdf’
          ,SIZE = 100MB
          ,MAXSIZE = UNLIMITED
          ,FILEGROWTH = 100MB
       )
LOG ON
    (
        NAME = N’TestDBLog’
       ,FILENAME = N’/var/opt/mssql/data/TestDB.ldf’
       ,SIZE = 100MB
       ,MAXSIZE = 2048GB
       ,FILEGROWTH = 100MB
    );
GO

That worked fine, but what if we want to create a database in a separate folder?

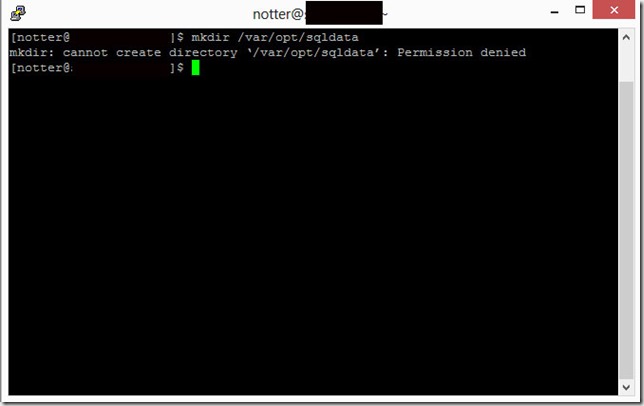
Using PuTTY, we can create a folder using the mkdir command (xp_cmdshell is not currently supported for SQL Server running on Linux):

mkdir /var/opt/sqldata

mkdir1

Unfortunately, that didn’t go as planned! We don’t have permission to create that folder, so we’ll try using sudo (more on sudo at this link):

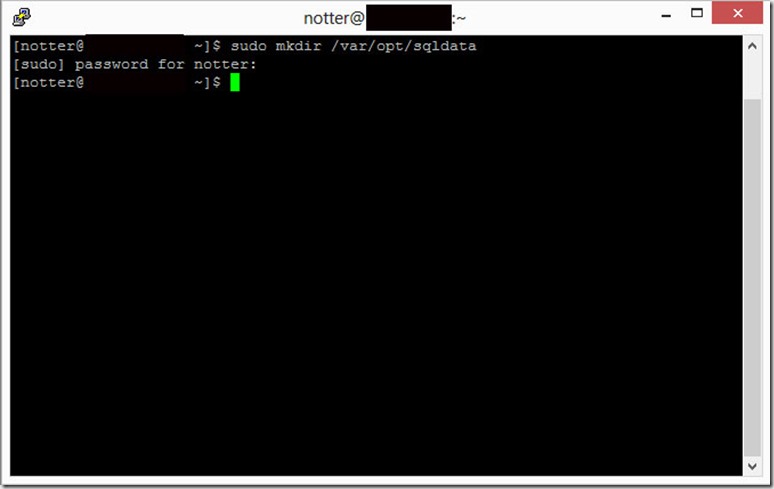
sudo mkdir /var/opt/sqldata

sudomkdir

sudo prompts you for your password, after which it will create the directory.

Now that the directory has been created, we can attempt to create a new database there.

USE master
GO
CREATE DATABASE [TestDB2]
ON PRIMARY
       (
           NAME = N’TestDB2Data’
          ,FILENAME = N’/var/opt/sqldata/TestDB2.mdf’
          ,SIZE = 100MB
          ,MAXSIZE = UNLIMITED
          ,FILEGROWTH = 100MB
       )
LOG ON
    (
        NAME = N’TestDB2Log’
       ,FILENAME = N’/var/opt/sqldata/TestDB2.ldf’
       ,SIZE = 100MB
       ,MAXSIZE = 2048GB
       ,FILEGROWTH = 100MB
    );
GO

error1

Still no luck – what could be the issue?

Let’s check the security context of the mssql service:

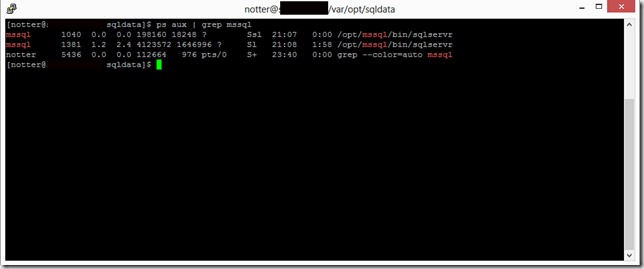
ps aux | grep mssql

mssql service

So, the sqlserver process executes under the mssql user account. Let’s check permissions in the sqldata directory with:

stat –format “%A” /var/opt/sqldata

On my VM, the results are:

rwxr-xr-x

Permissions for Linux files are separated into three sections:

  • owner
  • group (for the file or directory)
  • others

Each section can have the following attributes:

  • (r)ead
  • (w)rite
  • e(x)ecute

For more information on these attributes, please visit this link.

It’s easier to interpret the output if we break it up:

[rwx] [r-x] [r-x]

  • the directory owner has read, write, and execute permission
  • the directory group has read and execute permission
  • others have read and execute permission

When we create a directory, it’s owned by root. The problem with creating a database in this directory should be obvious: only the owner of the directory has write permission.

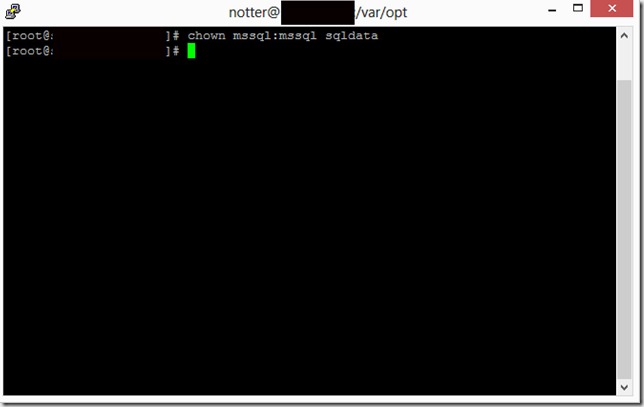
Let’s make the mssql user the owner of the sqldata directory:

chown mssql:mssql /var/opt/sqldata

chown
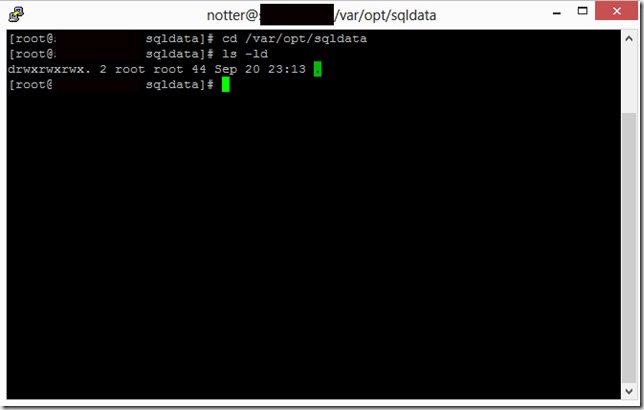
And finally, we’ll check the permissions for the sqldata folder:

final

Now let’s retry our CREATE DATABASE statement.

USE master
GO
CREATE DATABASE [TestDB2]
ON PRIMARY
       (
           NAME = N’TestDB2Data’
          ,FILENAME = N’/var/opt/sqldata/TestDB2.mdf’
          ,SIZE = 100MB
          ,MAXSIZE = UNLIMITED
          ,FILEGROWTH = 100MB
       )
LOG ON
    (
        NAME = N’TestDB2Log’
       ,FILENAME = N’/var/opt/sqldata/TestDB2.ldf’
       ,SIZE = 100MB
       ,MAXSIZE = 2048GB
       ,FILEGROWTH = 100MB
    );
GO

Voila! We successfully created a database in the intended folder.

Seasoned DBAs might be wondering about Instant File Initialization (IFI), a best practice on Windows that greatly increases the speed of creating or extending data files.

When IFI is not configured, data files must be zeroed when created or extended. Does Linux have something akin to IFI? The answer is…..IFI does not exist as a thing you can configure on the file systems that SQL on Linux supports (EXT4, available on all distributions, or XFS file system, available only on Redhat).

However, the good news is that on the Linux platform, data files are not initialized with zeros when created or extended – Linux takes care of this without any intervention from DBAs.

Anthony Nocentino (@centinosystems) just blogged about the internals of file initialization on the Linux platform in this post.

Using native compilation to insert parent/child tables

This blog post demonstrates various approaches when using native compilation to insert rows into parent/child tables.

First, let’s create tables named Parent and Child, and relate them with a FOREIGN KEY constraint. Note that the Parent table uses the IDENTITY property for the PRIMARY KEY column.

DROP TABLE IF EXISTS dbo.Child
GO
DROP TABLE IF EXISTS dbo.Parent
GO

CREATE TABLE dbo.Parent
(
     ParentID INT IDENTITY PRIMARY KEY NONCLUSTERED
    ,Name CHAR(50) NOT NULL
    ,Description CHAR(100) NOT NULL
)
WITH (MEMORY_OPTIMIZED = ON, DURABILITY = SCHEMA_AND_DATA)
GO
CREATE TABLE dbo.Child
(
     ChildID INT IDENTITY PRIMARY KEY NONCLUSTERED
    ,ParentID INT NOT NULL FOREIGN KEY REFERENCES dbo.Parent (ParentID) INDEX IX_Child_ParentID 
    ,Name CHAR(50) NOT NULL
    ,Description CHAR(100) NOT NULL
)
WITH (MEMORY_OPTIMIZED = ON, DURABILITY = SCHEMA_AND_DATA)
GO

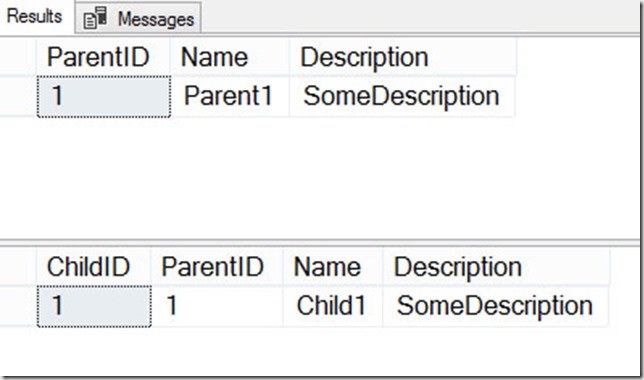
Next, we attempt to create a natively compiled procedure that performs an INSERT to the Parent table, and tries to reference the key value we just inserted, with @@IDENTITY.

Scenario 1

CREATE OR ALTER PROCEDURE dbo.Proc_InsertParentAndChild  
WITH NATIVE_COMPILATION, SCHEMABINDING
AS
BEGIN ATOMIC
WITH (TRANSACTION ISOLATION LEVEL = SNAPSHOT,  LANGUAGE = N'English')  

    INSERT dbo.Parent
    (
        Name
       ,Description
    )
    VALUES
    (
        'Parent1'
       ,'SomeDescription'
    )

    DECLARE @NewParentID INT
    SELECT @NewParentID  = SCOPE_IDENTITY()

    INSERT dbo.Child
    (
        ParentID
       ,Name
       ,Description
    )
    VALUES
    (
        @NewParentID
       ,'Child1'
       ,'SomeDescription' 
    )
END
GO

EXEC dbo.Proc_InsertParentAndChild

SELECT *
FROM Parent
ORDER BY ParentID

SELECT *
FROM Child
ORDER BY ParentID
GO


Results4

This works, but there are other approaches to solving this problem.

Next, we’ll try to DECLARE a table variable, and OUTPUT the new key value.

Scenario 2

CREATE OR ALTER PROCEDURE dbo.Proc_InsertParentAndChild  
WITH NATIVE_COMPILATION, SCHEMABINDING
AS
BEGIN ATOMIC
WITH (TRANSACTION ISOLATION LEVEL = SNAPSHOT,  LANGUAGE = N'English')  

    DECLARE @NewParentID TABLE (ParentID INT NOT NULL)
    INSERT dbo.Parent
    (
        Name
       ,Description
    )
    OUTPUT Inserted.ParentID INTO @NewParentID
    /*
        Msg 12305, Level 16, State 24, Procedure Proc_InsertParentAndChild, Line 7 [Batch Start Line 64]
        Inline table variables are not supported with natively compiled modules.
    */
    
    VALUES
    (
        'Parent1' 
       ,'SomeDescription' 
    ) 
END
GO

But again we have issues with unsupported T-SQL.

Now we’ll try creating a memory-optimized table variable outside the native procedure, and then declare a variable of that type inside the native procedure.

Scenario 3

CREATE TYPE dbo.ID_Table AS TABLE
(
    ParentID INT NOT NULL PRIMARY KEY NONCLUSTERED
)
WITH (MEMORY_OPTIMIZED = ON)

GO

CREATE OR ALTER PROCEDURE dbo.Proc_InsertParentAndChild  
WITH NATIVE_COMPILATION, SCHEMABINDING
AS
BEGIN ATOMIC
WITH (TRANSACTION ISOLATION LEVEL = SNAPSHOT,  LANGUAGE = N'English')  

    DECLARE @NewParentID dbo.ID_Table 
    INSERT dbo.Parent
    (
        Name
       ,Description
    )
    OUTPUT Inserted.ParentID INTO @NewParentID
    VALUES
    (
        'Parent1' 
       ,'SomeDescription' 
    )

    DECLARE @NewParentValue INT = (SELECT ParentID FROM @NewParentID)

    INSERT dbo.Child
    (
        ParentID
       ,Name
       ,Description
    )
    VALUES
    (
        @NewParentValue
       ,'Child1'
       ,'SomeDescriptioin' 
    )
END
GO

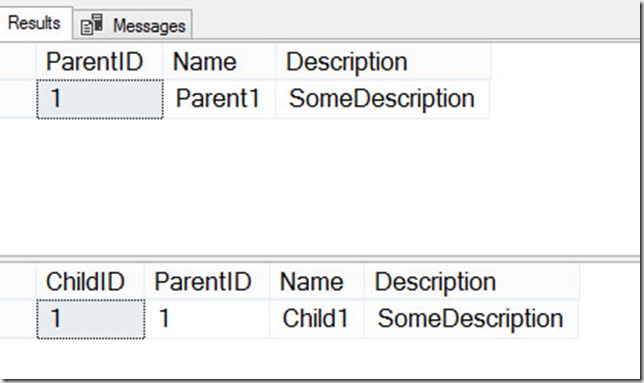
This compiles, so now let’s test it.

EXEC dbo.Proc_InsertParentAndChild

SELECT *
FROM Parent
ORDER BY ParentID

SELECT *
FROM Child
ORDER BY ParentID
GO

Results3
This works great, but for completeness, we should test other possibilities.

This time, we’ll recreate the tables, but we’ll leave off the IDENTITY property for the Parent table. Instead of IDENTITY, we’ll create a SEQUENCE, and attempt to generate the next value within the native module.

Scenario 4

DROP PROCEDURE IF EXISTS dbo.Proc_InsertParentAndChild  
go
DROP TABLE IF EXISTS dbo.Child
GO
DROP TABLE IF EXISTS dbo.Parent
GO

CREATE TABLE dbo.Parent
(
     ParentID INT PRIMARY KEY NONCLUSTERED – no IDENTITY property used here!
    ,Name CHAR(50) NOT NULL
    ,Description CHAR(100) NOT NULL
)
WITH (MEMORY_OPTIMIZED = ON, DURABILITY = SCHEMA_AND_DATA)
GO
CREATE TABLE dbo.Child
(
     ChildID INT IDENTITY PRIMARY KEY NONCLUSTERED
    ,ParentID INT NOT NULL FOREIGN KEY REFERENCES dbo.Parent (ParentID) INDEX IX_Child_ParentID 
    ,Name CHAR(50) NOT NULL
    ,Description CHAR(100) NOT NULL
)
WITH (MEMORY_OPTIMIZED = ON, DURABILITY = SCHEMA_AND_DATA)
GO


CREATE SEQUENCE dbo.ParentSequence AS INT

GO

CREATE OR ALTER PROCEDURE dbo.Proc_InsertParentAndChild  
WITH NATIVE_COMPILATION, SCHEMABINDING
AS
BEGIN ATOMIC
WITH (TRANSACTION ISOLATION LEVEL = SNAPSHOT,  LANGUAGE = N'English')  

    DECLARE @NextParentSequence INT = NEXT VALUE FOR dbo.ParentSequence

    INSERT dbo.Parent
    (
        ParentID
       ,Name
       ,Description
    )
    VALUES
    (
         @NextParentSequence
       ,'Parent1' 
       ,'SomeDescription' 
    )

    INSERT dbo.Child
    (
        ParentID
       ,Name
       ,Description
    )
    VALUES
    (
        @NextParentSequence
       ,'Child1'
       ,'SomeDescriptioin' 
    )
END
GO

/*
    Msg 10794, Level 16, State 72, Procedure Proc_InsertParentAndChild, Line 19 [Batch Start Line 176]
    The operator 'NEXT VALUE FOR' is not supported with natively compiled modules.
*/

But this fails, because as the error states, we can’t use NEXT VALUE FOR within native modules.

Scenario 5

How about if we generate the next value for the sequence outside the module, and pass that value?

Let’s see —


CREATE OR ALTER PROCEDURE dbo.Proc_InsertParentAndChild  
(
    @NewParentValue INT
)
WITH NATIVE_COMPILATION, SCHEMABINDING
AS
BEGIN ATOMIC
WITH (TRANSACTION ISOLATION LEVEL = SNAPSHOT,  LANGUAGE = N'English')  

    INSERT dbo.Parent
    (
        ParentID
       ,Name
       ,Description
    )
    VALUES
    (
         @NewParentValue
       ,'Parent1' -- Name - char(50)
       ,'SomeDescription' -- Description - char(100)
    )

    INSERT dbo.Child
    (
        ParentID
       ,Name
       ,Description
    )
    VALUES
    (
        @NewParentValue
       ,'Child1'
       ,'SomeDescriptioin' 
    )
END
GO

SELECT *
FROM Parent
ORDER BY ParentID

SELECT *
FROM Child
ORDER BY ParentID

DECLARE @NextParentSequence INT 
SELECT @NextParentSequence = NEXT VALUE FOR dbo.ParentSequence
EXEC dbo.Proc_InsertParentAndChild  @NextParentSequence

SELECT *
FROM Parent
ORDER BY ParentID

SELECT *
FROM Child
ORDER BY ParentID
GO

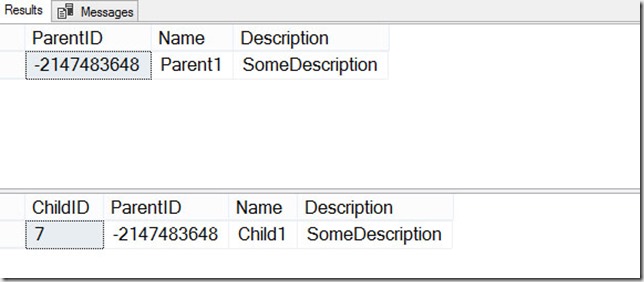
Results1

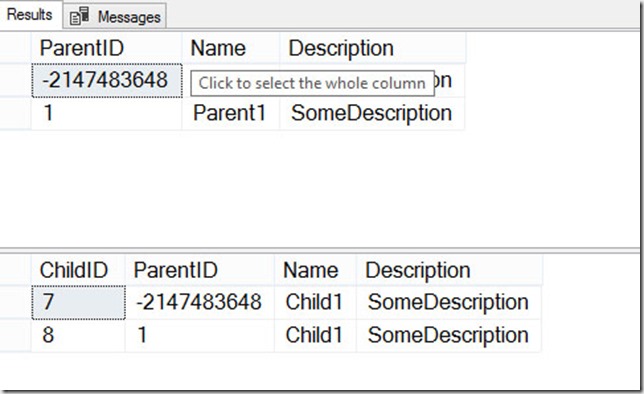
This also works, so we’ll add it to our arsenal. But there’s one weird thing – the value that was inserted into the Parent table is –2147483647, which is probably not what we intended. So we’ll have to tidy up our SEQUENCE a bit.

DROP SEQUENCE dbo.ParentSequence 
GO
CREATE SEQUENCE dbo.ParentSequence AS INT START WITH 1
GO
DECLARE @NextParentSequence INT 
SELECT @NextParentSequence = NEXT VALUE FOR dbo.ParentSequence
EXEC dbo.Proc_InsertParentAndChild  @NextParentSequence

SELECT *
FROM Parent
ORDER BY ParentID

SELECT *
FROM Child
ORDER BY ParentID

Everything looks good now:

Results2

In this post, we have verified three different ways to successfully insert into parent/child records, when using native compilation.

SQL 2017 In-Memory roundup

SQL Server 2017 includes enhancements to many features, and some of those enhancements include In-Memory OLTP.

  • Microsoft states that ALTER TABLE for memory-optimized tables is now “usually substantially faster”. I asked for clarity about that – if it means that ALTER TABLE is faster for the same events that were able to be executed in parallel and minimally logged in SQL 2016, or if there are new ALTER TABLE statements which now execute in parallel. They replied that there is no change to the set of operations that executed in parallel. So the ALTER TABLE commands that executed fast now (theoretically) execute faster.
  • Up to and including SQL 2016, the maximum number of nonclustered indexes on a memory-optimized table was eight, but that limitation has been removed for SQL 2017. I’ve tested this with almost 300 indexes, and it worked. With this many supported indexes, it’s no wonder they had to….
  • Enhance the index rebuild performance for nonclustered indexes during database recovery. I confirmed with Microsoft that the database does not have be in SQL 2017 compatibility mode (140) to benefit from the index rebuild enhancement. This type of rebuild happens not only for database restore and failover, but also for other “recovery events” – see my blog post here.
  • In SQL 2017, memory-optimized tables now support JSON in native modules (functions, procedures and check constraints).
  • Computed columns, and indexes on computed columns are now supported
  • TSQL enhancements for natively compiled modules include CASE, CROSS APPLY, and TOP (N) WITH TIES
  • Transaction log redo of memory-optimized tables is now done in parallel. This has been the case for on-disk tables since SQL 2016, so it’s great that this potential bottleneck for REDO has been removed.
  • Memory-optimized filegroup files can now be stored on Azure Storage, and you can also backup and restore memory-optimized files on Azure Storage.
  • sp_spaceused is now supported for memory-optimized tables
  • And last but definitely not least,  drum roll, please…….we can now rename memory-optimized tables and natively compiled modules

While Microsoft continues to improve columnstore indexes for on-disk tables, unfortunately columnstore for memory-optimized tables gets left further and further behind. Case in point would be support for LOB columns for on-disk tables in SQL 2017, but no such support for memory-optimized tables. And my good friend Niko Neugebauer (b|t) just reminded me that computed columns for on-disk CCI are supported in SQL 2017, but they are not supported for in-memory CCI. For an in-depth comparison of columnstore differences between on-disk and memory-optimized tables, see my  post here.

In addition to what’s listed above, I tested the following functionality for natively compiled stored procedures:

My wish list for the In-Memory OLTP feature is huge, but it’s great to see Microsoft continually improve and extend it.

All about In-Memory isolation levels, Part 2

In the Part 1, we covered the basics of transaction initiation modes and isolation levels. Today we’ll continue with more details about isolation levels and initiation modes for memory-optimized tables, and finally we’ll see how to reference both types of tables in a query.

But first, let’s summarize supported isolation levels.

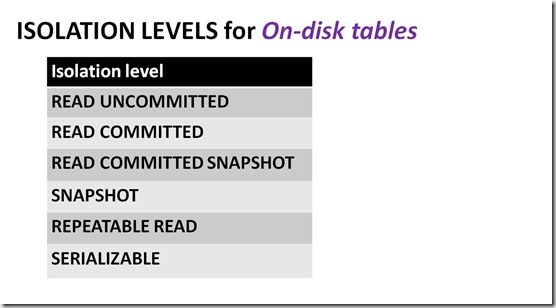
List 1:

OnDiskIsolation_thumb4

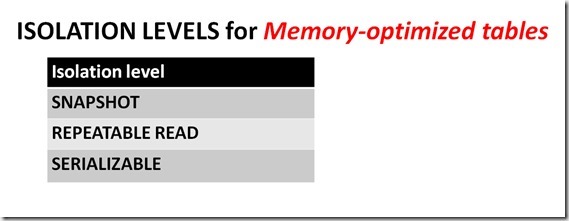
Last time, we had this for “List 2”:

InMemIsolation_thumb1

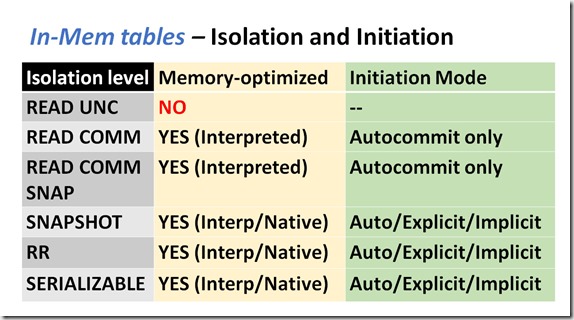
But that’s not the whole truth – the complete picture of isolation levels and initiation modes for memory-optimized tables is summarized in the following table:

InMemComplete

In Part 1, we said that READ COMMITED is supported for memory-optimized tables, but we didn’t explain how. Here we can see that it’s supported, but only for single statement, “autocommit” transactions. Autocommit transactions are not possible within a native module, so you’re limited to interpreted TSQL (un-compiled), as indicated in the table above.

Let’s work through an example.

If the transaction isolation level is set to READ COMMITED SNAPSHOT – which, as detailed in the last post, can only be set with an ALTER DATBASE command – then you can execute the following:

That’s a single statement that will be autocommitted.

But you cannot execute the following:

Why will it fail?

It will fail because the initiation mode of this transaction is not autocommit, which is required for READ COMMITED SNAPSHOT when referencing memory-optimized tables (the initiation mode is explicit, because we explicitly defined a transaction).  So to be totally clear, for queries that only reference memory-optimized tables, we can use the READ COMMITTED or READ COMMITTED SNAPSHOT isolation levels, but the transaction initiation mode must be autocommit. Keep this in mind, because in a moment, you’ll be questioning that statement….

Now let’s put it all together and understand the rules for referencing on-disk and memory-optimized tables in the same query.

Cross-Container

A query that references both on-disk and memory-optimized tables is known as a “cross-container” transaction.

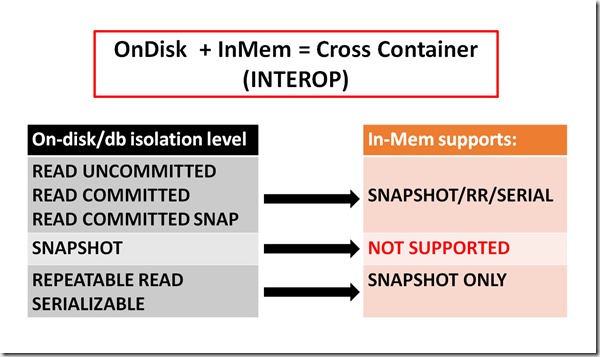
The following table lists the rules:

Interop1

If the on-disk or database isolation level is READ UNCOMMITTED, READ COMMITTED, or READ COMMITTED SNAPSHOT, then you can reference memory-optimized tables using SNAPSHOT, REPEATABLE READ, or SERIALIZABLE isolation levels. An example would be:

But wait – a moment ago we proved that when we use the READ COMMITTED isolation level, and we query a memory-optimized table, the transaction initiation mode must be autocommit. The code we just displayed uses an explicit transaction to do the same thing, so we’ve got some explaining to do….

The answer is that for queries that only reference memory-optimized tables, we must use autocommit. But the rules are different for cross-container transactions, and in that case, we can use explicit transactions.

Back to SNAPSHOT

What if we converted some tables to be memory-optimized, and they were referenced everywhere in our TSQL code?

Would we have to change all of our code to use WITH (SNAPSHOT)?

Fear not, there is a solution, and it’s a database setting known as MEMORY_OPTIMIZED_ELEVATE_TO_SNAPSHOT. If this option is enabled, then you don’t have to change your code to use WITH (SNAPSHOT) for interop statements. The engine will automagically elevate the isolation level to SNAPSHOT for all memory-optimized tables that use interop/cross-container. More information on MEMORY_OPTIMIZED_ELEVATE_TO_SNAPSHOT is available at this link.

Just to recap what we covered last time about the different forms of snapshot isolation:

  • READ COMMITTED SNAPSHOT isolation is “statement-level consistency”
  • SNAPSHOT isolation is “transaction-level consistency”

A cross-container transaction doesn’t support snapshot isolation, because it’s actually two sub-transactions, each with its own internal transaction ID and start time. As a result, it’s impossible to synchronize transaction-level consistency between on-disk and memory-optimized tables.

Wrapping up

In the first post on transaction processing, we covered isolation levels for both on-disk and memory-optimized tables, but we left out some of the details for memory-optimized tables. This post has filled in those details, and also introduced the rules for cross-container transactions.

All about In-Memory isolation levels, Part 1


Transaction initiation modes

If you want to understand the details of transaction isolation requirements for memory-optimized tables, you must first understand transaction initiation modes. That’s because the initiation mode affects what type of isolation levels are possible when referencing memory-optimized tables.

There are four different modes that describe the way in which a transaction is initiated:

Atomic Block – An atomic block is a unit of work that occurs within a natively compiled module (procedure, function, or trigger). Native modules can only reference memory-optimized tables.

Explicit – We’re all familiar with this mode, because it requires defining an explicit beginning for the transaction, and then either a commit or rollback.

Implicit – We’ll cover this mode for the sake of completeness, but I’ve not seen an implicit transaction in all my years of SQL Server. Implicit transactions require you to SET IMPLICIT_TRANSACTIONS ON, which then  – for specific types of TSQL statements – has the effect of beginning a transaction for you. It’s only benefit is that it spares you from having to write your own BEGIN TRAN statement (woo hoo).

Documentation for implicit transactions can be found here.

Autocommit – If you execute TSQL statements outside of an explicit or implicit transaction, and outside of an atomic block, then for each individual statement, the SQL Server engine starts a transaction. That transaction is automatically committed or rolled back.

An example of an autocommit transaction would be:

We did not create an explicit transaction with BEGIN TRAN, and we didn’t SET IMPLICIT_TRANSACTIONS ON, which would have allowed the engine to implicitly start a transaction. Therefore, this TSQL statement will be automatically committed or rolled back by the engine.

Isolation levels

Now that we have a basic understanding of transaction initiation modes, let’s move on to isolation levels. Isolation levels are what determine whether certain “concurrency side effects” are allowed, such as dirty reads (uncommitted data), or phantom reads. Please refer to the SQL Server documentation on isolation levels at this link or this link for specific details.

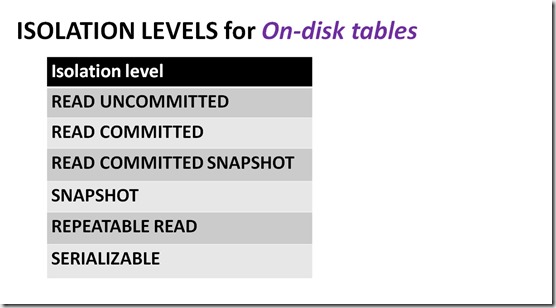
First, let’s display which types of isolation levels are available for each type of table.

List 1:

OnDiskIsolation

“Snapshot”

One thing I want to clear up right way, is how freely the word “snapshot” is used in the SQL Server documentation, the technology world in general, and how confusing this label is in the context of transaction isolation levels.

Some editions of SQL Server have the ability to create database snapshots, which use NTFS sparse files to make a “copy on write”, read-only version of a database. This type of snapshot has absolutely nothing to do with isolation levels.

The word “snapshot” is also used to describe saving the state of a virtual machine, i.e. Hyper-V, VMware, etc.

And there are also SAN snapshots, which create an image of your storage at a fixed point in time. Again, none of these types of snapshots have anything to do with isolation levels in SQL Server.

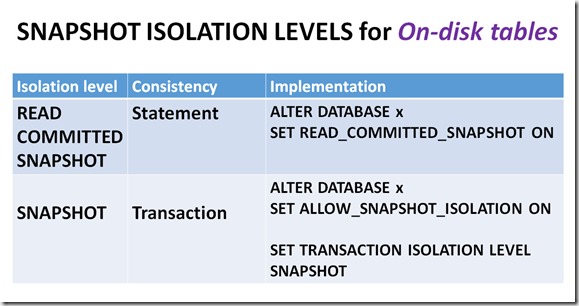
There are two variations of snapshot isolation in SQL Server:

  • statement-level consistency – Within the context of a transaction, each statement sees consistent data as of the moment the statement executed. Other transactions can modify data while your transaction is executing, potentially affecting results.
  • transaction-level consistency – All data that is referenced within the context of a transaction is guaranteed to be consistent as of the transaction start time. While your transaction is executing, modifications by other transactions cannot be seen by any statement within your transaction. When you attempt to COMMIT there can be conflicts, but we won’t cover that in this post.

Statement-level consistency is known as “read committed snapshot isolation”, while transaction-level consistency is known as “snapshot isolation”. Both can be enabled at the database level, while only transaction-level consistency can be set with the SET TRANSACTION ISOLATION command.

OnDiskSnapshot

(wrapping your brain around variations of snapshot isolation will help you understand some of the nuances in the next post)

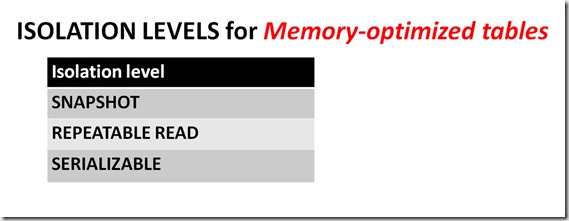
List 2*:

(*READ COMMITTED isolation is supported for memory-optimized tables, and we’ll cover that in the next post, but for now let’s concentrate on the isolations listed here)

InMemIsolation

If you are only querying on-disk tables, you can use any of the isolations levels from List 1. And if you are only querying memory-optimized tables, you can use any of the isolation levels from List 2.

But what if you want to reference both on-disk and memory-optimized tables in the same query? Of course, the answer is “it depends”, with transaction initiation modes and isolation levels being the components of that dependency.

As mentioned earlier, you can’t use native compilation to reference both on-disk and memory-optimized tables – instead you must use interpreted TSQL, otherwise known as “interop”. In the next post we’ll discuss the requirements for using interop to reference both on-disk and memory-optimized tables within a single query.