Category Archives: SQL Server

In-Memory OLTP relationship status: “it’s complicated”

Because partitioning is not supported for memory-optimized tables, Microsoft has posted workarounds here and here.

These workarounds describe how to use:

a. application-level partitioning

b. table partitioning for on-disk tables that contain cold data, in combination with memory-optimized tables for hot data.

Both of these workarounds maintain separate tables with identical schema. The first workaround would not require app changes, but the second workaround would require changes in order to know which table to insert/update/delete rows in. Technologists are not crazy about changing existing applications.

Even if we accept that these are viable solutions for existing applications, there are other potential problems with using either of these approaches.

Parent/Child issues

An OLTP database schema is usually highly normalized, with lots of parent/child relationships, and those relationships are usually enforced with PRIMARY KEY and FOREIGN KEY constraints. SQL 2016 allows us to implement PK/FK constraints for memory-optimized tables, but only if all participating tables are memory-optimized.

That leads us to an interesting problem:

How can we enforce PK and FK relationships if a database contains both disk-based and memory-optimized tables, when each table requires the same validation?

Sample scenario

In a simplified scenario, let’s say we have the following tables:

Parent table: memory-optimized, States_InMem

Child table 1: memory-optimized, contains hot data, Addresses_InMem

Child table 2: disk-based, contains cold data, Addresses_OnDisk

We must satisfy at least three conditions:

a. Condition 1: an insert/update on the memory-optimized child table must validate StateID

b. Condition 2: an insert/update on the disk-based child table must validate StateID

c. Condition 3: deleting a row from the parent table must not create orphaned child records

Example 1:

Condition 1

Assume Addresses_InMem has a column named StateID that references States_InMem.StateID.

If we create the States_InMem table as memory- optimized, the Addresses_InMem table can define a FOREIGN KEY that references it. Condition 1 is satisfied.

Condition 2

The disk-based Addresses_Disk table can use a trigger to validate the StateID for inserts or updates. Condition 2 is satisfied.

Condition 3

If we want to delete a record from the memory-optimized Parent table (States_InMem), the FK from memory-optimized Addresses_InMem will prevent the delete if child records exist (assuming we don’t cascade).

Triggers on memory-optimized tables must be natively compiled, and that means they cannot reference disk-based tables. Therefore, when you want to delete a record from the memory-optimized parent table, triggers cannot be used to enforce referential integrity to the disk-based child table.

Without a trigger or a parent/child relationship enforced at the database level, it will be possible to delete a record from States_InMem that references Addresses_OnDisk, thereby creating an orphaned child record. Condition 3 is NOT satisfied.

This “memory-optimized triggers cannot reference disk-based tables” issue also prevents the parent table from being disk-based (described next).

Example 2:

Parent table: disk-based, States_OnDisk

Child table 1: Hot data in memory-optimized table, Addresses_InMem

Child table 2: Cold data in disk-based table, Addresses_Disk

We can only define PK/FK between memory-optimized tables, so that won’t work for validating Addresses_InMem.StateID

As just described, we cannot use triggers on Addresses_InMem to enforce referential integrity, because triggers on memory-optimized tables must be natively compiled, and that means they cannot reference disk-based tables (States_OnDisk).

One solution might be to have all DML for this type of lookup table occur through interop stored procedures. But this has some drawbacks:

1. if a stored procedure must access both disk-based and memory-optimized tables, it cannot be natively compiled

2. Without PRIMARY and FOREIGN KEY rules enforced at the database engine level, invalid data can be introduced

Ideally we would like to have only a single copy of the parent table that can be referenced from either disk-based or memory-optimized child tables.

Separate “lookup” database

You might think that you can simply put reference tables in a separate database, but this approach won’t work, because memory-optimized tables don’t support cross-database queries. Also, the example of the States lookup table is overly simplified – it’s a single table that is a parent to child tables, but itself has no parent.

What if the tables were not Addresses and States, but instead Orders and OrderDetails? Orders might have a parent record, which can also have a parent record, and so on. Even if it was possible to place referenced tables in a separate database, this complexity will likely prevent you from doing so.

Double entry

For small lookup tables with no “parent”, one potential solution would be to store the reference data twice (on disk and in-memory). In this scenario you would modify only the disk-based table, and use triggers on the disk-based table to keep the memory-optimized lookup table in synch.

Entire table in memory

Of course if you put entire tables in memory (a single table that holds both hot and cold data), all of these problems go away. Depending on the complexity of the data model, this solution might work. However, placing both hot and cold data in memory will affect recovery time, and therefore RTO (see my other blog post on recovery for databases with memory-optimized data here).

All data in memory

You could also put your entire database in memory, but In-Memory OLTP isn’t designed for this. Its purpose is to locate tables with the highest activity to memory (or a subset of data for those hot tables). Putting your entire database in memory has even more impact on RTO than placing hot/cold data for a few tables in memory.

Also, cold data won’t benefit from most of what In-Memory OLTP has to offer, as by definition cold data rarely changes. However, there will likely be some benefit from querying data that resides solely in memory-optimized tables (no latching/locking).

Temporal

If your data is temporal in nature, it’s possible to use the new Temporal table feature of SQL 2016 to solve part of the issues discussed. It would work only for memory-optimized tables that are reference tables, like the States table.

You could define both the memory-optimized reference table and your memory-optimized referencing tables to be temporal, and that way the history of both over time is captured. At a given point in time, an Addresses record referenced a specific version of the States record (this will also work for disk-based tables, but the subject of this blog post is how In-Memory OLTP can be used to handle hot/cold data).

It’s recommended to use a clustered columnstore index on the history table to minimize the storage footprint and maximize query performance. Partitioning of the history table is also supported.

Archival data

If due to regulatory requirements multiple years of data must be retained, then you could create a view that encompassed both archival and hot data in memory-optimized temporal tables. And removing large amounts of data from the archival tables can easily be done with partitioning. But adding large amounts of data to the archival tables cannot be done seamlessly, because as mentioned earlier, partitioning is not supported for memory-optimized tables.

Down the road

With the current limitations on triggers, foreign keys, and partitioning for memory-optimized tables, enforcing referential integrity with a mix of hot and cold schemas/tables remains a challenge.
Row version lifecycle for In-Memory OLTP

    In this post we’re going to talk about a crucial element of the In-Memory database engine: the row version life cycle.

    We’ll cover:

    1. why row versions are part of the In-Memory engine
    2. which types of memory-optimized objects create row versions
    3. potential impact on production workloads of using row versioning
    4. and finally, we’ll talk about what happens to row versions after they’re no longer needed

    In a world without row versions – as was the case until SQL 2005 – due to the pessimistic nature of the SQL engine, readers and writers that tried to access the same row at the same time would block each other. This affected the scalability of workloads that had a large number of concurrent users, and/or with data that changed often.

    Creating row versions switches the concurrency model from pessimistic to optimistic, which resolves contention issues for readers and writers. This is achieved by using a process called Multi-Version-Concurrency-Control, which allows queries to see data as of a specific point in time – the view of the data is consistent, and this level of consistency is achieved by creating and referencing row versions.

    Harddrive-based tables only have row versions created when specific database options are set, and row versions are always stored in TempDB. However, for memory-optimized tables, rows versions are stored in memory, and created based on the following conditions, and are not related database settings:

    DML memory consumption:

    1. INSERT: a row version is created and consumes memory

    2. UPDATE: a row version is created, and consumes memory (logically a DELETE followed by an INSERT)

    3. DELETE: a row version is NOT created, and therefore no additional memory is consumed (the row is only logically deleted in the Delta file)

    Why must we be aware of row versions for memory-optimized tables? Because row versions affect the total amount of memory that’s used by the In-Memory engine, and so you need to allow for that as part of capacity planning.

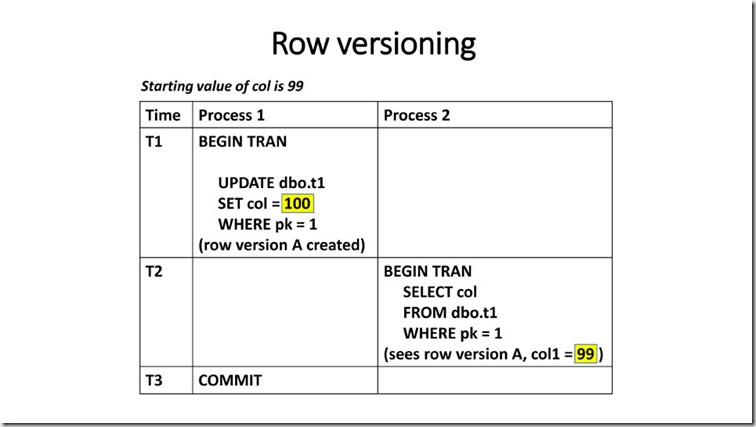
    Let’s have a quick look at how row versioning works. On the following slide you can see that there are two processes that reference the same row – the row that has the pk value of 1.

    Before any data is changed, the value of col is 99.

    PowerPoint Presentation

    A new row version is created each time a row is modified, but queries issued before the modification commits see a version of the row as it existed before the modification.

    Process 1 updates the value of col to 100, and row version A is created. Because this version is a copy of the row as it existed before the update, row version A has a col value of 99.

    Then Process 2 issues a SELECT. It can only see committed data, and since Process 1 has not yet committed, Process 2 sees row version A, which has a col value of 99, not the value of 100 from the UPDATE.

    Next, Process 1 commits. At this point, the value of co1 in the database is 100, but it’s important to remember that row version A is still in use by the SELECT from Process 2, and that means that row version A cannot be discarded. Imagine this happening on a much larger scale, and think about the amount of memory all those row versions will consume. At the extreme end of this scenario, the In-Memory engine can actually run out of memory, and SQL Server itself can become unstable.

    Things to note:

  • Memory allocated to the In-Memory engine can never be paged out under any circumstance
  • Memory-optimized tables don’t support compression

    That’s why there must be a separate process to reclaim memory used by row versions after they’re no longer needed. A background process called Garbage Collection takes care of this, and it’s designed to allow the memory consumed by row versions to be deallocated, and therefore re-used.

    Garbage Collection is designed to be:

  • Non-blocking
  • Responsive
  • Cooperative
  • Scalable

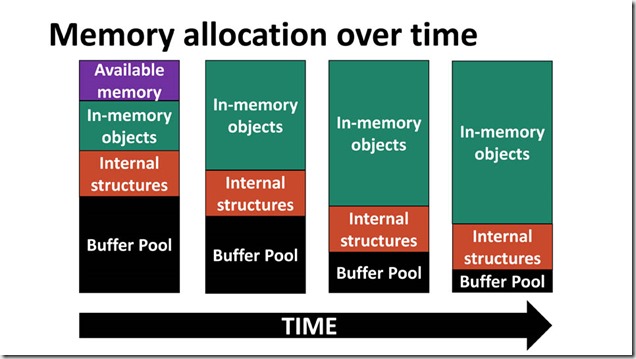
The following slide shows various stages of memory allocation for an instance of SQL Server, and assumes that both disk-based and memory-optimized tables exist in the database. To avoid the performance penalty of doing physical IOs, data for harddrive-based tables should be cached in the buffer pool. But an ever-increasing footprint for the In-Memory engine puts pressure on the buffer pool, causing it to shrink. As a result, performance for harddrive-based tables can suffer from the ever-growing footprint of the In-Memory engine. In fact, the entire SQL Server instance can be impacted. 

PowerPoint Presentation

    We need to understand how Garbage Collection works, so that we can determine what might cause it to fail – or perform below expected levels.

    There are two types of objects that can hold rows in memory:

  • Memory-optimized tables
  • Memory-optimized table variables

Modifications to data in both types of objects will create row versions, and those row versions will of course consume memory. Unfortunately, row versions for memory-optimized table variables are not handled by the Garbage Collection process – the memory consumed by them is only released when the variable goes out of scope. If changes are made to memory-optimized table variables that affect many rows – especially if the table variable has a NONCLUSTERED index – a large amount of memory can be consumed by row versions (see Connect item here).

The Garbage Collection process

    By default, the main garbage collection thread wakes up once every minute, but this frequency changes with the number of completed transactions.

    Garbage Collection occurs in two phases:

  • Unlinking rows from all relevant indexes
  • Deallocating rows from memory

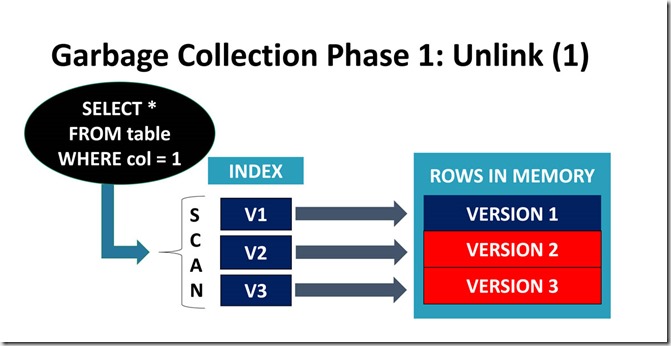
1. Unlinking rows from all relevant indexes

Before: Index references stale row versions

PowerPoint Presentation

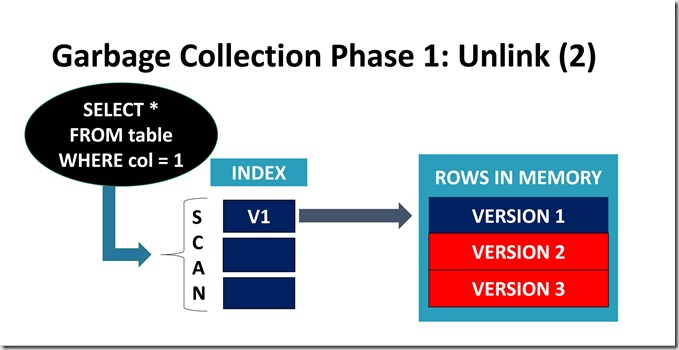
After: Index no longer references stale row versions. As part of user activity, indexes are scanned for rows that qualify for garbage collection. So stale row versions are easily identified if they reside in an active index range. But if an index range has low activity, a separate process is required to identity stale row versions. That process is called a “dusty corner” sweep – and it has to do much more work than the user activity processes to identify stale rows. This can affect the performance of Garbage Collection, and allow the footprint for the In-Memory engine to grow.

PowerPoint Presentation

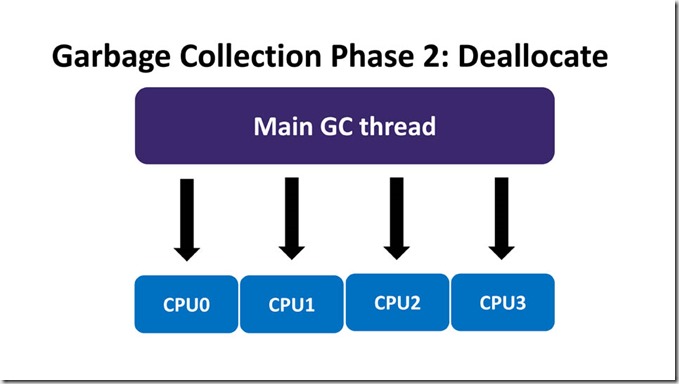
2. Deallocating rows from memory

Each CPU scheduler has a garbage collection queue, and the main garbage collection thread places items on those queues. There is one scheduler for each queue, and after a user transaction commits, it selects all queued items on the scheduler it ran on, and deallocates memory for those items. If there are no items in the queue on its scheduler, the user transaction will search on any queue in the current NUMA node that’s not empty.

PowerPoint Presentation

If transaction activity is low and there’s memory pressure, the main garbage-collection thread can deallocate rows from any queue.

    So the two triggers for Garbage Collection are memory pressure and/or transactional activity. Conversely, that means if there’s no memory pressure – or transactional activity is low – it’s perfectly reasonable to have row versions that aren’t garbage collected. There’s also no way to force garbage collection to occur.

    Monitoring memory usage per table

    We can use the sys.dm_db_xtp_table_memory_stats DMV to see how much memory is in use by a memory-optimized table.  Row versions exist as rows in the table, which is why when we SELECT from the sys.dm_db_xtp_table_memory_stats  DMV, the memory_used_by_table_kb column represents the total amount of memory in use by the table, which includes the amount consumed by row versions. There’s no way to see the amount of memory consumed by row versions at the table or database level.

    SELECT CONVERT(CHAR(20), OBJECT_NAME(object_id)) 
          ,* 
    FROM sys.dm_db_xtp_table_memory_stats 

    tablememoryallocation

    Monitoring the Garbage Collection process

    To verify the current state of garbage collection, we can look at the output from the sys.dm_xtp_gc_queue_stats DMV. The output contains one row for each logical CPU on the server.

    SELECT * 
    FROM sys.dm_xtp_gc_queue_stats


        GCstatus

        If Garbage Collection is operational, we’ll see that there are non-zero values in the current_queue_depth column, and those values change every time we select from the queue stats DMV. If entries in the current_queue_depth column are not being processed or if no new items are being added to current_queue_depth for some of the queues, it means that garbage collection is not actively reclaiming memory, and as stated before, that might be ok, depending on memory pressure and/or transactional activity.

        Also remember that if we were modifying rows in a memory-optimized table variable, Garbage Collection could not have cleaned up any row versions.

        Blocking Garbage Collection

        The only thing that can prevent Garbage Collection from being operational is a long running transaction. That’s because long running transactions can create long chains of row versions, and they can’t be cleaned up until all of the queries that reference them have completed – Garbage Collection will simply have to wait.

        So – if you expect Garbage Collection to be active, and it’s not, the first thing you should check is if there are any long running transactions.

        Summing up

        Now you know about how the Garbage Collection process works for row versions, which types of memory-optimized objects you expect it to work with, and how to determine if it’s operational. There’s also a completely separate Garbage Collection process for handling data/delta files, and I’ll cover that in a separate post.


      Backup and Recovery for SQL Server databases that contain durable memory-optimized data

      With regard to backup and recovery, databases that contain durable memory-optimized tables are treated differently than backups that contain only disk-based tables. DBAs must be aware of the differences so that they don’t mistakenly affect production environments and impact SLAs.

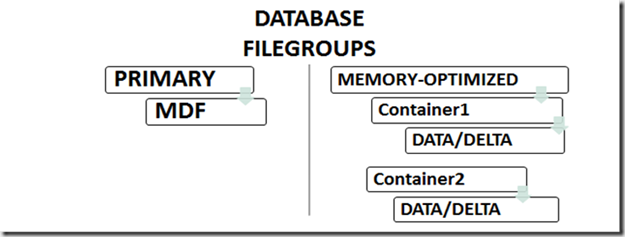
      The following image describes files/filegroups for databases that contain durable memory-optimized data:

      clip_image002

      Data/delta files are required so that memory-optimized tables can be durable, and they reside in Containers, which is a special type of folder. Containers can reside on different drives (more about why you’d want to do that in a bit).

      Database recovery occurs due to the following events:

      • Database RESTORE
      • Database OFFLINE/ONLINE
      • Restart of SQL Server service
      • Server boot
      • Failover, including
          • FCI
        • Availability Groups*
        • Log Shipping
        • Database mirroring

      The first thing to be aware of is that having durable memory-optimized data in a database can affect your Recovery Time Objective (RTO).

      Why?

      Because for each of the recovery events listed above, SQL Server must stream data from the data/delta files into memory as part of recovery.

      There’s no getting around the fact that if you have lots of durable memory-optimized data, even if you have multiple containers on different volumes, recovery can take a while. That’s especially true in SQL 2016 because Microsoft has raised the limit on the amount of memory-optimized data per database from 256GB to multiple TB (yes, terabytes, limited only by the OS). Imagine waiting for your multi-terabytes of data to stream into memory, and how that will impact your SLAs (when SQL Server streams data to memory, you’ll see a wait type of WAIT_XTP_RECOVERY).

      *One exception to the impact that failover can have is when you use Availability Groups with a Secondary replica. In that specific scenario, the REDO process keeps memory-optimized tables up to date in memory on the Secondary, which greatly reduces failover time.

      Indexes for memory-optimized tables have no physical representation on disk. That means they must be created as part of database recovery, further extending the recovery timeline.

      CPU bound recovery

      The recovery process for memory-optimized data uses one thread per logical CPU, and each thread handles a set of data/delta files. That means that simply restoring a database can cause the server to be CPU bound, potentially affecting other databases on the server.

      During recovery, SQL Server workloads can be affected by increased CPU utilization due to:

      • low bucket count for hash indexes – this can lead to excessive collisions, causing inserts to be slower
      • nonclustered indexes – unlike static HASH indexes, the size of nonclustered indexes will grow as the data grows. This could be an issue when SQL Server must create those indexes upon recovery.
      • LOB columns – new in SQL 2016, SQL Server maintains a separate internal table for each LOB column. LOB usage is exposed through the sys.memory_optimized_tables_internal_attributes and sys.dm_db_xtp_memory_consumers views. LOB-related documentation for these views has not yet been released.

      You can see from the following output that SQL 2016 does indeed create a separate internal table per LOB column. The Items_nvarchar table has a single NVARCHAR(MAX) column. It will take additional time during the recovery phase to recreate these internal per-column tables.

      image

      Corruption

      Because they don’t have any physical representation on disk (except for durability, if you so choose), memory-optimized tables are completely ignored by both CHECKDB and CHECKTABLE. There is no allocation verification, or any of the myriad other benefits that come from running CHECKDB/CHECKTABLE on disk-based tables. So what is done to verify that everything is ok with your memory-optimized data?

      CHECKSUM of data/delta files

      When a write occurs to a file, a CHECKSUM for the block is calculated and stored with the block. During database backup, the CHECKSUM is calculated again and compared to the CHECKSUM value stored with the block. If the comparison fails, the backup fails (no backup file gets created).

      Restore/Recovery

      If a backup file contains durable memory-optimized data, there is currently no way to interrogate that backup file to determine how much memory is required to successfully restore.

      I did the following to test backup/recovery for a database that contained durable memory-optimized data:

      • Created a database with only one durable memory-optimized table
      • Generated an INSERT only workload (no merging of delta/delta files)
      • INSERTed rows until the size of the table in memory was 20GB
      • Created a full database backup
      • Executed RESTORE FILELISTONLY for that backup file

      The following are the relevant columns from the FILELISTONLY output. Note the last row, the one that references the memory-optimized filegroup:

      image

      There are several things to be aware of here:

      • The size of the memory-optimized data in the backup is 10GB larger than memory allocated for the table (the combined size of the data/delta files is 30GB, hence the extra 10GB)
      • The Type for the memory-optimized filegroup is ‘S’. Within backup files, Filestream, FileTable and In-Memory OLTP all have the same value for Type, which means that database backups that contain two or more types of streaming data don’t have a way to differentiate resource requirements for restoring. A reasonable naming convention should help with that.
      • It is not possible to determine how much memory is required to restore this database. Usually the amount of memory is about the same size as the data/delta storage footprint, but in this case the storage footprint was overestimated by 50%, perhaps due to file pre-creation. There should be a fix in SQL 2016 RC0 to reduce the size of pre-created data/delta files for initial data load. However, this does not help with determining memory requirements for a successful restore.

      Now let’s have a look at a slightly different scenario — imagine that you have a 1TB backup file, and that you are tasked with restoring it to a development server. The backup file is comprised of the following:

      • 900GB disk-based data
      • 100GB memory-optimized data

      The restore process will create all of the files that must reside on disk, including files for disk-based data (mdf/ndf/ldf) and files for durable memory-optimized data (data/delta files). The general steps that the restore process performs are:

      • Create files to hold disk-based data (size = 900GB, so this can take quite a while)
      • Create files for durable memory-optimized data (size = 100GB)
      • After all files are created, 100GB of durable memory-optimized data must be streamed from the data files into memory

      But what if the server you are restoring to only has 64GB of memory for the entire SQL Server instance? In that case, the process of streaming data to memory will fail when there is no more memory available to stream data. Wouldn’t it have been great to know that before you wasted precious time creating 1TB worth of files on disk?

      When you ask SQL Server to restore a database, it determines if there is enough free space to create the required files from the backup, and if there isn’t enough free space, the restore fails immediately. If you think that Microsoft should treat databases containing memory-optimized data the same way (fail immediately if there is not enough memory to restore), please vote for this Azure UserVoice item.

      SQL Server log shipping within the AWS Cloud

      Much of what you see in the blogosphere pertaining to log shipping and AWS references an on-premises server as part of the topology. I searched far and wide for any information about how to setup log shipping between AWS VMs, but found very little. However, I have a client that does business solely within AWS, and needed a solution for HA/DR that did not include on-premises servers.

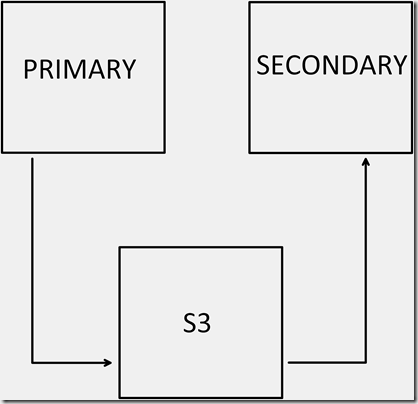
      Due to network latency issues and disaster recovery requirements (the log shipping secondary server must reside in a separate AWS region), it was decided to have the Primary server push transaction logs to S3, and the Secondary server pull from S3. On the Primary, log shipping would occur as usual, backing up to a local share, with a separate SQL Agent job responsible for copying the transaction log backups to S3. Amazon has created a set of Powershell functionality embodied in AWS Tools for Windows Powershell, which can be downloaded here. One could argue that Amazon RDS might solve some of the HA/DR issues that this client faced, but it was deemed too restrictive.

      image_thumb12

      S3 quirks

      When files are written to S3, the date and time of when the file was last modified is not retained. That means when the Secondary server polls S3 for files to copy, it cannot rely on the date/time from S3. Also, it is not possible to set the LastModified value on S3 files. Instead, a list of S3 file name must be generated, and compared to files that reside on the Secondary. If the S3 file does not reside locally, it must be copied.

      Credentials – AWS Authentication

      AWS supports different methods of authentication:

      1. IAM roles (details here)
      2. profiles (details here)

      From an administrative perspective, I don’t have and don’t want access to the client’s AWS administratove console. Additionally, I needed a solution that I could easily test and modify without involving the client. For this reason, I chose an authentication solution based on AWS profiles that are stored within the Windows environment, for a specific Windows account (in case you’re wondering, the profiles are encrypted).

      Windows setup

      • create a Windows user named SQLAgentCmdProxy
      • create a password for the SQLAgentCmdProxy account (you will need this later)

      The SQLAgentCmdProxy Windows account will be used as a proxy in for SQL Agent job steps, which will execute Powershell scripts. (NOTE: if you change the drive letters and or folder names, you will need to update the scripts in this post)

      from a cmd prompt, execute the following:

      Powershell setup

      (The scripts in this blog post should be run on the Secondary log shipping server, but with very little effort, they can be modified to run on the Primary and push transaction log backups to S3.)

      The following scripts assume you already have an S3 bucket that contains one or more transaction log files that you want to copy to the Secondary server (they must have the extension “trn”, otherwise you will need to change -Match “trn” in the script below). Change the bucket name to match your bucket, and if required, also change the name of the region. Depending on the security configuration for your server, you may also need to execute “Set-ExecutionPolicy RemoteSigned” in a Powershell prompt as a Windows Administrator, prior to executing any Powershell scripts.

      After installing AWS Tools for Windows Powershell, create a new Powershell script with the following commands

      Be sure to fill in your AccessKey and SecretKey values in the script above, then save the script as C:\Powershell\Setup.ps1. When this script is executed, it will establish an AWS environment based on the proxy for the SQL Agent job step.

      The next step is to create a new Powershell script with the following commands:

      Again you should substitute your bucket and region names in the script above. Note that after the files are copied to the Secondary, the LastModifiedTime is updated based on the file name (log shipping uses the UTC format when naming transaction log backups). Save the Powershell script as C:\powershell\CopyS3TRNToLocal.ps1

      SQL Server setup

      • create a login for the SQLAgentCmdProxy Windows account (for our purposes, we will make this account a member of the sysadmin role, but you should not do that in your production environment)
      • create a credential named TlogCopyFromS3Credential, mapped to SQLAgentCmdProxy (you will need the password for SQLAgentCmdProxy in order to accomplish this)
      • create a SQL Agent job
      • create a job step, Type: Operating System (CmdExec), Runas: TlogCopyFromS3Credential

      Script for the above steps

      • Change references to <DomainName> to be your domain or local server name, and save the script
      • Execute the job
      • Open the job and navigate to the job step. In the Command window, change the name of the Powershell script from Setup.ps1 to CopyS3TRNToLocal.ps1
      • Execute the job
      • Verify the contents of the C:\Backups\logs folder – you should now see the file(s) from your S3 bucket

      Troubleshooting credentials

      If you see errors for the job that resemble this:

      InitializeDefaultsCmdletGet-S3Object : No credentials specified or obtained from persisted/shell defaults.

      then recheck the AccessKey and SecretKey values that you ran in the Setup.ps1 script. If you find errors in either of those keys, you’ll need to rerun the Setup.ps1 file (change the name of the file to be executed in the SQL Agent job, and re-run the job). If you don’t find any errors in the AccessKey or SecretKey values, you might have luck with creating the AWS profile for the proxy account manually (my results with this approach have been mixed). Since profiles are specific to a Windows user, we can use runas /user:SQLAgentCmdProxy powershell_ise.exe to launch the Powershell ISE, and then execute the code from Setup.ps1.

      You can verify that the Powershell environment uses the SQL proxy account by temporarily adding $env:USERNAME to the script.

      S3 Maintenance

      When you setup log shipping on the Primary or Secondary, you can specify the retention period, but S3 file maintenance needs to be a bit more hands on. The following script handles purging local and S3 files with the extension “trn” that are more than 30 days old, based on UTC file name.

      Save the script, and create a SQL Agent job to execute it. You’ll also have to reference the proxy account as in the prior SQL Agent job.

      Don’t forget

      If you use log shipping between AWS VMs as outlined in this post, you will need to disable/delete the SQL Agent copy jobs on the Primary and Secondary servers.

      Disaster Recovery

      All log shipping described here occurs within the AWS cloud. An alternative would be to ship transaction logs to a separate storage service (that does not use S3), or a completely separate cloud. At the time of this writing, this blog post by David Bermingham clearly describes many of the issues and resources associated with HA/DR in AWS.

      “Hope is not a strategy”

      HA/DR strategies require careful planning and thorough testing. In order to save money, some AWS users may be tempted to create a Secondary instance with small memory and CPU requirements, hoping to be able to resize the Secondary when failover is required. For patching, the ‘”resize it when we need it” approach might work, but for Disaster Recovery it can be fatal. Be forewarned that Amazon does not guarantee the ability to start an instance of a specific size, in a specific availability zone/region, unless the instance is reserved. If the us-east region has just gone down, everyone with Disaster Recovery instances in other AWS regions will attempt to launch them. As a result, it is likely that some of those who are desperately trying to resize and then launch their unreserved Disaster Recovery instances in the new region will receive the dreaded “InsufficientInstanceCapacity” error message from AWS. Even in my limited testing for this blog post, I encountered this error after resizing a t1-micro instance to r2.xlarge, and attempting to start the instance (this error persisted for at least 30 minutes, but the web is full of stories of people waiting multiple hours). You could try to launch a different size EC2 instance, but there is no guarantee you will have success (more details on InstanceCapacity can be found here).

      The bottom line is that if you run a DR instance that is not reserved, at the precise moment you require more capacity it may be unavailable. That’s not the type of hassle you want when you’re in the middle of recovering from a disaster.

      I am indebted to Mike Fal (b) for reviewing this post.