Author Archives: Ned Otter

Trials and Tribulations of SQL Transactional Replication

I’ve dealt with SQL replication for decades, and in a sense, not a lot has changed. I mean this from a basic configuration and troubleshooting perspective, though it has in some ways been extended a bit through the years, for new SQL Server features (like In-Memory OLTP, Azure, etc.).

Many refer to replication as the the Swiss Army Knife of SQL Server, and I can understand why, but with this “extreme flexibility” comes “extreme shortcomings”, and this post will delve into some of the issues you should be aware of.

Many have blogged about SQL replication, but Kendra Little (b|t) stands out – her posts are clear and concise, and you will always learn something from her.

But despite having read all of her posts about replication, and those of many others, when I started my current role almost 3 years ago, I was woefully ignorant of many facets of the replication feature.

This post is my effort to save you some of the pain and head scratching that I’ve endured!

Gotcha #1: you want to go parallel for initial sync

Much of the pain of SQL replication occurs when tables/articles are large. Setting up subscribers to receive terabytes of data requires changing some very specific things in very specific places, in order to have a chance of going parallel.

Unfortunately, the out-of-the-box defaults for replication place you squarely in the single-threaded camp. The Snapshot Agent can be configured with a setting named maxbcpthreads that can make snapshot generation much faster by using parallel threads to generate the snapshot.

The catch?

It’s ignored unless the sync_method for the publication is native. Now you might have looked at the docs and determined that in fact you’re already getting native snapshots, because you are using the default sync_method of concurrent, but your snapshot will still be generated by a single thread with concurrent. In order to get parallel snapshot generation, you must have a sync_method of native and use the maxbcpthreads switch on the Snapshot Agent job step. You have been warned!

Gotcha #2: Agent job naming sucks

Deploying replication generates tons of SQL Agent jobs, especially if you use push subscriptions, and you have the distribution database on the publisher. If you have long publication names (or even if you don’t), when it comes time to look for a specific job, it can be difficult to discern which ones are for generating snapshots, which are for distribution, etc. That’s why I always rename my replication jobs according to function/category. I append “_Snapshot” or “_Distribution” to the relevant jobs, using a script.

Doing this might make it impossible from other places in the UI to bring up the proper job when drilling down in Replication Monitor, but I don’t use the monitor for that – it’s a sacrifice I’m willing to make.

Gotcha #3: Password rotation can break replication

Most companies have a password rotation policy for domain users, as well as domain service accounts. If you use a domain account for anything having to do with replication agent security, obviously the SQL Server environment will have no knowledge of this password rotation. So while using domain accounts is sometimes unavoidable when using replication, the runbook you use for password rotation should include this often-overlooked area.

Gotcha #4: Replication cleanup issues

The default batch size for replication cleanup is 5,000 records. If you are in charge of a very busy system, the replication cleanup process will never catch up, and your distribution database will continue to grow. Depending on where you have the distribution database located, this could affect your production databases, because the drive can run out of space.

The cleanup job runs often by default, and so if you change the batch size to something larger, it might cause blocking in your system.

A different approach – if you have the storage to handle it – is to schedule the cleanup job so that it doesn’t run at all during the week, and use a large batch size when it runs on the weekend (assuming you have a maintenance window to actually do this type of work on weekends).

Gotcha #5: Not likely to get compression for your snapshots

The rules around getting compression for snapshots are baffling and mysterious. There is some “2GB per file” rule that I can never seem to find a way to have properly observed, and so I’ve never been successful at creating compressed snapshots. Mind you, generating compressed snapshots is not likely to be any faster than uncompressed snapshots, and in fact is likely to be slower. But if you have not-so-great bandwidth, then it would be great to not send all that data across the wire.

The documentation for snapshot compression is located here (search for “Compressed snapshots”).

Gotcha #6: Initializing from a backup will probably not float your boat

Now before you comment below and tell me that you’ve read the paper written by Robert Davis and Kenneth Fischer about initializing from a filegroup backup, most databases in the wild have tons of user tables on the PRIMARY filegroup, and so are not really candidates for what’s described in that paper.

The main issue is that you can’t really recover just a slice (or multiple slices) of your database to initialize a subscriber. You have to install PRIMARY plus the filegroups that you’re interested in, and that’s too large 99% of the time. Or you restore your entire database backup, then delete what you don’t want. But you’ll have to disable/remove Foreign Keys, etc.

Other than for demos and/or really small databases, I don’t see how this path will work.

Gotcha #7: No easy/good way to filter horizontally if > 1 table is involved

See my thread with the late, great Robert Davis here.

Gotcha #8: Log Reader woes

The log reader will sometimes stop running, and if that happens, you won’t receive any warning/error, unless you’re polling for that. Perhaps a better way is to add Retry attempts to the job step. That will work, but you’ll have to remember to re-add that retry for each log reader when you build a new environment.

Gotcha #9: DR sucks with SQL replication

How will you handle setting up replication in a DR environment? One possibility is to automagically script the entire PRD replication environment on some type of schedule, and then modify the server names in those scripts for deployment to DR. But no matter how you handle deploying replication to DR, you will still have to initialize the new DR subscribers, and as described in Gotcha #1, that can be painful.

Gotcha #10: Rows deleted at the subscriber will break distribution

For transactional replication, I can’t think of a good reason that writes should be allowed on subscription databases. But if they are allowed, eventually someone will delete a row that appears in the distribution database, and when the change to that row is attempted at the subscriber, it will of course fail. And all of the rows behind it in the distribution database will also fail to be distributed.

You can work around this – even on a temporary basis, just to get past it – by choosing a different profile for the Distribution Agent. I believe they even have some that are canned for getting past this specific error. It will allow your distribution database to stop growing, but unless you want to leave this profile in place permanently, you’ll eventually have to reinitialize at least the offending article in the relevant publication, and switch back to the default/former profile.

Gotcha #11: Nothing sucks worse than schema changes to replicated tables

Why? Because they force you to do the following:

  • remove the table from replication
  • make the schema change at the publisher
  • add the table back to the subscription
  • reinitialize the subscriber(s) (that’s right, you’re back to Gotcha #1 if your tables are large)

If done properly, the snapshot you generate will only include the table you removed from the subscription and added back. But if that table is large, it can still be painful. Also, It’s easy to make a mistake when removing a table/article from a subscription.

Of course, using AGs removes this hassle, because schema changes will simply flow through to secondary replicas via the log blocks that are sent to them (your send and redo queues will explode for large tables…). But hey, if you could be running AGs, you’d probably never have deployed replication in the first place.

Gotcha #12: CI/CD woes

Thought your CI/CD pipeline meant “push button” deployments? Think again, because CI/CD has no idea that you have tables that are replicated. This causes DBAs to get involved with deployments due to Gotcha #11. 

Gotcha #13: Monitoring for replication errors/latency

There’s nothing out-of-the-box that I’m aware of that properly handles monitoring the facets of transactional replication that most shops would be interested in.

For example – it might be fine during the day to have 10 million rows pending, but at night when ETL jobs are executing, that threshold might need to be increased to 20 million.

But what if the number of pending rows was within the allowable threshold but did not decrease after 20 minutes? Or after 40 minutes? Every shop will likely want to tweak this kind of monitoring, but you’ll probably have to roll your own and execute it across all environments where replication is deployed, and take appropriate action.

Sometimes, everything can look fine – no latency – but replication is “down”, because the log reader is down. My point is there are many things that can contribute to a replication failure.

Kendra has an excellent post on monitoring replication here.

Be forewarned that any script that literally counts the number of undistributed commands can be very slow in doing so. Imagine an environment where several publications have millions of rows pending in the distribution database – it would probably take longer to count them all than you have as a threshold for monitoring latency.

That’s why when I had to solve this problem, I cycled through each publication, and stored the out put of calling sp_replmonitorpendingcmds  to a table, and then alerted if required.

Gotcha #14: Immediate_sync is misunderstood

Most DBAs don’t really understand what this setting is used for, and that out-of-the box settings for it can cause you to have to….reinitialize.

If a subscription is set to sync immediately (immediate_sync = 1, which is the default), the data is kept in the distribution database for a specific period of time (72 hours by default). This allows new subscribers to be synced “immediately”, without having to create a new snapshot. But if a subscriber goes offline for too long, you will have to…..reinitialize.

In my current role, I set immediate_sync to 0 for all subscriptions. I’ve only got 2 subscribers, and I’m ok with having to generate a new snapshot for a new subscriber (which never happens). 

But I don’t want SQL server telling me when I have to reinitialize.

Mohammed Moinudheen wrote an excellent post here about retention periods for replication.

Mohammed Moinudheen also wrote an excellent post here about immediate_sync.

Gotcha #15: Replication takes precedence over AGs, by default

If you replicate a subset of data from a database that belongs to an asynchronous AG, you should know that the default behavior is that the Log Reader won’t harvest transactions to send to subscribers that have not yet been sent to the AG secondary replicas.

That means your production database transaction log can’t be cleared of these transactions, and will continue to grow, potentially affecting your production environment. You’ll need Trace Flag 1448 to solve this, and luckily it takes effect immediately.

Andy Mallon wrote an excellent post on TF 1448 here.

TF 1448 only applies to async replicas. If you’re running synchronous replicas, the default behavior still applies – subscribers don’t receive new data until the sync replicas have been hardened.

More “gotchas”

Undocumented “gotchas” of transactional replication by Robert Davis can be found here.

I’m sure there are tons more gotchas for transactional replication, but these are the most glaring I’ve tripped across.
SQL 2019: Always Encrypted with Secure Enclaves, Part 2

In the first post of this series, we explored the requirements for using Always Encrypted with secure enclaves, as well as some of the limitations.

For this post, we’ll be using Powershell to install and configure the HGS server (required for “attestation”) as well as executing the steps required to configure the SQL 2019 server to work with HGS.

Full requirements for running Always Encrypted with secure enclaves can be found here. Operating system requirements are:

  • HGS server running Windows Server 2019, Standard or Datacenter edition
  • SQL Server running Windows Server 2019 Datacenter edition
  • SSMS 18.0 and later for testing (we won’t be running an application server)

Both the client and SQL Server must have connectivity to the HGS environment, and we’ll be using SSMS as the client. SSMS 18.0+ is required because it has the ability to alter the connection string to support Always Encrypted.

We’ll be using VMs for this scenario, and we could use SSMS on the host, but to keep things simple, we’ll be using SSMS on the SQL instance. However, you should never do this in the real world. Why?

The first reason is that Always Encrypted is designed to allow for role separation between those who own the data, and those who manage the data environment (DBAs). In the examples that follow, if a single person is using SSMS, generating the certificates, and subsequently encrypting data, there isn’t any separation of roles.

Again, I want to reiterate that for real-world usage, you should never have a single person do what’s outlined in the examples that follow – sample code is for proving concepts only. Details about using SSMS to deploy Always Encrypted can be found here.

The second reason you should not use SSMS on the SQL instance to provision keys and deploy encryption is that data can be leaked. More details about that here.

The main point from that link is:

“Make sure you run key provisioning or data encryption tools in a secure environment, on a computer that is different from the computer hosting your database. Otherwise, sensitive data or the keys could leak to the server environment, which would reduce the benefits of the using Always Encrypted.”

HGS

HGS can perform attestation using more than one method:

  1. Host Key
  2. Trusted Platform Module (TPM)

HGS and its implementation in your organization are vast topics, and detailed information about HGS attestation can be found here.

Microsoft recommends TPM for production environments and Host Key for lower environments, but it should be noted that many of the benefits of using TPM are reduced or eliminated if SQL Server runs virtualized.

Using an enclave with Always Encrypted is new to SQL 2019. Virtualization Based Security (VBS) is used to create the enclave, and is a feature of the Windows Hypervisor.

From the documentation:

“In the VBS enclave trust model, the encrypted queries and data are evaluated in a software-based enclave to protect it from the host OS. Access to this enclave is protected by the hypervisor in the same way two virtual machines running on the same computer can’t access each other’s memory. In order for a client to trust that it’s talking to a legitimate instance of VBS, you must use TPM-based attestation that establishes a hardware root of trust on the SQL Server computer. The TPM measurements captured during the boot process include the unique identity key of the VBS instance, ensuring the health certificate is only valid on that exact computer. Further, when a TPM is available on a computer running VBS, the private part of the VBS identity key is protected by the TPM, preventing anyone from trying to impersonate that VBS instance.

 Secure Boot is required with TPM attestation to ensure UEFI loaded a legitimate, Microsoft-signed bootloader and that no rootkits intercepted the hypervisor boot process. Additionally, an IOMMU device is required by default to ensure any hardware devices with direct memory access can’t inspect or modify enclave memory.

These protections all assume the computer running SQL Server is a physical machine. If you virtualize the computer running SQL Server, you can no longer guarantee that the memory of the VM is safe from inspection by the hypervisor or hypervisor admin. A hypervisor admin could, for example, dump the memory of the VM and gain access to the plaintext version of the query and data in the enclave. Similarly, even if the VM has a virtual TPM, it can only measure the state and integrity of the VM operating system and boot environment. It cannot measure the state of the hypervisor controlling the VM.”

TPM is much more complicated to deploy, which is why we’ll be using Host Key attestation.

When you install the HGS feature, a Windows Server Failover Cluster (WSFC) is created, even if you only have only a single node. Presumably this is to allow you to add HA capabilities, i.e., additional nodes. DNS and Active Directory are also installed on the HGS cluster, and corporate DNS solutions will have to forward relevant requests to the HGS cluster. The HGS node also becomes a Domain Controller.

Here are the steps we’ll be following to deploy and configure the HGS server for for Host Key attestation:

  • install the Host Guardian Service role
  • define a domain name
  • define a password for the Directory Services restore mode
  • install the HGS server, referencing the domain name and password that we defined
  • initialize HGS Attestation, giving a name to the service, and specifying that we want to use TrustHostKey
  • copy the certificate from the SQL 2019 host to the HGS server
  • add that host key to HGS attestation
  • create self-signed certificates for HGS attestation and key protection
  • export those certificates to files
  • display the thumbprints for the each of the new certificates
  • add those thumbprints to protect the encryption and signing certificates within HGS
  • initialize the HGS server with the certificates we just created
  • validate the HGS environment (assumes you have completed configuration on the SQL host, which was not included in these steps)

The first steps are to create two VMs in Hyper-V, and make sure that one of them is running Windows 2019 Datacenter. I did this on my Windows 10 laptop, which has the following specs:

  • 32GB memory
  • 2TB external Samsung T5 connected via Thunderbolt

VM specs:

  • HGS, 3GB of memory, and 2 vCPU
  • SQL Server, 4GB of memory, 4 vCPU (our PoC will use almost zero resources)

On the server running Datacenter, rename the machine to “SQL2019VM”, and install SQL 2019

On the other VM, (where we’ll be installing HGS), open Powershell ISE with Administrator privileges, and save the following code as a script. The code assumes that you will be adding a SQL Server host named SQL2019VM to the HGS environment.

I’m using “supersonic.local” for the HGS domain name.

If you didn’t encounter any errors, you can move on to configuring the SQL2019VM.

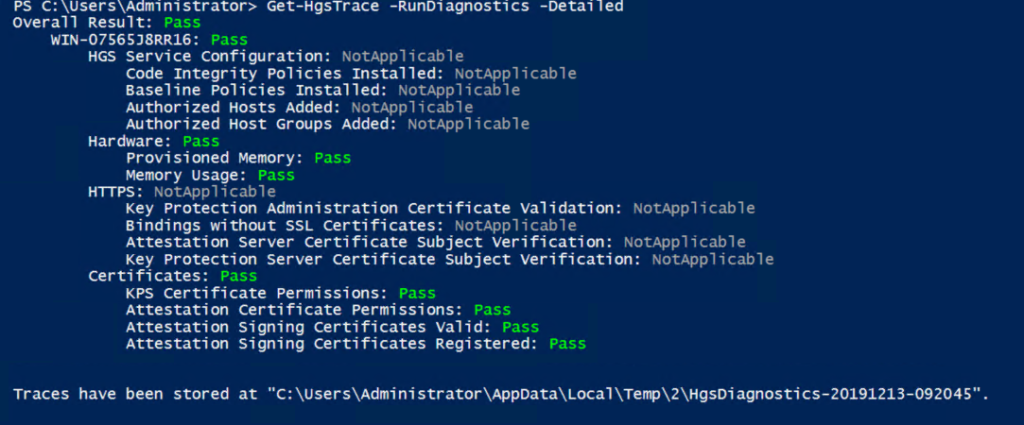
There’s no point in going further if both the SQL VM and the HGS VM don’t validate properly. If you have errors on the HGS server or the SQL Server, carefully check the code you ran, and perhaps retry.

Here’s an example of the type of output you would hope to see from executing Get-HgsTrace:

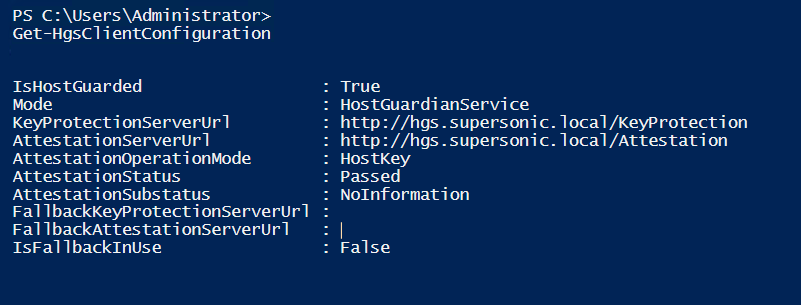
Here’s an example of the type of output you would hope to see from executing Get-HgsClientConfiguration:

Certificates

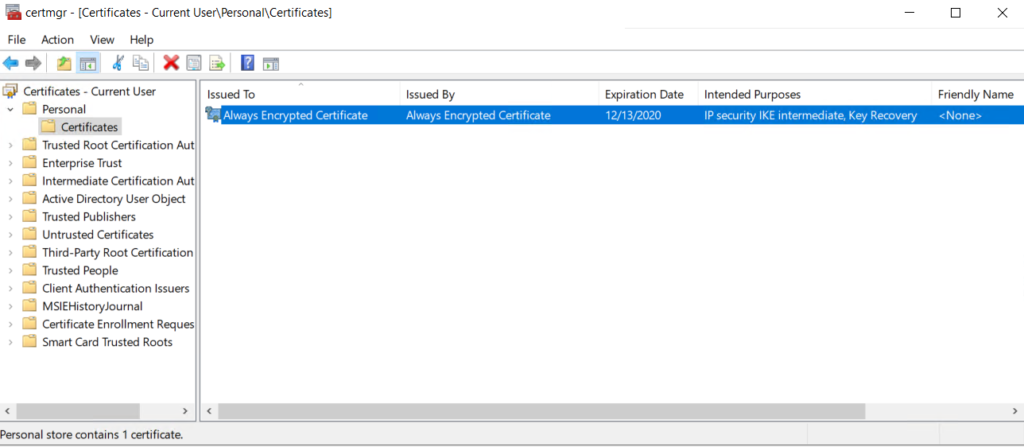
On the SQL2019VM server, verify that the certificates for the current user were properly created by going to a command prompt and executing:
certmgr.msc /f /y

On the HGS server, verify that the certificates for the local machine were properly created by going to a command prompt and executing:
certlm.msc

Sample output for the current user:

Sample output for the local machine:

Assuming everything looks ok, we can begin to configure SQL Server – we’ll tackle that in the next post.

SQL 2019: Always Encrypted with Secure Enclaves, Part 1

I’m going to start this blog post series with a basic introduction to what’s required in order to deploy Always Encrypted with Secure Enclaves, and how the pieces fit together.

First, some background on using encryption with SQL Server.

Cell/column-level

Column-level encryption is described here.

It uses certificates to encrypt data, and the application must change in order to do the actual encryption/decryption. As you can imagine, changing applications is not too popular. Both the certificates and the data are available to highly privileged technology staff (DBAs).

At rest

Transparent Data Encryption also known as TDE, encrypts data “at rest”. You can’t restore or attach a database or database backup to a server that doesn’t have the same certificate as the source environment.

TDE has been the defacto standard for encrypting SQL Server databases for ages. It’s even been recently enhanced to allow you to pause and resume, which is great functionality to have for large databases.

See this link for more details on pausing and restarting TDE.

TDE is I/O based encryption. That means SQL Server processes that circumvent the I/O stack can’t use it. This was the case for SQL 2016, if you used NVDIMM-N/PMEM, because those hardware solutions for storage latency circumvent the I/O stack (that changes in SQL 2019, where using the Hybrid Buffer Pool allows you to use TDE).

The Database Encryption Key (DEK) resides in the database boot page of the encrypted database, so that it can be referenced during database recovery.

The main issue with TDE from a compliance/auditing perspective, is that highly privileged users (DBAs and sysadmins) have access to both the database and the encryption keys.

In transit

TDE is great for encrypting data “at rest” but doesn’t handle encrypting data “across communication channels”, as the documentation states.

For “across the wire” encryption, you’ll need to use TLS, and configure things properly. Details here.

In use

Always Encrypted resolves the “highly privileged user” issue – the certificates used for encryption don’t reside in the SQL Server environment. Data can only be decrypted on the client, so it’s also encrypted in transit. And unlike TDE, data is also encrypted in memory.

Using Always Encrypted in SQL 2016/2017 has limited functionality, including (but not limited to) the following:

  • Initial encryption and key rotation required moving all data to be encrypted out of the database, encrypting it, and writing it back to the database (encryption happens on the client)
  • Columns that were randomly encrypted could only be referenced by equality predicates
  • It was not possible to index columns with random encryption

Enter the Enclave

SQL 2019 supports an enhanced version of Always Encrypted, known as “Secure Enclaves”. What is an enclave? It’s like a consulate: “….a state that is enclosed within the territory of another state”.

It takes the form of a protected region of memory within the SQL Server environment, requiring special credentials for access. Data in the secure enclave lives in an unencrypted state.

However, as I’ll discuss later in this series, depending on how your organization implements Always Encrypted with Secure Enclaves, it might not be as secure as you had hoped.

HGS and Attestation

Client applications need to be assured that the enclave they are connecting to (on the SQL Server) is safe and secure. That’s were “attestation” comes in – a separate computer/VM assumes the responsibility of attesting to the validity of the enclave. This attestation comes in the form of a Windows service named “Host Guardian Service”, or HGS.

There are at least three required components for encrypting/decrypting data using Always Encrypted with Secure Enclaves:

  • Client/application server
  • SQL Server
  • HGS server

Clients (i.e. an app server) and SQL Server must have connectivity to the HGS server.

Data in the enclave is plaintext, which allows SQL Server to delegate non-equality comparisons to the enclave. A DLL resides in the enclave that allows this to happen.

HA/DR

Just like your production SQL Server instance, your production HGS environment should be redundant. Microsoft supports creating a Windows Server Failover Cluster (WSFC) for HGS, and in this specialized form of a WSFC, there is no shared storage.

For lower environments, you might consider running HGS on a single computer, but you should be aware that if the HGS environment suffers an outage, queries against encrypted data fail.

Unlike other forms of encryption for SQL Server, Always Encrypted uses the client side to encrypt/decrypt data. In this context, “client side” could be an application server, but it could also be a properly configured SSMS session.

What the enclave buys you

Not unlike many 1.0 features, Always Encrypted – which was released in SQL 2016 had many severe limitations that prevented it from being widely adopted. There were no changes to Always Encrypted in SQL 2017.

Some of the limitations of using Always Encrypted without an enclave are addressed when using an enclave:

  • Initial encryption and key rotation allow encryption “in place”
  • Non-equality predicates are supported, i.e. LIKE, >=, <=
  • Creating indexes on columns with random encryption

Under certain circumstances enclaves won’t be able to manage your encrypted data “in place”. So where does it go? The encrypted data to be manipulated must be copied to the memory on the client, unencrypted, manipulated, re-encrypted, and sent back to the enclave, which sends it to the database. That could be incredibly painful, but as usual, it depends.

Under the hood

The initial size of the enclave is 29 kilobytes, and it can grow to a maximum size of 35 megabytes. The amount of memory allocated to the VM or physical server does not affect the size of the enclave.

The enclave can grow, but once it grows it cannot shrink.

The size of the enclave can be interrogated in sys.dm_column_encryption_enclave

Don’t ditch that TDE just yet

You’re not supposed to be using Always Encrypted on your entire database – it’s meant to be used on specific columns, and in conjunction with TDE (not instead of it).

Why, you might ask?

I can think of at least three reasons:

  • Performance impact: client-side encryption has overhead
  • Storage impact: using Always Encrypted on a significant number of columns in your database could drastically increase the storage footprint. See “cyphertext length” at this link for more info.
  • Risk: if you remove TDE, it’s even easier for rogue folks to get a hold of your data. Maybe not the columns encrypted with Always Encrypted – but all the other formerly TDE-encrypted data is exposed to anyone that has access. All they have to do is grab a backup, and restore it on another instance of SQL Server.

SSMS

Microsoft has done a great job of making our lives easier, specifically in SSMS. The client driver knows which columns are encrypted with Always Encrypted (encryption metadata is cached), and if you reference one of those columns in a query and use a variable as a predicate, the client driver converts this to a parameterized query behind the scenes.

More details about how .NET automagically works with Always Encrypted can be found here.

High level limitations

Always Encrypted still has a lot of limitations, but mainly what you have to do is change the way you think about how SQL Server operates on data.

For example, you can’t do the following in a stored procedure, if the column is encrypted with Always Encrypted:

Why will this fail?

Because Always Encrypted is specifically designed to disallow this behavior.

Remember – only the client side can encrypt/decrypt data – SQL Server has no ability to do this. In this scenario, SQL Server must insert data that’s already encrypted. But the data referenced above is “plain text”, so the INSERT will fail. Predicates used withing stored procedures that will be compared with Always Encrypted columns must also be encrypted, and that includes parameters.

SQL Server data masking

Always Encrypted is not compatible with data masking or user-defined types (UDT). That’s unfortunate, as many companies have a requirement to obfuscate data in lower environments.

Linux support

Support for secure enclaves is on the roadmap for Always Encrypted on Linux. Secure enclaves in its present form uses Virtualization Based Security (VBS) which is a Windows thing, so Linux can’t use VBS. Microsoft will implement secure enclaves on Linux based on Intel SGX. More info about SGX can be found here.

Availability Groups

All replicas must be configured to use a secure enclave in order to be fully functional. If a secure enclave is not configured for a replica, and a query is executed on the replica that references encrypted columns, the query will fail.

Backup/Restore

Restore is similar to AGs in that a secure enclave must be configured in order to run queries against encrypted columns. But restore also has an additional requirement. Remember that the enclave must be attested to by a computer running HGS. Therefore, if you create a backup of a production database that uses a secure enclave, and restore it in a lower environment (which likely has its own HGS configuration), unless you re-encrypt the data with the lower environment certificate (this is known as key rotation), your queries will fail. You can rotate the keys without an enclave, but it will not be done “in-place” – all encrypted data will have to be copied to the client, decrypted, re-encrypted, and written back to the database.

Replication

Only columns that are not encrypted with Always Encrypted can be replicated. I tested this with Transactional Replication, and it works.

In the next post, we’ll configure Always Encrypted in SQL 2019 to use a secure enclave.

SQL 2019: PMEM, Enlightenment, and the Hybrid Buffer Pool

f you pay attention to hardware innovations as they relate to SQL Server, you’ve probably heard of PMEM, aka Persistent Memory, or Storage Class Memory. I blogged about PMEM in October of 2016, when HP Gen9 servers first started to support it (my post is here). If you are unfamiliar with PMEM, I suggest you read that post and watch the linked videos, before reading further.

With the impending release of SQL 2019, things are about to change in potentially big ways with regard to drastically reducing storage latency.

But first let’s reiterate how PMEM is supported on SQL Server 2016 running on Windows Server 2016.

SQL 2016 supports placing the “tail of the log” on a PMEM device (NVDIMM-N modules), which had the effect of reducing or eliminating WRITELOG waits. I was quite interested in that specific wait type, because of my keen interest in the In-Memory OLTP feature. If by deploying Hekaton you removed some of the bottlenecks associated with the traditional engine, usually the next bottleneck that appeared was the transaction log itself, in the form of WRITELOG waits. The log could keep up when the traditional engine was the bottleneck, but PMEM can bypass the storage stack, and it often eliminates or reduces transaction log latency. However, PMEM cannot do this alone — it must be used in conjunction with an application specifically written to leverage its capabilities (like SQL Server).

One issue for adopting PMEM for tail of the log on Windows Server 2016 is the fact that there is no support for TDE (but see the Hybrid Buffer Pool section below). Also, in the first release of PMEM from HP, there was limited capacity. This was not an issue because the tail of the log only consumes about 20MB per database (that’s not a typo, it’s megabytes), and the minimum size of a NVDIMM-N module was 8GB. For tail of the log on Windows Server 2016, you had way more PMEM capacity than required.

General restrictions/potential issues with deploying NVDIMM-N PMEM (not specific to any version of Windows Server or SQL Server) include:

  • it occupies memory slots that could otherwise be used by DRAM, thereby reducing the total memory capacity on the server

  • It’s not compatible with LRDIMMS

HP now makes NVDIMMs that operate at two different speeds. If using NVDIMMs that are slower than DRAM, all memory on the server will run at the slower speed. HP Gen10 servers support NVDIMMs that run at 2666Mhz, which matches the upper clock speed of RDIMMs (which they are compatible with). In that case, there should not be any server-level reduction in memory speed.

PMEM can be formatted as block storage – which will always navigate the storage stack – or as DAX (Direct Access) – which bypasses the storage stack. PMEM formatted as DAX can be considerably faster than when formatted as block storage (see section on TDE below, about DAX formatted PMEM still navigating the storage stack). Files placed on a DAX formatted volume become “memory-mapped”, and are byte-addressable.

Intel Optane DC Persistent Memory

Intel has recently joined the field, offering PMEM in the form of Intel Optane DC Persistent Memory, which has capacities large enough to host database files. It can operate in three modes:

  1. Memory mode – in this mode, Optane will not be persistent – data will be lost if there is a power failure or server shutdown/boot. Actual DRAM on the server is used as a hot tier with the memory capacity seen by the OS equivalent to the amount of Optane PMEM on the server.

  2. App Direct – this mode is used to persist data without navigating the storage stack, in conjunction with an application designed to take advantage of it (like SQL Server).

  3. Mixed mode – allocate some capacity to memory mode and some to App Direct mode.

At MS Ignite 2018, Cosmos Darwin demonstrated a reference architecture that used Intel Optane DC, and it achieved almost 14 million IOPS (the Ignite video can be seen here).

Anandtech reviewed a 512GB Intel Optane (Apache Pass) module here. Another thing to be aware of is that in order to use Intel Optane modules, your server must be running Cascade Lake CPUs (like Coffee Lake).

SQL version support for PMEM

SQL 2017 on Windows Server 2016 behaves the same as SQL 2016 on Windows Server 2016 – “tail of the log” is supported. However, there is no support for PMEM with SQL 2017 on supported Linux distributions (except as a traditional block store). Using PMEM with SQL 2019 on Linux supports what’s known as “enlightenment”, which allows us to place data and log files on DAX formatted volumes, thereby reducing latency considerably. SQL 2019 on Linux also support “tail of the log”.

To recap, for NVDIMM-N and Optane:

  • Windows Server 2016/Windows Server 2019 tail of the log: supported for SQL 2016, SQL 2017, and SQL 2019

  • Windows Server enlightenment: not available

  • Linux tail of the log: supported on SQL 2019

  • Linux enlightenment: supported for data and log files on SQL 2019

Hybrid Buffer Pool

As of SQL 2019 CTP 3.0, PMEM can be used with SQL Server 2019 running on Windows Server 2019 or supported Linux distributions to create what’s known as a Hybrid Buffer Pool. Think of it as a combination of traditional buffer pool memory (but for clean pages only), plus memory-mapped files. If the pages are clean, the engine will either reference the relevant pages in the traditional area of the hybrid buffer pool, or memory-mapped files on PMEM. This will be transparent to the user and/or application, but DBAs and application developers should be aware of the potential repercussions (the documentation for the Hybrid Buffer Pool can be found here).

Earlier in this post, I mentioned that TDE is not compatible with PMEM for Windows Server 2016, for which the only PMEM use case was tail of the log. However, if you use the Hybrid Buffer Pool, it’s now possible to use TDE if PMEM is installed (for both Windows Server 2019 and supported Linux distributions).

If we use enlightenment, data and log files would be memory-mapped, circumventing the storage stack – BUT – if you then enable TDE, even though the files are memory-mapped, they will be accessed as a block device, which requires navigating the storage stack. In this scenario, it might not make sense to have placed your data files on an enlightened device. But this should be verified though rigorous testing.

In addition to TDE, other features/settings that cause SQL Server to navigate the storage stack for DAX formatted PMEM are:

  • page verification of torn page

  • anything that uses the persistent version store (the only feature I’m aware of in SQL 2019 that uses PVS is Accelerated Database Recovery)

Some astute readers might be wondering why you’d want to use enlightenment on Linux, and not just use HBP from the start. Keep in mind that as stated above, the Hybrid Buffer Pool is only for clean pages that don’t exist in the buffer pool, so that’s a limitation you’ll have to consider.

Another way to think of it is that the Hybrid Buffer Pool is ideal for a workload that is very heavy on the read side (normally causing buffer pool thrashing or needing to access lots of pages outside the buffer pool), while enlightenment can optimize both reads and writes.

It’s not known at this time if the Hybrid Buffer Pool will be an Enterprise-only feature.

Syntax

Enabling the Hybrid Buffer Pool can be done at the instance or database level.

Instance-level syntax:

ALTER SERVER CONFIGURATION SET MEMORY_OPTIMIZED HYBRID_BUFFER_POOL = ON;

ALTER SERVER CONFIGURATION SET MEMORY_OPTIMIZED HYBRID_BUFFER_POOL = OFF;

Database-level syntax:

ALTER DATABASE <databaseName> SET MEMORY_OPTIMIZED = ON;

ALTER DATABASE <databaseName> SET MEMORY_OPTIMIZED = OFF;

Despite the fact that “memory-optimized” appears in this syntax, it should be noted that enabling/disabling an instance or database for Hybrid Buffer Pool has nothing to do with the In-Memory OLTP feature, which the documentation may also refer to as “memory-optimized” databases.

Also potentially significant is the fact that the syntax for enabling/disabling Hybrid Buffer Pool may change before RTM.

Cost

If you check the pricing on the web, you can see that 128GB Optane PMEM costs around $2,000, 256GB costs almost $7,000, and 512GB costs over $21,000. And don’t forget, that does not  include the cost of Xeon Gen 2 CPUs, which are required.

Xeon Gen2 processors are listed here, with core counts from 4 to 56.

Supermicro supports Xeon Gen2 CPUs, and pricing for one of their servers can be seen here:

At that link, support for larger amounts of memory costs between $21,000 and $42,000 per cpu, and the fastest CPUs have a very high core-count (often 24 to 56 cores).

When you add up the cost of PMEM, the required Xeon Gen 2 CPUs, and SQL Server licensing, adoption of Optane Persistent memory may not be feasible for a lot of workloads that might benefit from its usage. You might start asking yourself if using NVMe storage and more memory would be a better fit budget-wise.

Availability Groups in general

For SQL Server workloads with extremely high throughput requirements that also require HA (and which workloads don’t?), it’s likely that PMEM will expose the fact that HA underpinnings can be a bottleneck, specifically for synchronous Availability Groups.. This may even prevent adoption of PMEM, until a suitable HA transport is available. To my knowledge, no database vendors currently have a solution to this problem; PMEM can be so blazingly fast, everything else in the chain is a bottleneck, including networking and HA transport. I have been advised that push mode RDMA might be a solution on the networking side of things, but I don’t believe that will be available for a while. Allan Hirt blogged about using RDMA for AGs here.

Due to the way the log transport mechanism is architected, PMEM usage with tail of the log for a database that belongs to an Availability Group is supported on secondary replicas only.

That means in order to achieve the same performance in case of failover, you would have to install PMEM on all replicas, in case they must operate as a secondary replica at some point. This would potentially drive up the price of adopting PMEM with Availability Groups and FCIs, especially if using Optane PMEM.

Availability Groups, enlightenment, and Hybrid Buffer Pool

On supported platforms (Linux), both enlightenment and Hybrid Buffer Pool are supported.

In-Memory OLTP and Enlightenment

As of this writing, enlightenment will not be supported for data/delta files (also known as checkpoint file pairs) for the In-Memory OLTP feature.

Gratitude

In November of 2018, PMEM – as it pertains to SQL Server – was owned by Argenis Fernandez (t) of the SQL Server Tiger Team, and I am greatly indebted to him for taking the time to explain the nuances of SQL Server interaction with PMEM, and how Microsoft envisions its usage in SQL 2019. I must also thank my friend Brian Carrig (t), who currently owns PMEM on the Tiger Team, for his patience in confirming what I believed to be correct, reorienting me when I was off-base, and resolving answers to my endless questions. Without either of these generous and brilliant technologists, this blog post doesn’t get written (thanks, gents!).

Finale

These are exciting times for DBAs, architects, and developers, and the evolution of PMEM provides choices that were not envisioned even just a few years ago. I look forward to seeing how this space evolves, as the technology matures, and applications are architected to leverage it. SQL Server integration with PMEM is a very forward looking move on the part of the SQL Server team.

Hekatonized Tempdb

At PASS Summit 2018, I attended a session led by Pam Lahoud (t) of the SQL Tiger Team , entitled “TempDB: The Good, The Bad, and The Ugly”. If you have access to the PASS recordings from 2018, I highly recommend watching this session.

It was a really fantastic presentation, detailing the full history of how the SQL Server engineering team has attempted to optimize TempDB in various ways. The two problems that busy servers can have with regard to TempDB are allocation page contention, and metadata contention, and the engineering team should be applauded for its clever approaches to solving these types of contention throughout the years. To be clear, all of the optimizations were related to temp table usage in stored procedures, not scripts.

However, none of those solutions for contention scaled – some only relocated the issue. As part of Pam’s presentation, she did a demo with a single TempDB metadata table that was “Hekatonized”  – actually using the In-Memory OLTP engine – and the difference in throughput was significant. She said that Microsoft intends to convert the remaining system tables in TempDB to be memory-optimized (you’ll need SQL 2019 CTP 3.0 or later to test).

So once you’ve got it installed or have started a container running it – how to you automagically convert TempDB system tables to be memory-optimized? With TSQL, of course:

ALTER SERVER CONFIGURATION SET MEMORY_OPTIMIZED TEMPDB_METADATA = ON;

Like other changes to TempDB, in order for the new memory-optimization to take effect a restart of the SQL Server service is required. Once the service is restarted, system tables in TempDB are now memory-optimized (it should be that way for RTM, but in CTP 3.0, it could be the case that not all system tables have been converted to Hekaton). You can reverse this setting with the following command, and again restarting the SQL Server service:

ALTER SERVER CONFIGURATION SET MEMORY_OPTIMIZED TEMPDB_METADATA = OFF;

Unless your workload was truly hammering TempDB, you probably won’t see much difference in TempDB performance.

We need to be careful with this new In-Memory power, because depending on workload characteristics, we might need a whole lot more memory just to handle what’s going on in TempDB. Also, if you have scripts and/or monitoring that interrogate system tables in TempDB, you might be affected by some of the restrictions if TempDB system tables are memory-optimized. As the CTP release notes, state:

“A single transaction may not access memory-optimized tables in more than one database. This means that any transactions that involve a memory-optimized table in a user database will not be able to access TempDB system views in the same transaction.”

Another thing I want to make clear is that this new TempDB optimization only affects system tables in TempDB – not the tables you create; #table and ##table do not become memory-optimized as a result of this new feature.

After all, it’s name is MEMORY_OPTIMIZED_TEMPDB_METADATA

Database Administration: A Point of Departure

In this post, I want to delve into one aspect of managing your career as a DBA that’s not often discussed: being a DBA is likely best used a point of departure for a different, but related role.

Don’t believe me?

Just look at some of the folks who used to be DBAs that have moved on:

Erin Stellato, now a consultant for SQL Skills
Glen Berry, now a consultant for SQL Skills
Jonathan Kehayias, now a consultant for SQL Skills
Brent Ozar, created a consulting and training company
Argenis Fernandez, worked for Pure Storage, now works on the SQL Server Tiger Team
Brian Carrig, now works on the SQL Server Tiger Team
Mike Fal, database manager at Rubrik
Denny Cherry, started his own consulting company
Joey D’Antoni, now a consultant for Denny Cherry and Company
Chris Adkin, pre-sales for Pure Storage
Thomas Grohser, architect for a hedge fund
Kendra Little, worked for Brent Ozar Unlimited, now works for Redgate

and the list goes on….

Why have all of these great technologists abandoned the DBA role? I’m guessing that there are several possible reasons:

  • who wants to do the same thing for 40 years?
  • more financial opportunity in sales and/or consulting
  • they move up, becoming database managers

Under specific circumstances, you might have a long career as a DBA, but if you’re not smart about it, your options can be limited.

Not mentioned so far is the fact that the likelihood of getting good/great roles as a DBA diminishes as you get older. Here in the USA, it’s not legal to ask a job applicant their age, but employers often get around that by asking you what year you graduated high school (why on earth would that be relevant, except to determine your age?).

How many older, gray-haired DBAs do you see in the field? Not too many, I’m guessing. An exception to this might be a DBA that has been at the same company for a very long time. Or someone who was hired specifically because they have decades of experience.

So, is being a production DBA the exclusive domain of younger technologists? I suppose that depends on where you draw the line between “young” and “mature”. For example, one of the all-time greatest DBAs was Robert Davis, aka @SQLSoldier. While he may have had a stint or two outside the DBA role, for almost all of his career, he worked as a DBA. Unfortunately, Robert passed away in early 2018, so we’ll never know if he would have stayed on that path. He did have consulting jobs on the side, but once he started to work at a hedge fund here in NYC, the hoops he had to jump through to get “approval” weren’t worth the hassle, so he no longer did outside work. 

Consulting shops are often the next stop in a DBA’s career. But there can be a lot of travel when working for a consulting shop, and that lifestyle isn’t for everyone (especially if you have young kids).

A superset of the DBA skill set would be that of an architect, which requires deep expertise in a variety of areas, such as storage, networking, HA/DR, perhaps Azure and/or AWS.

If you have less working years left than you’ve already worked, you might consider staying in the DBA role for your remaining working years. But that role is evolving,  and you’ll probably go the way of the dinosaurs, unless you also evolve.

If you’re a younger DBA – how sure are you that what you do on a daily basis will not be automated away by the cloud over the next decade?

Sharks must keep moving, or they’ll die. DBAs are pretty much the same, but have to be smarter than sharks about where they move, and what they move into.

What dedication and community engagement can do for your career

In July of 2012, I started a new role, but after a few months, I could see that there wouldn’t be much opportunity for me to learn there, and/or the pace of learning was simply too slow. The biggest problem I faced was that I had to move forward in the professional development realm on my own time. A brief overview of my life schedule looked like:

  • Monday to Friday: work from 10am to 6pm, get home and study SQL Server until 2am
  • Saturday and Sunday: study SQL Server from 10 am until 2am

Yeah, that’s not much of a life – or to be brutally honest, that’s no life at all, and I did this from 2012 until just last week. I’d say that at least 45 to 48 weeks of the year, I stuck to that schedule.

My work role was split between SQL development and DBA tasks, and it was a pretty small company. I was trying to get a dedicated DBA role, but that type of role usually exists at larger companies, and without recent large company experience, I was often not a good fit for the roles I was seeing. Add to that the fact that I have zero SSIS in my career (many roles require that), and we have a stumbling block to moving forward/upward.

SET PERSEVERANCE ON

In the interest of attaining advanced knowledge of SQL Server, I attended the following training and conferences since 2011:

  • 2011, SQL Skills Immersion Event (Performance Tuning)
  • 2013, SQL Cruise – on this trip I met Aaron Bertrand, Mike Fal, Stacia Varga, Brandon Leach, Buck Woody, Tim Ford, and others
  • 2014, Brent Ozar – Senior SQL DBA
  • 2015, Allan Hirt , Mission Critical SQL Server
  • 2016, Edwin Sarmiento online HA class
  • PASS Summit, 2013, 2015, 2016, 2017, 2018

I devoured blog posts from Brent, Jonathan Kehayias, Robert Davis, Paul Randal, Kimberly Tripp, Paul White, Aaron Bertrand, Kendra Little, Edwin Sarmiento, Allan Hirt, and many others.

As is often said, if you really want to learn something, you’ve got to teach it, and that’s why since 2016 I’ve been blogging and presenting at many SQL Saturdays across the USA.

I always believed that my next role would come from engagement with the SQL community – that someone out there would recognize my dedication, passion for learning, and desire to help others. I came close to getting a new role a few times, but nothing panned out, although during the initial phone screen for one of the positions I applied for, the interviewer told me that he had solved a production problem from reading one of my blog posts.

Not long ago I saw a post from a colleague on the NYC SQL user group message board about needing to fill a role for a strong DBA, and I’m thrilled to write that I’ve got a new dedicated DBA role at an international financial powerhouse. What struck me during the interview process was that I was not asked a single technical question about SQL Server – it seems my reputation had preceded me.

There are benefits to dedicating yourself to a life of learning, and helping others — you just never know when it might pay off.


Frameworks O How I Hate Thee

I’ve seen a lot of tech come and go in my time, but nothing I’ve seen vexes me more than “framework generated SQL”.  No doubt I’m ignorant about some aspects of it, but its usage continues to confound many a DBA.

To troubleshoot one of these bad boys, you might consider Google Glass, but it will fail you. The first issue is that these crappy frameworks generate a code tsunami that’s almost (or actually) unreadable by humans. The tables you know and love are aliased with names such as “Extent1” and the like. Multiple nestings of that, and it’s all gobbledygook aka spaghetti code.

Developers love frameworks, because they don’t have to spend time coding/maintaining SQL queries. I’m guessing it’s mostly used for UI, cause if it’s used for much more than that, performance is likely to absolutely suck. So you wicked smart developers theoretically save a bunch of money generating SQL for your UI, but then – because you have a totally crap schema – you have to pay expensive DBAs to drill down and resolve performance issues. And in the end, if your code and/or schema is bad enough, you relent, and convert it to a stored procedure call, which is exactly what your sharp DBA told you to do 20 billable hours ago.

A typical response to why developers use frameworks for databases is that they want their code to be “portable”. How many times have you seen a shop change database platforms? I could understand that argument if you used frameworks for all your code, reports, UI, everything. But if you use frameworks for the UI, and stored procedures for reporting, I guarantee that you’d have a heck of a time making that stored procedure code “generic”, such that it could be used against Oracle, Sybase, SQL Server, or DB2.

The more I think about it, I should totally love frameworks. I say that because if they were not in use, think of all the times I’d be stuck trying to improve performance, when now I can simply say: “Hey – that’s a framework query, and there’s absolutely nothing I can do about it – have a nice day….”


SQL 2019 In-Memory hotness

SQL 2019 is on track to become one of the most awesome releases – the product touches so many realms of the data platform, it’s truly mind boggling.

Since I have such a keen interest in Hekaton/In-Memory OLTP, when the CTPs are released for a new version of SQL Server, I look forward to any potential announcements about that feature.

So far, there’s been only one publicly announced enhancement for In-Memory OLTP in SQL 2019: system tables in TempDB will be “Hekatonized”. This will forever solve the issue of system table contention in TempDB, which is a fantastic use of Hekaton. I’m told it will be “opt in”, so you can use this enhancement if you want to, but you can also back out of it, which would require a restart of the SQL Server service.

But there’s at least one other enhancement that’s not been announced, although the details of its implementation are not yet known.

When you start to research the Hekaton feature, most are shocked to learn that CHECKDB does not verify anything about durable In-Memory tables: it silently ignores them.

That appears to have changed in SQL 2019, although either the informational message about what it does is misleading, or behind the scenes it does something different.

This is the output for DBCC CHECKDB of a memory-optimized database in SQL 2017:

Object ID 949578421 (object ‘inmem_table’): The operation is not
supported with memory optimized tables. This object has been skipped and will not be processed.

(the emphasis was added by me)

This is the output for DBCC CHECKDB of a memory-optimized database in SQL 2019:

DBCC results for ‘inmem_table’.
There are 101 rows in 3 pages for object “inmem_table”.

Why do I say the message is misleading?

Because durable data for memory-optimized tables is not stored in pages, but instead in a streaming fashion in files known as checkpoint file pairs (or data and delta files). Also, while it’s true that there are 101 rows in this table, the engine pre-creates a number of data and delta files, and it would make DBAs sleep a lot better at night, if all of those files were verified as being corruption free.

We’ll just have to stay tuned to the future CTPs and RTM of SQL 2019 to see how all of this shakes out.

In Pursuit of Batch Mode on Rowstore

In her excellent blog post entitled “Batch Mode Hacks for Rowstore Queries in SQL Server“, Kendra Little b|t pays homage to Itzik Ben-Gan, Niko Neugebauer, and others.

The solutions she details will indeed result in batch mode for rowstore queries. I had already seen the solution proposed by Mr. Ben-Gan, and as is typically the case, a simple example is given to illustrate the concept, and these types of examples are almost always single-threaded.

I have a client that used Itzik Ben-Gan’s solution of creating a filtered nonclustered columnstore index to achieve batch mode on a rowstore (in fact I proposed that the client consider it). They have an OLTP system, and often perform YTD calculations. When they tested, processing time was reduced by 30 to 50 percent, without touching a single line of application code. If that ain’t low hanging fruit, I don’t know what is —

However, during testing, I noticed some intermittent blocking that didn’t make sense to me. But I couldn’t nail it down, and they went live with the “filtered nonclustered columnstore index” solution.

Once they deployed – and there was a lot of concurrency – I could see what had eluded me during my proof of concept: blocking in tempdb.

The repro is super-simple:

  • Create a table, and insert some sample data
  • Create a stored procedure that does the following:
    SELECT from that table into a #temp table
    Create a filtered nonclustered columnstore index on the #temp table, using a filter that cannot possibly be true, i.e. IDcolumn < 0 and IDcolumn > 0
    SELECT from the #temp table (return results)

From the first connection, issue a BEGIN TRAN execute the stored procedure. Note the spid for this connection. Then open a separate connection, issue a BEGIN TRAN and execute the stored procedure. Note the spid for this connection.

You’ll notice that the first connection has no issues, but when you execute the proc in the second connection, it gets blocked.

When you peel back the layers, you can see that the first connection requests and obtains a schema modification lock on the #temp table (Sch-M).

The second connection requests a schema stability lock on the same object_id, and is blocked (Sch-S).

To be clear, what’s happening here is that separate connections are placing incompatible locks on the same temporary object in tempdb, which is supposed to be impossible (but in fact the object_id is the same). My gut tells me that this is perhaps related to metadata when creating the NCCI, but I couldn’t prove that.

It should be noted that if you remove the filter on the NCCI, there is no blocking, and also if you use a regular filtered nonclustered index (not columnstore), this issue persists. Of course, in the real world, removing the filter is not an option because what we’re interested in speed, and if there’s one thing that columnstore indexes are not fast at, it’s being created.

Hopefully if/when Microsoft fixes this, it will be back ported to earlier versions of SQL Server.

I can reproduce this on SQL 2016 and 2017 (and even 2019, but that’s not really fair, cause it’s not RTM yet…)

If you think that Microsoft should fix this, please upvote my Azure User Voice entry here.

Repro code: